Inspecting HTTP Requests With RequestBin

EDIT: Since this post was originally published, the originally quoted Request Bin URL was closed down, there are other alternatives that may be of use such as: https://beeceptor.com/ https://hookbin.com/ https://requestbin.com/ etc.

RequstBin is a free community project from Runscope. It allows you to generate a test URL that will capture requests sent to it and allow you to view details of those requests. This may be useful when developing push functionality, webhooks, etc. You should of course not send sensitive data, passwords, etc. and use only non-real test data.

You start by heading over to https://requestb.in/ and creating your own “request bin” which gives you a unique URL which you can send HTTP request to:

Creating a RequestBin

Once you’ve clicked the “Create a RequestBin” button you’ll be given a “Bin URL” to send requests to(you can also restrict viewing to your current browser which uses a cookie behind the scenes):

RequestBin created

Now the the bin is set up and you have your bin URL, you can send HTTP requests to it, for example by setting up a test webhook to call the bin URL, setting up your test application to push to the bin URL, or as an example here using Postman:

Sending a request using Postman

Heading back to the browser window and refreshing it will show you the last (several) requests captured, including any form/post data that was sent, header information such as:

  • Content-Type
  • Cf-Ipcountry
  • Postman-Token
  • Total-Route-Time
  • Cache-Control
  • Host
  • User-Agent
  • Cf-Connecting-Ip
  • Connection
  • Content-Length
  • Cf-Visitor
  • Connect-Time
  • Cf-Ray
  • Accept-Encoding
  • Cookie
  • Via
  • X-Request-Id
  • Accept

And any raw body content such as:

{
    "arbitrary" : "Jason",
    "data" : "Roberts"
}

You can also check out the project on GitHub.

SHARE:

Using AutoFixture To Generate Anonymous Test Data in Web UI Automation With BDDfy and Seleno

I’m currently working on an AutoFixture Pluralsight course and it got me thinking about using it to generate anonymous test data when writing automated UI tests.

The basic premise is that in addition to using AutoFixture to generate unit test data, it can also be used to populate UI elements where the specific data values are unimportant.

If you are unfamiliar with BDDfy and Seleno, they are part of the TestStack project.

BDDfy allows tests to be written and to produce business readable documentation. Seleno allows the automation of web browsers using Selenium and strongly-typed page object models.

Example Scenario

Imagine that we have an (ASP.NET MVC) web site that allows the addition of members of the royal family.

image

If we wanted to test different king/queen names (but didn’t care about the Regnal number) we could start off by defining some strongly typed (Seleno) page object models:

public class HomePage : Page<AddRoyaltyModel>
{
    public CreatedPage CreateRoyalty(AddRoyaltyModel royal)
    {
        Input.Model(royal);

        return Navigate.To<CreatedPage>(By.Id("Create"));
    }
}

public class CreatedPage : Page
{
}


(all the examples in this post are fairly quick-and-dirty to demonstrate the AutoFixture involvement)


Next we can write some example in BDDfy (using xUnit.net as the test framework):

public class AddRoyaltyTests
{
    private HomePage _home;
    private CreatedPage _confirmationPage;
    public string Name { get; set; }
    public string Number { get; set; }

    [Fact]
    public void ShouldAddRoyaltiesWithDifferentNames()
    {
        this.Given(x => GivenIAmStartingANewRoyalAddition())
            .And("And I have entered <name> as the royalty name")
            .And("And I have entered <number> as the regnal number")
            .When(x => WhenIChooseToAddTheNewRoyal())
            .Then(x => ThenIShouldSeeAConfirmationOfTheNewRoyalHavingBeenAdded())
            .WithExamples(new ExampleTable("name", "number")
                          {
                              {"Richard", "I"},
                              {"Henry", "I"},
                              {"Elizabeth", "I"}
                          })
            .BDDfy();            
    }


    private void GivenIAmStartingANewRoyalAddition()
    {
        _home = Host.Instance.NavigateToInitialPage<HomeController, HomePage>(x => x.Index());
    }        

    private void WhenIChooseToAddTheNewRoyal()
    {
        var royal = new AddRoyaltyModel
        {
            Name = this.Name,
            RegnalRomanNumeral = this.Number
        };

        _confirmationPage = _home.CreateRoyalty(royal);
    }

    private void ThenIShouldSeeAConfirmationOfTheNewRoyalHavingBeenAdded()
    {
        Assert.Equal("Created ok", _confirmationPage.Title);
    }
}

Notice in the preceding code that even though we don’t care about the Regnal number we are still supplying it in the examples. We could just set it manually to a hardcoded value, and in this simple example that might be ok, but if we had a form with many fields then this  will introduce extra work and may make the test less “refactor-safe”.

The following code shows the removal of the Regnal name/number:

public class AddRoyaltyTestsUsingAutoFixture
{
    private HomePage _home;
    private CreatedPage _confirmationPage;
    public string Name { get; set; }

    [Fact]
    public void ShouldAddRoyaltiesWithDifferentNames()
    {
        this.Given(x => GivenIAmStartingANewRoyalAddition())
            .And("And I have entered <name> as the royalty name")
            .When(x => WhenIChooseToAddTheNewRoyal())
            .Then(x => ThenIShouldSeeAConfirmationOfTheNewRoyalHavingBeenAdded())
            .WithExamples(new ExampleTable("name")
                          {
                              "Richard",
                              "Henry",
                              "Elizabeth"
                          })
            .BDDfy();            
    }

    private void GivenIAmStartingANewRoyalAddition()
    {
        _home = Host.Instance.NavigateToInitialPage<HomeController, HomePage>(x => x.Index());
    }        

    private void WhenIChooseToAddTheNewRoyal()
    {
        var fixture = new Fixture();

        // Use AutoFixture to create anonymous data for all properties except
        // name which is set to the BDDfy example value
        var royal = fixture.Build<AddRoyaltyModel>()
            .With(x => x.Name, this.Name)
            .Create();

        _confirmationPage = _home.CreateRoyalty(royal);
    }

    private void ThenIShouldSeeAConfirmationOfTheNewRoyalHavingBeenAdded()
    {
        Assert.Equal("Created ok", _confirmationPage.Title);
    }
}

In this version, AutoFixture’s Build method is being used to automatically generate test data for all the fields, except the royal name which is set to the name(s) specified in the BDDfy examples.

Running this test results in the following automation:
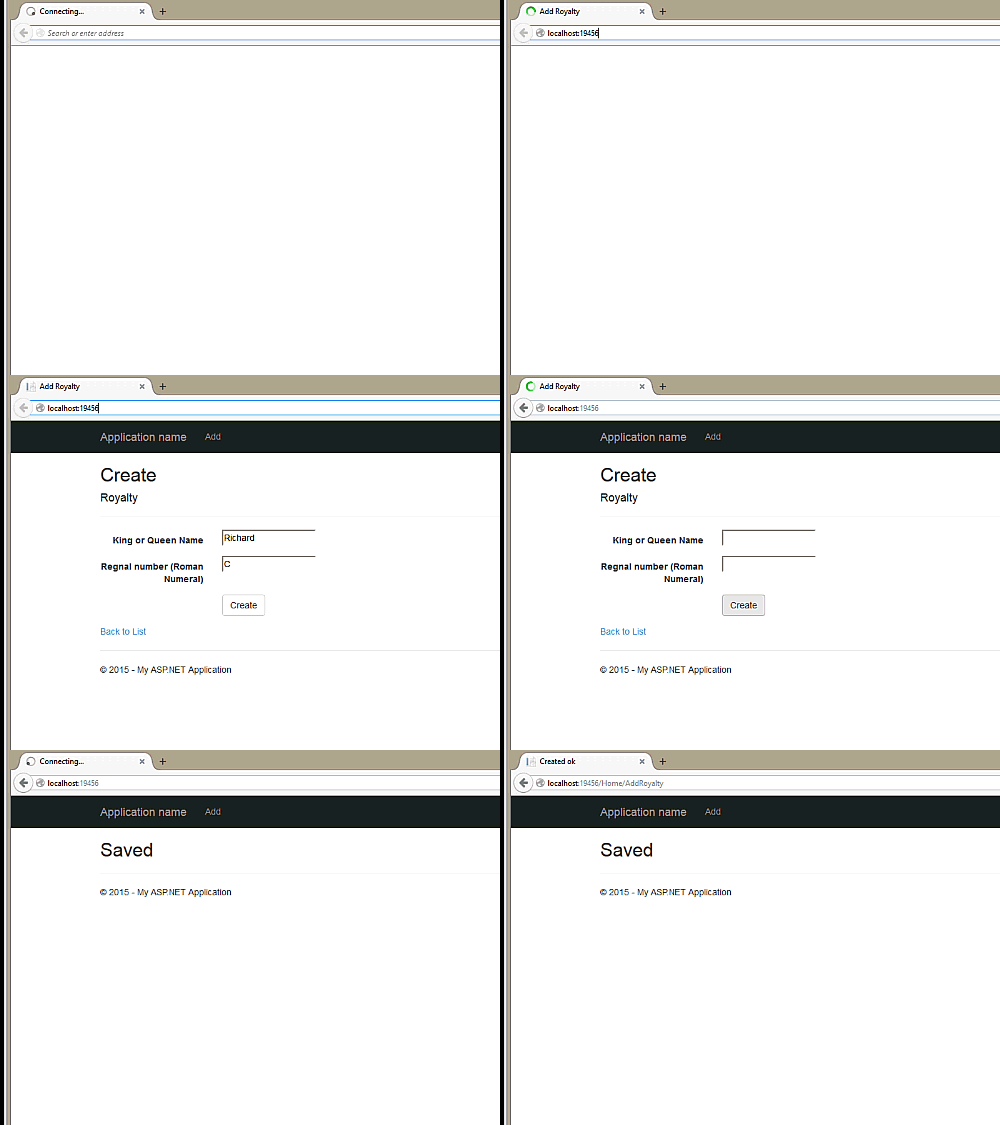
SelenoAutofixture


And produces the following HTML BDDfy report:

image

If you want to fill in the gaps in your C# knowledge be sure to check out my C# Tips and Traps training course from Pluralsight – get started with a free trial.

SHARE:

Using Sass Maps to Save Time in CSS

Sass is a superset of CSS that “compiles” down to regular CSS usable by any browser. It adds features such as functions, logic, and loads more.

Sass already had the concept of lists that allow a one-dimensional list of values to be defined; Sass 3.3 introduced maps – a series of key-value pairs.

Defining a Sass Map

To define a variable called team-colors containing a map of values (in this case a map of soccer teams and their colors):

$team-colors: (
    australia: #F7AD31,
    england: #FFF,
    sweden: #FFE700,
    japan: #435AAD
);

Iterating over a Sass Map

Now we can iterate through all the team names and access their color values:

@each $team, $color in $team-colors{
    .#{$team} {   
        background-color: $color;
  }
}

This will create a CSS class with the name of the team (using Sass interpolation syntax) and its associated background color:

.australia {
  background-color: #F7AD31;
}

.england {
  background-color: #FFF;
}

.sweden {
  background-color: #FFE700;
}

.japan {
  background-color: #435AAD;
}

There’s also a number of functions for manipulating maps such as map-get and map-has-key.


To learn how to simplify your CSS and save time writing it with Sass, check out my Pluralsight course.

You can start watching with a Pluralsight free trial.

SHARE:

Create More Maintainable CSS in Less Time with Sass and Visual Studio

My new Pluralsight course was recently released that shows how to use Sass when developing ASP.Net web applications.

Sass (CSS with superpowers) allows the creation of regular CSS, but produce it with loads of cool features that regular programmers know such as variables and functions.

Sass is a superset of CSS and has a .scss file extension. A CSS file is a valid Sass (.scss) file.

A tool “compiles” the Sass .scss file to regular CSS. One way to do this in Visual Studio is to install the free Web Workbench extension. Once installed, whenever you save the .scss file, Web Workbench will create the accompanying .css file as shown in the following screenshot:

CSS files generated from Sass

(Notice here the minified version is being created by Web Workbench because the full version is installed.)

Sass Variables

Sass variables can be defined and then used wherever regular CSS property values are used. For example, the following shows 3 variables declared and used in the .scss file:

$main-brand-color: pink;
$secondary-brand-color: #111;
$base-font-size: 50px;

body {
    background-color: $main-brand-color;
    color: $secondary-brand-color;
    font-size: $base-font-size;
}

This produced the following .css:

body {
  background-color: pink;
  color: #111111;
  font-size: 50px; }

Mixins

Mixins decrease the amount of boilerplate CSS we need to write. For example using vendor prefixes throughout the stylesheet. Rather than writing all the prefixes by hand we can declare and invoke a mixin:

@mixin border-radius($radius){
    -webkit-border-radius: $radius;
    -moz-border-radius: $radius;
    border-radius: $radius;
}

.border {
    @include border-radius(10px);
}

This produces the following CSS:

.border {
  -webkit-border-radius: 10px;
  -moz-border-radius: 10px;
  border-radius: 10px; }

Inheritance

Repetition can be reduced with Sass inheritance. In the following example, happy and sad inherit from greeting:

.greeting {
  border: 1px solid #000;
  padding: 10px;
}

.happy {
  @extend .greeting;
  border-color: yellow;
}

.sad {
  @extend .greeting;
  border-color: grey;
}

This produces:

.greeting, .happy, .sad {
  border: 1px solid #000;
  padding: 10px; }

.happy {
  border-color: yellow; }

.sad {
  border-color: grey; }

Now in the HTML, when the happy or sad class is used, the element will also get the greeting styles without having to apply both classes explicitly.

These examples just scratch the surface of the feature set of Sass. To learn more check out the official site or my Simplifying CSS in Visual Studio With Sass Pluralsight course.

You can start watching with a Pluralsight free trial.

SHARE:

Consuming Server-Side SignalR Events in Universal Windows App Clients

In a previous article I wrote about creating server side SignalR timer events.

As part of my learning of SignalR I wanted to see how easy it would be to create a Universal Windows app consuming these server side events.

So first off I created a new blank Universal app:

creating universal app in Visual Studio screenshot


Next installed the SignalR NuGet package into both app projects: install-package Microsoft.AspNet.SignalR.Client

In the Windows 8.1 Store app project XAML I added a simple bound TextBlock that will display the server messages:

<Page
    x:Class="UpTimeUni.MainPage"
    xmlns="http://schemas.microsoft.com/winfx/2006/xaml/presentation"
    xmlns:x="http://schemas.microsoft.com/winfx/2006/xaml"
    xmlns:local="using:UpTimeUni"
    xmlns:d="http://schemas.microsoft.com/expression/blend/2008"
    xmlns:mc="http://schemas.openxmlformats.org/markup-compatibility/2006"
    mc:Ignorable="d">

    <Grid Background="{ThemeResource ApplicationPageBackgroundThemeBrush}">
        <Viewbox>
            <TextBlock Text="{Binding Uptime}">please wait...</TextBlock>
        </Viewbox>
    </Grid>
</Page>

I also added similar XAML in the Windows Phone 8.1 main page.

More...

SHARE:

Using Server Side Timers and SignalR in ASP.NET MVC Applications

I thought it would be fun to create an “Internet uptime” page that you can see live here on Azure Websites. It shows how long the Internet (since ARPANET) has been around for.

image

Creating a Class that can be Managed by ASP.NET

The HostingEnvironment.RegisterObject method can be used to register an instance of an object that has its lifetime managed by the hosting environment.

To register an object it must implement the IRegisteredObject interface.

This interface defines a Stop method which gets called when ASP.NET needs to shutdown the app domain.

So, in the application start we can create an instance of our class and register it:

protected void Application_Start()
{
    AreaRegistration.RegisterAllAreas();
    RouteConfig.RegisterRoutes(RouteTable.Routes);

    HostingEnvironment.RegisterObject(new BackgroundUptimeServerTimer());
}

Creating a SignalR Hub to Send Messages from the Server to Client

Next we create a SignalR hub and the HTML.

So the hub class is called UptimeHub:

public class UptimeHub : Hub
{
}

We can get the server to call a client JavaScript method called “internetUpTime” in the HTML page and have this client code display the what’s been sent from the server timer.

The following shows the complete HTML for the page. Notice the “hub.client.internetUpTime = function (time) …” this function will get executed every time our server timer event fires.

More...

SHARE:

Vertically Center Div in Browser Window using Viewport-Relative Lengths

I found out about these units this week so I wanted to have a play with them.

The CSS units: vw, vh, vmin, and vmax allow sizes to be specified relative the the browser window size (or the “initial containing block”).

So 1 vw is equal to 1% of the viewport width and 1 vh is equal to 1% of the viewport height.

vmin and vmax return the smaller and larger respectively of vw or vh.

There is good support  for vw and vh in modern browsers with some partial support for vmax, overall about 55% of browsers offer full support, 20% partial support.

So for example to center a div vertically in the browser we could set its height to “50vh”  (50% of the viewport height) and set its top margin to be “25vh” (or a quarter of the viewport height), thus leaving a quarter below the div.

So here’s a screenshot of this in action in a tiny browser window (the white is the div):

image

And after resizing the browser:

More...

SHARE:

On Staying Positive and Subconscious Prejudices

So I was toying with an idea using SignalR on Azure.

In the client code:

<!DOCTYPE html>
<html xmlns="http://www.w3.org/1999/xhtml">
<head>
    <title>Internet Uptime</title>
</head>
<body>   
    <script src="Scripts/jquery-1.6.4.min.js"></script>
    <script src="Scripts/jquery.signalR-2.1.0.min.js"></script>
    <script src="/signalr/hubs"></script>
        
    <script>
        $(function () {
            var hub = $.connection.uptimeHub;            

            $.connection.hub.start();           

            hub.client.internetUpTime = function (time) {
                $('body').text(time);
                
            };           
        });
    </script>    
</body>
</html>

So when the server sends  an “internetUpTime” message, the <body> is being set to the content of the string sent from the server.

More...

SHARE:

Introducing JS Name-O-Tron – Find a Name for Your JavaScript Library

As a Microsoft MVP I get free Azure credits to use every month, so I thought I’d better start making use of them :)

screenshot of JS Name-O-Tron application on Azure

JS Name-O-Tron is the first web site I’ve deployed to Azure and I’m pleased to say it was crazy-easy :)

It generates a random word and adds “.js” to it – you can then check if there’s an existing library with that name (GitHub, CodePlex, and NuGet).

I used Visual Studio 2013 to create a new ASP.Net application and chose MVC (v5) which resulted in a Bootstrapped site with a default Home controller and views.

More...

SHARE:

Making An Awesome Windows 8 Pinned Tile for your Website

With Windows 8 and the metro "Modern Windows New UI Store Experience Style" version of Internet Explorer 10, you can pin a web site to the start menu and provide a hi-res image to be displayed on the tile. This is a nice little touch to "delight the user" and requires very little effort.

There are also some cool things you can do to enable your pinned tile to display notification badges, though this requires a little extra work.

Customising the Pinned Site Tile Image

By default the tile that gets pinned to your start menu will either appear with the site favicon or the default Internet Explorer logo.

Either way it doesn't look super great.

You can create a larger PNG image and tell Windows 8 to use this hi-res image rather than the small lo-res favicon or default IE logo. The image must be 144px high and 144px wide and it's recommended by Microsoft that you use a transparent background.

More...

SHARE: