Grouping and Filtering Tests in Visual Studio Test Explorer

One way to run automated tests is to use Visual Studio’s Test Explorer. Test Explorer can be found under the Test –> Windows –> Test Explorer menu items.

In this article we’ll look at how to manage the list of tests using grouping and also how to specify custom search filter expressions.

Two test projects in Visual Studio solution

Grouping Tests

There are a number of ways to group tests in Test Explorer, at the highest structural level we can group by project.

To select a group by method, click the drop down arrow as show in the following screenshot:

Selecting a grouping in Visual Studio Test Explorer

With the grouping set to Project, the test list looks as follows:

image

The next structural grouping is Class:

Grouping by test class

The final structural grouping is by Namespace:

Grouping by namespace

There are a number of non-structural groupings.

Group by Duration:

Group by duration

Group by Outcome:

Group by outcome

…and group by Traits:

Grouping by traits

Filtering Tests

Custom filters can also be applied.

For example by file path:

Filtering tests by file path

Other search examples include:

  • Trait:"Smoke Test"
  • Message:"System.Exception"
  • Class1
  • Outcome:"Passed"
  • Outcome:"Failed"

Subsets can also be excluded by prefixing the type of filter with a -. For example to show all tests in Class1 except failed tests: Class:"TestClass1" -Outcome:"Passed".

To learn xUnit.net check out my xUnit.net course from Pluralsight - You can start watching with a Pluralsight free trial.

SHARE:

Getting Started Testing .NET Core Code with xUnit.net

xUnit.net is a testing framework that can be used to write automated tests for .NET (full) framework and also .NET Core.

To get started, first create a .NET Core application, in the following example a .NET Core console app.

Creating a .NET core console project

A testing project can now be added to the solution:

Adding an xUnit test project in Visual Studio 2017

This test project will come pre-configured with the relevant NuGet packages installed to start writing test code, though you may want to update the pre-configured packages to the newest NuGet versions.

The xUnit Test Project template will also create the following default test class:

using System;
using Xunit;

namespace ConsoleCalculator.Tests
{
    public class UnitTest1
    {
        [Fact]
        public void Test1()
        {

        }
    }
}

Notice in the preceding code, the Test1 method is decorated with the [Fact] attribute. This is an xUnit.net attribute that tells a test runner that it should execute the method, treat it as a test, and report on if the test passed or not.

Next add a project reference from the test project to the project that contains the code that is to be tested, this gives the test project access to the production code.

In the production project, the following class can be added:

namespace ConsoleCalculator
{
    public class Calculator
    {
        public int Add(int a, int b)
        {            
            return a + b;
        }
    }
}

Now the test class can be renamed (for example to “CalculatorTests”) and the test method changed to create a test:

using Xunit;

namespace ConsoleCalculator.Tests
{
    public class CalculatorTests
    {
        [Fact]
        public void ShouldAddTwoNumbers()
        {
            Calculator calculator = new Calculator();

            int result = calculator.Add(7, 3);

            Assert.Equal(10, result);
        }
    }
}

In the preceding code, once again the [Fact] attribute is being used, then the thing being tested is created (the Calculator class instance). The next step is to perform some kind of action on the thing being tested, in this example calling the Add method. The final step is to signal to the test runner if the test has passed or not, this is done by using one of the many xUnit.net Assert methods; in the preceding code the Assert.Equal method is being used. The first parameter is the expected value of 10, the second parameter is the actual value produced by the code being tested. So if  result is 10 the test will pass, otherwise it will fail.

One way to execute tests is to use Visual Studio’s Test Explorer which can be found under the Test –> Windows –> Test Explorer menu item. Once the test project is built, the test will show up and can be executed as the following screenshot shows:

Running xUnit tests in Visual Studio Test Explorer

To learn more about how to get started testing code with xUnit.net check out my Pluralsight course

You can start watching with a Pluralsight free trial.

SHARE:

Using PostgreSQL Document Databases with Azure Functions and Marten

With the appearance of managed PostgreSQL databases on Azure, we can now harness the simplicity of Marten to create document databases that Azure Functions can utilize.

Marten is on open source library headed by Jeremy Miller and offers simple document database style persistence for .NET apps which means it can also be used from Azure Functions.

Creating a PostgreSQL Azure Server

Log in to the Azure Portal and create a new “Azure Database for PostgreSQL”:

Creating a PostgreSQL Azure Server

You can follow these detailed steps to create and setup the PostgreSQL instance. Be sure to follow the firewall instructions to be able to connect to the database from an external source.

Creating a PostgreSQL Azure Server

Connecting and Creating a Database Using pgAdmin

pgAdmin is a tool for working with PostgreSQL database. Once installed, a new connection can be added to the Azure database server (you’ll need to provide the server, username, and password).

Connecting and Creating a Database Using pgAdmin

Once connected, right-click the newly added Azure server instance and choose Create –> Database. In this example a “quotes” database was added:

Connecting and Creating a Database Using pgAdmin

Notice in the preceding screenshot there are currently no tables in the database.

Reading and Writing to an Azure PostgreSQL Database from an Azure Function

Now we have a database, we can access it from an Azure Function using Marten.

First create a new Azure Functions project in Visual Studio 2017, reference Marten, and add a new POCO class called Quote:

public class Quote
{
    public int Id { get; set; }
    public string Text { get; set; }
}

Next add a new HTTP-triggered function called QuotesPost that will allow new quotes to be added to the database:

using System.Net;
using System.Net.Http;
using System.Threading.Tasks;
using Marten;
using Microsoft.Azure.WebJobs;
using Microsoft.Azure.WebJobs.Extensions.Http;
using Microsoft.Azure.WebJobs.Host;

namespace MartenAzureDocDbDemo
{
    public static class QuotesPost
    {
        [FunctionName("QuotesPost")]
        public static async Task<HttpResponseMessage> Run(
            [HttpTrigger(AuthorizationLevel.Anonymous, "post", Route = "quotes")]HttpRequestMessage req, 
            TraceWriter log)
        {
            log.Info("C# HTTP trigger function processed a request.");

            Quote quote = await req.Content.ReadAsAsync<Quote>();

            using (var store = DocumentStore
                .For("host=dctquotesdemo.postgres.database.azure.com;database=quotes;password=3ncei*3!@)nco39zn;username=dctdemoadmin@dctquotesdemo"))
            {
                using (var session = store.LightweightSession())
                {
                    session.Store(quote);

                    session.SaveChanges();
                }
            }

            return req.CreateResponse(HttpStatusCode.OK, $"Added new quote with ID={quote.Id}");
        }
    }
}

Next add another new function called QuotesGet that will read quote data:

using System.Net;
using System.Net.Http;
using Marten;
using Microsoft.Azure.WebJobs;
using Microsoft.Azure.WebJobs.Extensions.Http;
using Microsoft.Azure.WebJobs.Host;

namespace MartenAzureDocDbDemo
{
    public static class QuotesGet
    {
        [FunctionName("QuotesGet")]
        public static HttpResponseMessage Run(
            [HttpTrigger(AuthorizationLevel.Anonymous, "get", Route = "quotes/{id}")]HttpRequestMessage req, 
            int id, 
            TraceWriter log)
        {
            log.Info("C# HTTP trigger function processed a request.");

            using (var store = DocumentStore
                .For("host=dctquotesdemo.postgres.database.azure.com;database=quotes;password=3ncei*3!@)nco39zn;username=dctdemoadmin@dctquotesdemo"))
            {
                using (var session = store.QuerySession())
                {
                    Quote quote = session.Load<Quote>(id);
                    return req.CreateResponse(HttpStatusCode.OK, quote);
                }
            }                        
        }
    }
}

Testing the Azure Functions Locally

Hit F5 in Visual Studio to start the local functions runtime, and notice the info messages, e.g.

Http Function QuotesGet: http://localhost:7071/api/quotes/{id}
Http Function QuotesPost: http://localhost:7071/api/quotes

We can now use a tool like Postman to hit these endpoints.

We can POST to “http://localhost:7071/api/quotes” the JSON: { "Text" : "Be yourself; everyone else is already taken." } and get back the response “"Added new quote with ID=3001"”.

If we use pgAdmin, we can see the mt_doc_quote table has been created by Marten and the new quote added with the id of 3001.

Querying Azure PostgreSQL with pgAdmin


Doing a GET to “http://localhost:7071/api/quotes/3001” returns the quote data:

{
    "Id": 3001,
    "Text": "Be yourself; everyone else is already taken."
}

Pricing details are available here.

To learn more about Marten, check out the docs or my Pluralsight courses Getting Started with .NET Document Databases Using Marten and Working with Data and Schemas in Marten.

To learn more about Azure Functions check out the docs, my other posts or my Pluralsight course Azure Function Triggers Quick Start .

You can start watching with a Pluralsight free trial.

SHARE:

Creating Precompiled Azure Functions with Visual Studio 2017

As the Azure Functions story continues to unfold, the latest facility is the ease of creation of precompiled functions. Visual Studio 2017 Update 3 (v15.3) brings the release of functionality to create function code in C# using all the familiar tools and abilities of Visual Studio development (you can also use the Azure Functions CLI).

Precompiled functions allow familiar techniques to be used such as separating shared business logic/entities into separate class libraries and creating unit tests. They also offer some cold start performance benefits.

To create your first precompiled Azure Function, first off install Visual Studio 2017 Update 3 (and enable the "Azure development tools" workload during installation) and once installed also ensure the Azure Functions and Web Jobs Tools Visual Studio extension is installed/updated.
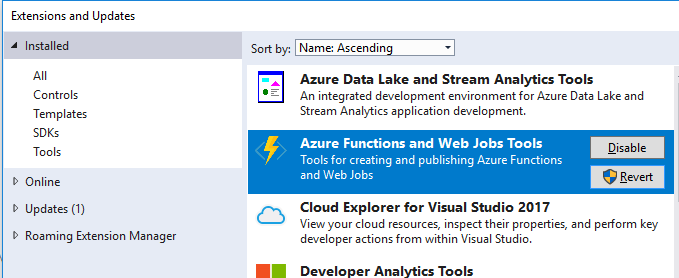
Azure Functions and Web Jobs Tools Visual Studio 2017 extension

After you’ve created an Azure account (free trials may be available), open Visual Studio and create a new Azure Functions project (under the Cloud section):
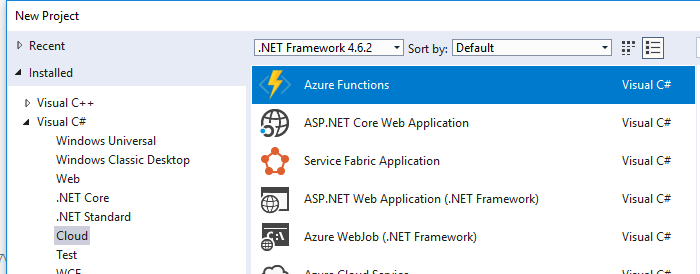
Creating a new Azure Functions project in Visual Studio

This will create a new project with a .gitignore, a host.json, and a local.settings.json file.

To add a new function, right click the project, choose add –> new item. Then select Azure Function:

Adding a new function to and Azure Function app

The name of the .cs file can be anything, the actual name of the function in Azure is not tied to the class file name.

Next the type of function (trigger) can be selected, such as a function triggered by an HTTP request:
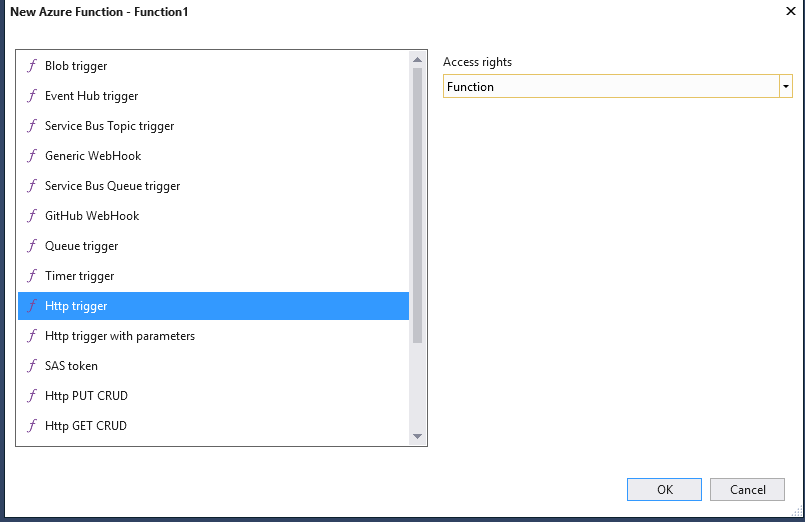
Choosing a function trigger type

Adding this will create the following code (note the name of the function has been changed in the [FunctionName] attribute):

namespace MirrorMirrorOnTheWall
{
    public static class Function1
    {
        [FunctionName("WhosTheFairestOfThemAll")]
        public static async Task<HttpResponseMessage> Run(
            [HttpTrigger(AuthorizationLevel.Function, "get", "post", Route = null)]HttpRequestMessage req, 
            TraceWriter log)
        {
            log.Info("C# HTTP trigger function processed a request.");

            // parse query parameter
            string name = req.GetQueryNameValuePairs()
                .FirstOrDefault(q => string.Compare(q.Key, "name", true) == 0)
                .Value;

            // Get request body
            dynamic data = await req.Content.ReadAsAsync<object>();

            // Set name to query string or body data
            name = name ?? data?.name;

            return name == null
                ? req.CreateResponse(HttpStatusCode.BadRequest, "Please pass a name on the query string or in the request body")
                : req.CreateResponse(HttpStatusCode.OK, "Hello " + name);
        }
    }
}

We can simplify this code to:

namespace MirrorMirrorOnTheWall
{
    public static class Function1
    {
        [FunctionName("WhosTheFairestOfThemAll")]
        public static HttpResponseMessage Run(
            [HttpTrigger(AuthorizationLevel.Function, "get", "post", Route = null)]HttpRequestMessage req, 
            TraceWriter log)
        {
            log.Info("C# HTTP trigger function processed a request.");

            return req.CreateResponse(HttpStatusCode.OK, "You are.");
        }
    }
}

Hitting F5 in Visual Studio will launch the local Azure Functions environment and host the newly created function:
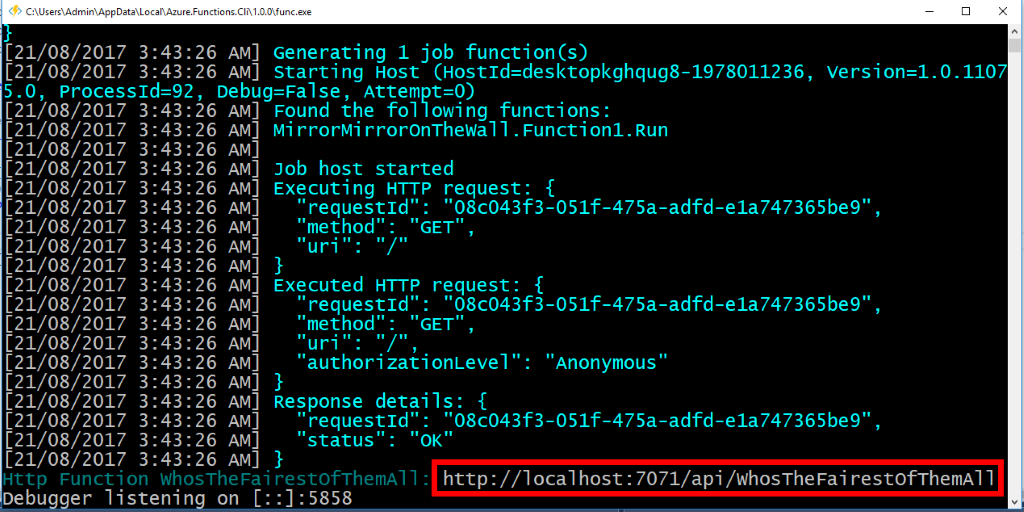
Local Azure Functions runtime environment

Note in the preceding screenshot, the “WhosTheFairestOfThemAll” function is loaded and is listening on “http://localhost:7071/api/WhosTheFairestOfThemAll”. If we hit that URL, we get back “You are.”.

Publishing to Azure

Right click the project in Visual Studio and choose publish, this will start the publish wizard:
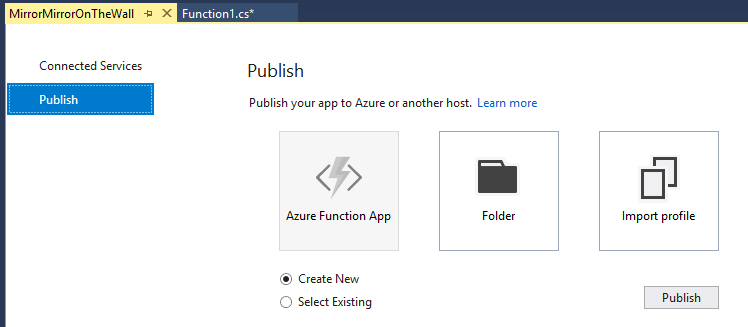
Publish Wizard

Choose to create a new Function App and follow the prompts, you need to select your Azure Account at the top right and choose an App Name (in this case “mirrormirroronthewall”). You also need to choose existing items or create new ones for Resource Groups, etc.
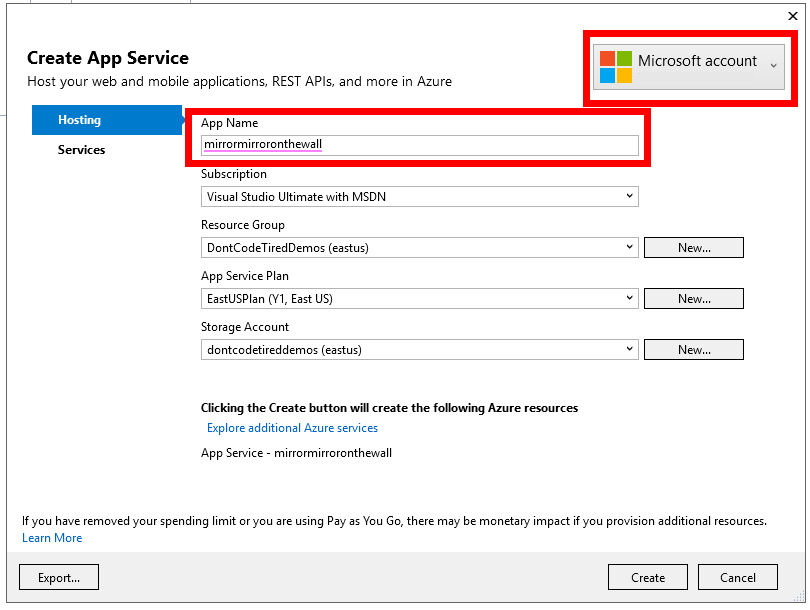
App Service settings for Azure Function app

Click create and the deployment will start.

Once deployed, the function is now listening in the cloud at “https://mirrormirroronthewall.azurewebsites.net/api/WhosTheFairestOfThemAll”.

Because earlier we specified an Access Rights setting of Function, a key needs to be provided to be able to invoke the function. This key can be found in the Azure portal for the newly created function app:
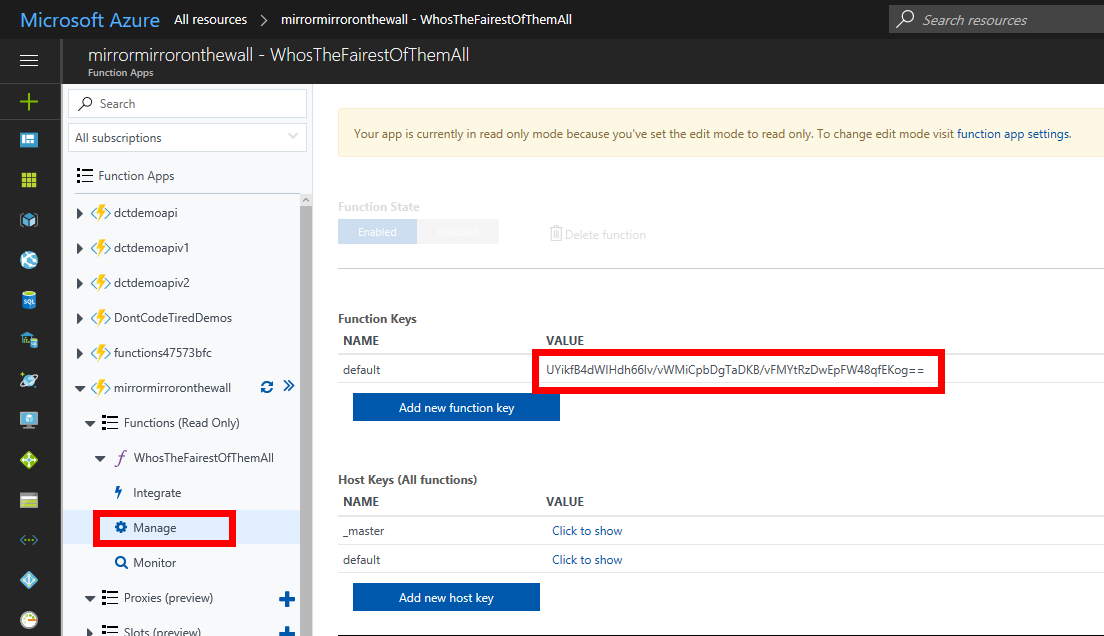
Getting an Azure Function key

Now we can add the key as a querystring parameter to get: “https://mirrormirroronthewall.azurewebsites.net/api/WhosTheFairestOfThemAll?code=UYikfB4dWIHdh66Iv/vWMiCpbDgTaDKB/vFMYtRzDwEpFW48qfEKog==”. Hitting up this URL now returns the result “You are.” as it did in the local environment.

To learn how to create precompiled Azure Functions in Visual Studio, check out my Writing and Testing Precompiled Azure Functions in Visual Studio 2017 Pluralsight course.

You can start watching with a Pluralsight free trial.

SHARE:

Using C# 7.1 Features

With the release of Visual Studio 2017 update 3, the new C# 7.1 features became available.

To use the new features, the .csproj file can be modified and the <LangVersion> element set to either “latest” (the newest release including minor releases) or explicitly to “7.1” , for example:

<LangVersion>latest</LangVersion>

or

<LangVersion>7.1</LangVersion>

To select one of these in Visual Studio,  go to the project properties and the build tab and choose the “Advanced…” button as the following screenshot shows:

Visual Studio 2017 Screenshot showing C# 7.1 enabled

Now the new features of C# 7.1 including  asynchronous main methods are available.

C# 7.1 Async Main Methods

With C# 7.0, in a console app the entry point could not be marked async requiring some workarounds/boilerplate code, for example:

class Program
{
    static void Main(string[] args)
    {
       MainAsync().GetAwaiter().GetResult();
    }

    private static async Task MainAsync()
    {
        using (StreamWriter writer = File.CreateText(@"c:\temp\anewfile.txt"))
        {
            await writer.WriteLineAsync("Hello");
        }
    }
}

With C# 7.1, the main method can be async, as the following code shows:

class Program
{
    static async Task Main(string[] args)
    {
        using (StreamWriter writer = File.CreateText(@"c:\temp\anewfile.txt"))
        {
            await writer.WriteLineAsync("Hello");
        }
    }
}

You can check out the C#7.1 features on GitHub such as:

If you want to fill in the gaps in your C# knowledge be sure to check out my C# Tips and Traps training course from Pluralsight – get started with a free trial.

SHARE:

Testing Automation: The Big Picture

It’s often useful to take a step back and look at the bigger picture, this is true in different aspects of life such as health or wealth or relationships, and is also true of software development.

When it comes to creating automated tests (as with other aspects of software development) dogmatism and absolutist schools of though can exist.

As with all things, the decision to write tests (and how many tests, what type of tests, test coverage aims, etc.) ultimately should boil down to one question: do they add value to what you are doing?

To be clear, I absolutely believe in the creation of automated tests in many cases, however it is good to not be dogmatic. For example if there is a niche market that is ripe for capitalizing on, and time-to-market is the most important thing to capture this market, then an extensive suite of automated tests may slow down getting to that initial release. This of course assumes that the potential market will have some tolerance for software defects. It also depends on what the product is; medical life-critical software is probably going to have a higher quality requirement than a social media app for example. This can be a trade-off however with shorter term delivery speeds being quicker but at the expense of delivery speed in the long term, if you’re overwhelmed fixing production outages you have very little time to add new features/value.

Another aspect to consider is that of risk. What are the risks associated with defects in the software making their way into production? Different features/application areas may also have different risk profiles; for example  the “share on social media” feature may not be deemed as important as a working shopping cart. It’s also important to remember that risk is not just monetary, in the previous example a broken “share on social media” feature may bring the business into disrepute, aka “reputational risk”.

When it comes to the myriad of different types of tests (unit, integration, subcutaneous, etc.) the testing pyramid is an oft-quoted model of how many of each type of tests to have in the test suite. While the testing pyramid may be of great help for someone new to automated testing to help them learn and navigate their initial steps, as experience grows the model may no longer be optimal to some of the projects that are being worked on. Beyond the testing pyramid the different aspects of test types can be considered such as execution speed, breadth/depth, reliability/brittleness etc.

Automated tests also do not exist in and of themselves, they are part of a bigger set of processes/considerations such as pair programming, code reviews, good management, well-understood requirements, good environment management/DevOps, etc.

If you want to take a step back and look at the big picture, or know a developer or manager who wants to understand the trade-offs/benefits check out my Testing Automation: The Big Picture Pluralsight course.

You can start watching with a Pluralsight free trial.

SHARE:

Installing and Configuring a UPS with Windows 10

The power grid at my home office is sometimes unreliable. In the last year there have been several power outages ranging from several hours to transient outages of a few seconds.

My main PC is a silent desktop which means (unlike a laptop) has no resilience to power outages. This is where an external uninterruptable power supply (UPS ) comes in handy. A UPS is like a big battery that gets charged from main power, but when there is an outage the battery kicks in and provides power to connected devices.

When choosing a UPS, generally speaking, the more expensive they are the longer they can provide power to connected devices (or provide the same or more power for a longer time). Having researched typical power consumptions and armed with the knowledge that my PC uses SSDs, is fan-less, and does not have a high-powered GPU something in the 1000-1500 VA range was required. My main requirement was the ability to save work and safely shut down the PC before losing all power. If I had more complex energy requirements I would have first purchased a power meter to measure how much power my devices were using before choosing the UPS.

Installing the UPS

Once I understood the approximate power requirements, I selected the Smart-UPS 1000VA LCD 230V from APC.

APC Smart-UPS 1000VA LCD 230V Front

The rear of the unit consists of a number of sockets, for the outputs there are 2 distinct groups that can be configured differently. For example the main group can have the PC and one of the monitors connected. The secondary power group can have non-essential devices attached, in my case the powered studio monitor speakers. The UPS was configured to turn off the secondary group if there is a power outage but after a 15 second delay; this will help with short transient outages. The main group will remain on for as long as the UPC battery has power. There are many different ways to configure this UPS by using the LCD display and front buttons, including the ability to enable/disable audible notifications.

APC Smart-UPS 1000VA LCD 230V rear panel

The rear panel also has a USB connector that can be connected to the PC.

Configuring Windows 10 Power Settings for a UPS

Once everything had been connected (including the UPS-PC USB cable) it can all be switched on. Once the UPS battery is fully charged, turning off the main power at the power outlet causes the UPS to switch to battery power, the PC and single monitor stay on and 15 seconds later the speakers turn off (to save power). Once on battery, the PC and monitor draw about 50W of power and the estimated run time according to the UPS LCD  is about 2 hours.

Because of the USB connection to the PC, Windows 10 also displays the battery status in the system tray:

Windows 10 UPS Battery status

If a power outage occurs when using the PC, once the battery gets low I can manually shutdown the PC to prevent damage/data loss. If however the PC is unattended at the time, I still want it to be safely shutdown.

To do this in Windows 10, type “power & sleep settings” in the start menu and configure the basic settings. From here, “Additional power settings can be opened” and power plans customized. Once in the plan settings, the “Change advanced power settings” can be selected to get down into the fine details:

Opening additional power settings

Once in the detailed Power Options dialog, in additional to other settings I opened the Battery section and changed the critical battery level to be 20% and the critical battery action to Hibernate. I also modified some o the other battery settings. 20% for critical is very conservative as I wanted to hibernate the PC with plenty of UPS battery capacity remaining.

Hibernating Windows 10 when critical UPS battery level reached

Now when on UPS battery power, Windows will warn me when the battery gets low (I configured this to be 40%) and then auto-hibernate at 20% battery.

It’s a great feeling to know that even when there is a storm blowing in that I will not lose any work and that my main PC hardware is protected from surges and unexpected power loss.

SHARE:

Testing ASP.NET Core Controllers in Isolation with Mock Objects and Moq

In previous posts we saw how to get started testing ASP.NET Core MVC controllers and also how to use the Moq mocking library in .NET Core tests.

If there is code in controllers that needs testing, but the controller has a dependency, for example passed into the constructor, it may not make sense to use the real version of the dependency. In these cases Moq can be used to create a mock version of the dependency and pass it to the controller that needs testing.

As an example suppose we have the following controller code:

public class HomeController : Controller
{
    private readonly ISmsGateway _smsGateway;

    public HomeController(ISmsGateway smsGateway)
    {
        _smsGateway = smsGateway;
    }

    [HttpPost]
    [ValidateAntiForgeryToken]
    public IActionResult Send(SendSmsRequest request)
    {
        if (ModelState.IsValid)
        {
            var sendReceipt = _smsGateway.Send(request.PhoneNumber, request.Message);

            return Ok(sendReceipt);
        }

        return BadRequest();
    }
}

In the preceding code, the controller takes an ISmsGateway dependency as a constructor parameter. This dependency is later used in the the Send() method.

After installing Moq a mock SMS gateway can be created. Once created, Moq’s Setup() method can be used to determine what happens when the controller calls the mocked Send() method as the following code demonstrates:

[Fact]
public void ShouldSendOk()
{
    SendSmsRequest sendSmsRequest = new SendSmsRequest
    {
        PhoneNumber = "42",
        Message = "Hello"
    };

    Guid expectedSendReceipt = Guid.NewGuid();

    var mockSmsGateway = new Mock<ISmsGateway>();
    
    mockSmsGateway.Setup(x => x.Send(sendSmsRequest.PhoneNumber, sendSmsRequest.Message))
                  .Returns(expectedSendReceipt);

    var sut = new HomeController(mockSmsGateway.Object);
    
    IActionResult result = sut.Send(sendSmsRequest);

    var okObjectResult = Assert.IsType<OkObjectResult>(result);

    Assert.Equal(expectedSendReceipt, okObjectResult.Value);
}

We may also want to test that if there is a model binding error, then  no message is sent via the SMS gateway. The follow test code shows the use of the AddModelError() method to simulate an error, and the use of Moq’s Verify() method to check that the gateway’s Send() method was never called:

[Fact]
public void ShouldNotSendWhenModelError()
{
    SendSmsRequest sendSmsRequest = new SendSmsRequest
    {
        PhoneNumber = "42",
        Message = "Hello"
    };

    var mockSmsGateway = new Mock<ISmsGateway>();

    var sut = new HomeController(mockSmsGateway.Object);
    sut.ModelState.AddModelError("Simulated", "Model error");

    sut.Send(sendSmsRequest);

    mockSmsGateway.Verify(x => x.Send(It.IsAny<string>(), It.IsAny<string>()), Times.Never);
}

To learn more about using Moq to create/configure/use mock objects check out:

You can start watching with a Pluralsight free trial.

SHARE:

Paying Your Software Development Tax

In software development we already have the technical debt metaphor that helps describe the the fact that a quick and dirty approach now, may create problems in the future. For example getting a feature into production sooner but compromising the quality/design/testability/etc. may make future changes harder or more costly: hence paying interest over time for the technical debt that was just created.

The technical debt metaphor is easily relatable to by non-developers and can help facilitate discussions with business owners/stakeholders.

In the real world, paying interest is an acceptable part of life and loans in various forms are not seen as problematic for the majority of people in modern society.

Even though they are an essential part of society however, most people dislike the thought of taxes.

Would the metaphor of a software development tax provide a more visceral reaction and encourage higher quality software where appropriate?

For example, there are “taxes” that come from everyday software development, such as bug fixing or introducing code duplication. Rather than saying “this will add some technical debt to the project…”, we could say “that’s going to increase the amount of tax we have to pay to deliver this…”.

SHARE:

Testing ASP.NET Core MVC Controllers: Getting Started

When writing ASP.NET Core MVC web applications, you may want to test that controller actions behave in the expected way, for example that the action returns the correct result type (e.g. a ViewResult) or that the action behaves as expected when the model state is invalid.

To get started writing controller tests, first add a new .NET Core xUnit test project to the solution. This will create the test project along with requried xUnit.net NuGet packages. It will also add a default test class "UnitTest1.cs":

using System;
using Xunit;

namespace WebApplication1.Tests
{
    public class UnitTest1
    {
        [Fact]
        public void Test1()
        {
        }
    }
}

In the preceding code, notice the xUnit.net [Fact] attribute that marks the Test1 method as a test that should be executed by the test runner. One way to run tests in Visual Studio is to use the built-in Test Explorer which can be accessed via the menus: Test->Windows->Test Explorer.

If you build the project you will see the default test shown in the Test Explorer window:

Visual Studio Test Explorer

Adding a Controller Test

First, to get access to the controllers in the ASP.NET Core MVC application, add a reference to the web project from the test project. An instance of a controller can now be created in the test method:

var sut = new WebApplication1.Controllers.HomeController();

We can now call methods (actions) on the controller and verify the results. As a simple example, we can check that the Index method result is a view:

[Fact]
public void Test1()
{
    HomeController sut = new WebApplication1.Controllers.HomeController();

    IActionResult result = sut.Index();

    Assert.IsType<ViewResult>(result);
}

There are many different ways to test the results of controllers, including the ability to simulate model errors or using Moq mock objects as controller constructor dependencies.

The following code shows an excerpt from a controller and a test that examines the view's model that was returned:

public class PersonViewModel
{
    public string Name { get; set; }
}

public IActionResult Person()
{
    PersonViewModel viewModel = new PersonViewModel
    {
        Name = "Amrit"
    };

    return View(viewModel);
}
[Fact]
public void Test2()
{
    HomeController sut = new WebApplication1.Controllers.HomeController();

    IActionResult result = sut.Person();

    ViewResult viewResult = Assert.IsType<ViewResult>(result);

    PersonViewModel model = Assert.IsType<PersonViewModel>(viewResult.Model);

    Assert.Equal("Amrit", model.Name);
}

To learn how to get started testing ASP.NET Core MVC applications check out my ASP.NET Core MVC Testing Fundamentals Pluralsight course.

You can start watching with a Pluralsight free trial.

SHARE: