New Free eBook: C# 7.2: What's New Quick Start

My new free eBook is now available for download.

The book covers the following new features of C# 7.2:

  • Leading Digit Separator
  • Reference Semantics With Value Types
  • Non-trailing Named Arguments
  • Private Protected Access Modifier
  • Span<T> and ReadOnlySpan<T>

Free C# 7.2 eBook

You can get the book for free (or pay what you’re able to) in PDF, EPUB, and MOBI formats.

SHARE:

Create Precompiled Azure Functions With Azure Event Grid Triggers

Visual Studio can be used to create precompiled Azure Functions using standard C# classes and tools/techniques and then they can be published to Azure.

This article assumes you’ve created the resources (resource group, Event Grid Topic, etc.) from this previous article.

In Visual Studio 2017, create a new Azure Functions project.

Next update the pre-installed Microsoft.NET.Sdk.Functions NuGet package to the latest version.

To get access to the Azure Event Grid function trigger attribute, install the Microsoft.Azure.WebJobs.Extensions.EventGrid NuGet package (this package is currently in preview/beta).

Add a new class to the project with the following code:

using Microsoft.Azure.WebJobs;
using Microsoft.Azure.WebJobs.Extensions.EventGrid;
using Microsoft.Azure.WebJobs.Host;

namespace DCTDemos
{
    public static class Class1
    {
        [FunctionName("SendNewLeadWelcomeLetter")]
        public static void SendNewLeadWelcomeLetter([EventGridTrigger] EventGridEvent eventGridEvent, TraceWriter log)
        {
            log.Info($"EventGridEvent" +
                $"\n\tId:{eventGridEvent.Id}" +
                $"\n\tTopic:{eventGridEvent.Topic}" +
                $"\n\tSubject:{eventGridEvent.Subject}" +
                $"\n\tType:{eventGridEvent.EventType}" +
                $"\n\tData:{eventGridEvent.Data}");
        }
    }
}

Notice in the preceding code, the method name SendNewLeadWelcomeLetter is the same as specified in the function name attribute, this may be required due to a bug in the current preview/beta implementation – if these are different your function may not be executed when an event occurs.

Right-click on the function project and choose publish. Follow the wizard and create a new Function App and select your resource group where your Event Grid Topics is. Select West US 2 if you need to create any new Azure resources/storage account/etc..

Once deployed, head over to Azure Portal, open your new function app and select the newly deployed SendNewLeadWelcomeLetter function:

Adding an Azure Event Grid subcription for an Azure Function

At the top right select Add Event Grid subscription. And follow the wizard to create a new subscription - this will enable the new function to be triggered by an Event Grid Subscription. As part of the subscription we’ll limit the event type to new-sales-lead-created:

Adding an Azure Event Grid subcription for an Azure Function

Next go to the function app platform features tab and select Log Streaming. We can now use Postman to POST the following JSON to the Event Grid Topic we created earlier.

[
    {
        "id": "1236",
        "eventType": "new-sales-lead-created",
        "subject": "myapp/sales/leads",
        "eventTime": "2017-12-08T01:01:36+00:00",
        "data":{
            "firstName": "Amrit",
            "postalAddress": "xyz"
        }
    }
]

Head back to the streaming logs and you should see your precompiled Azure Function executing in response to the Event Grid event:

2017-12-08T06:38:25  Welcome, you are now connected to log-streaming service.

2017-12-08T06:38:49.841 Function started (Id=ec927bc1-fa15-4211-a7bd-8e593f5d4840)

2017-12-08T06:38:49.841 EventGridEvent
    Id:1234
    Topic:/subscriptions/797e1c4e-3fd4-4cd6-84b8-ef103cee8b6b/resourceGroups/DCTEGDemo/providers/Microsoft.EventGrid/topics/sales-leads
    Subject:myapp/sales/leads
    Type:new-sales-lead-created
    Data:{

  "firstName": "Amrit",

  "postalAddress": "xyz"

}

2017-12-08T06:38:49.841 Function completed (Success, Id=ec927bc1-fa15-4211-a7bd-8e593f5d4840, Duration=0ms)


To learn how to create precompiled Azure Functions in Visual Studio, check out my Writing and Testing Precompiled Azure Functions in Visual Studio 2017 Pluralsight course.

You can start watching with a Pluralsight free trial.

SHARE:

Getting Started with Azure Event Grid

In a previous article we got an introduction to Azure Event Grid, if you’re new to Event Grid you should check it out first to familiarise yourself with some basic concepts.

In this article we’ll create an Azure Event Grid topic and subscription and see it in action.

First off, if you want to create a free Azure Account you can do so, then log into the Azure portal.

Next go and create a new resource group, Azure Event Grid is currently in preview and only available in selected locations such as West US 2.
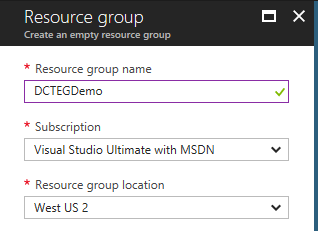
Creating a new resource group

Once the resource group is created, head down to the More services option and search for Event Grid.
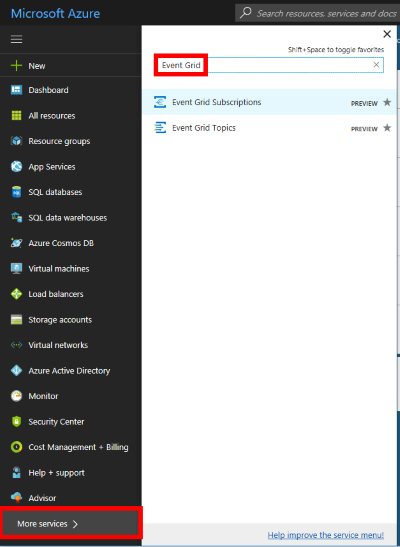
Navigating to Event Grid Topics

There are topics provided by Azure services (such as blob storage ) and there is also the ability to create your own custom topics for custom applications/third parties/etc.

Click Event Grid Topics and this will take you to a list of all your topics. Click the +Add button to begin creation of a custom topic. Give the topic a name sales-leads and choose the resource group created earlier, once again choose West US 2.
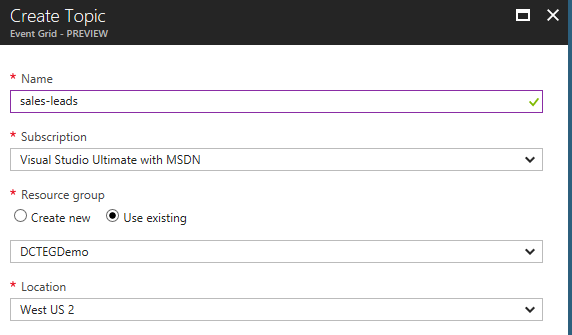
Creating a new Azure Event Grid Topic

Click create, wait for the deployment to complete and hit refresh in the topics list to see your new topic:

Azure Event Grid topic added

Click on the newly added sales-leads topic, notice the overview showing publish metrics:
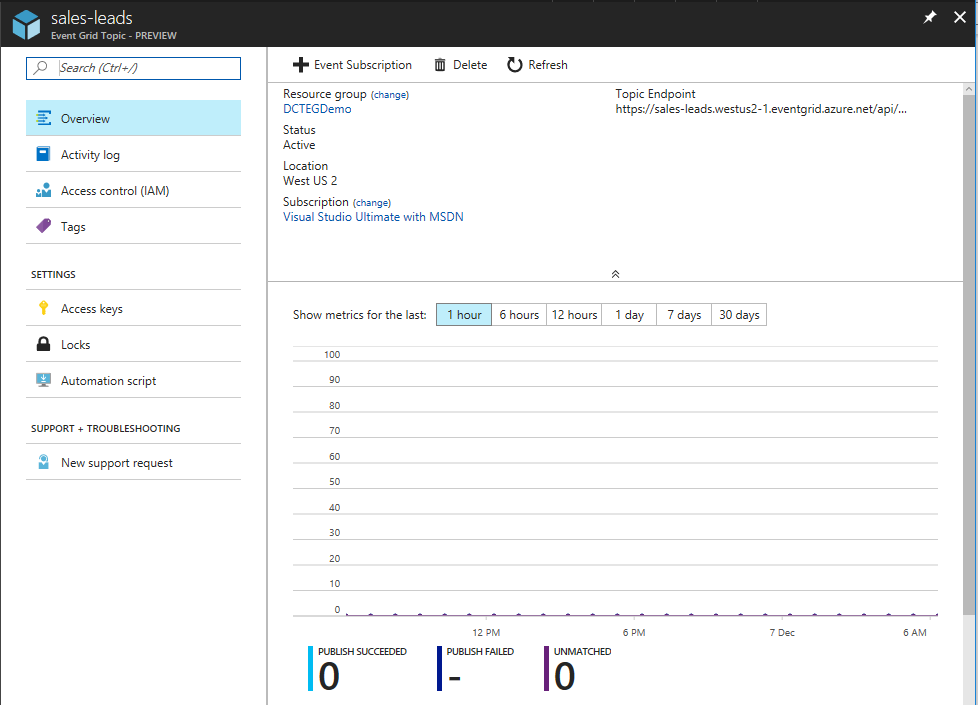
Event Grid Topic details

At the top right hover over the Topic Endpoint and click the button to copy this to the clipboard (we’ll use this later):

Getting Event Grid Topic endpoint

In this example the copied endpoint is: https://sales-leads.westus2-1.eventgrid.azure.net/api/events

We’ll also need an access key to be able to HTTP POST to this custom topic later, to do this click the Access keys option and copy Key 1 for later use:
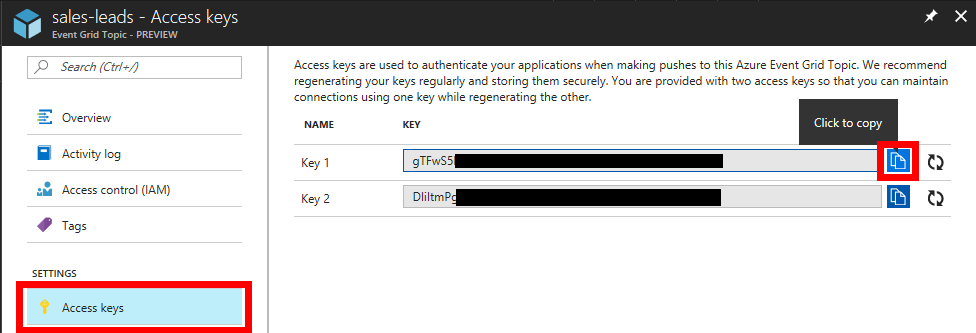
Getting access key for Azure Event Grid topic

Click back on Overview and click the +Event Subscription button:
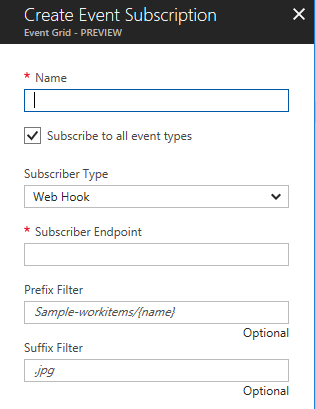
Creating a new Azure Event Grid Subscription

In this example we’ll create a subscription that will call an external (to Azure) service that will mail a conference brochure to all new sales leads. In this example we are simulating a temporary extension to the sales system for a limited period during the run-up to a sales conference. This is one use case for Azure Event Grid that allows extension of a core system without needing to modify it (assuming that events are being emitted).

To simulate this external service we’ll use RequestBin which you can learn more about in this article. Once you’ve created your request bin, take a note of the Bin URL.
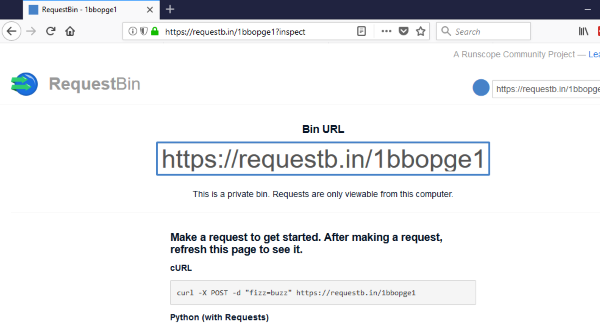
Creating a RequestBin URL

Fill out the new event subscription details:

  • Name: send-upcoming-conference-brochure
  • Subscribe to all event types: Untick
  • Event Types: new-sales-lead-created
  • Subscriber endpoint: https://requestb.in/1bbopge1 (this is the RequestBin URL created above)
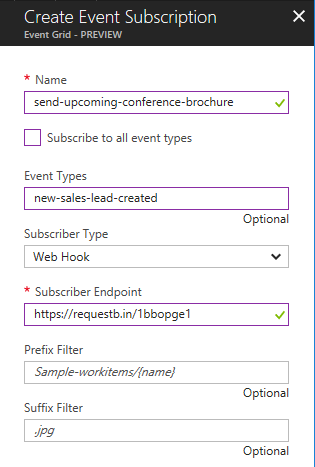
Event subscription details

Click Create.

To recap, there is now a custom topic called sales-leads that we can publish events to at its URL: https://sales-leads.westus2-1.eventgrid.azure.net/api/events. There is also an event subscription set up for this topic but that is limited to only those events published of type new-sales-lead-created. This event subscription uses the Azure Event Grid WebHooks event handler to HTTP push events to the RequestBin URL.

To see this in action, open Postman and select POST and paste the topic URL (https://sales-leads.westus2-1.eventgrid.azure.net/api/events). Add a header called aeg-sas-key and paste in the key that was copied earlier:
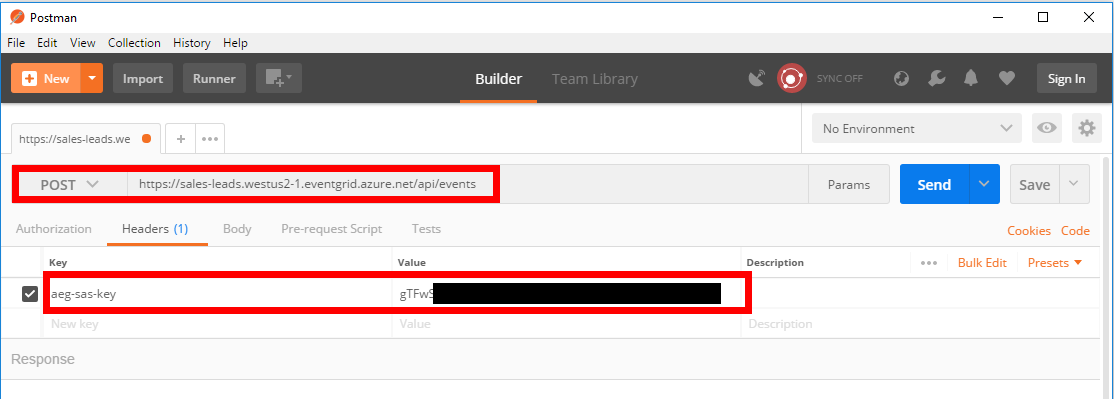
Basic Postman setup

The final thing to do is define the event data that we want to publish:

[
    {
        "id": "42",
        "eventType": "new-sales-lead-created",
        "subject": "myapp/sales/leads",
        "eventTime": "2017-12-07T01:01:36+00:00",
        "data":{
            "firstName": "Jason",
            "postalAddress": "xyz"
        }
    }
]
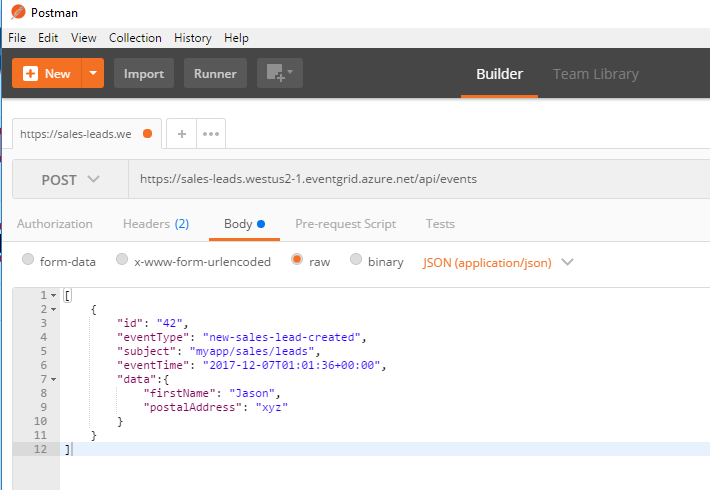
Event JSON data

And then click Send in Postman. You should get a 200 OK response.

Heading back to the RequestBin window and refreshing the page shows the subscription working and the event being pushed to RequestBin:
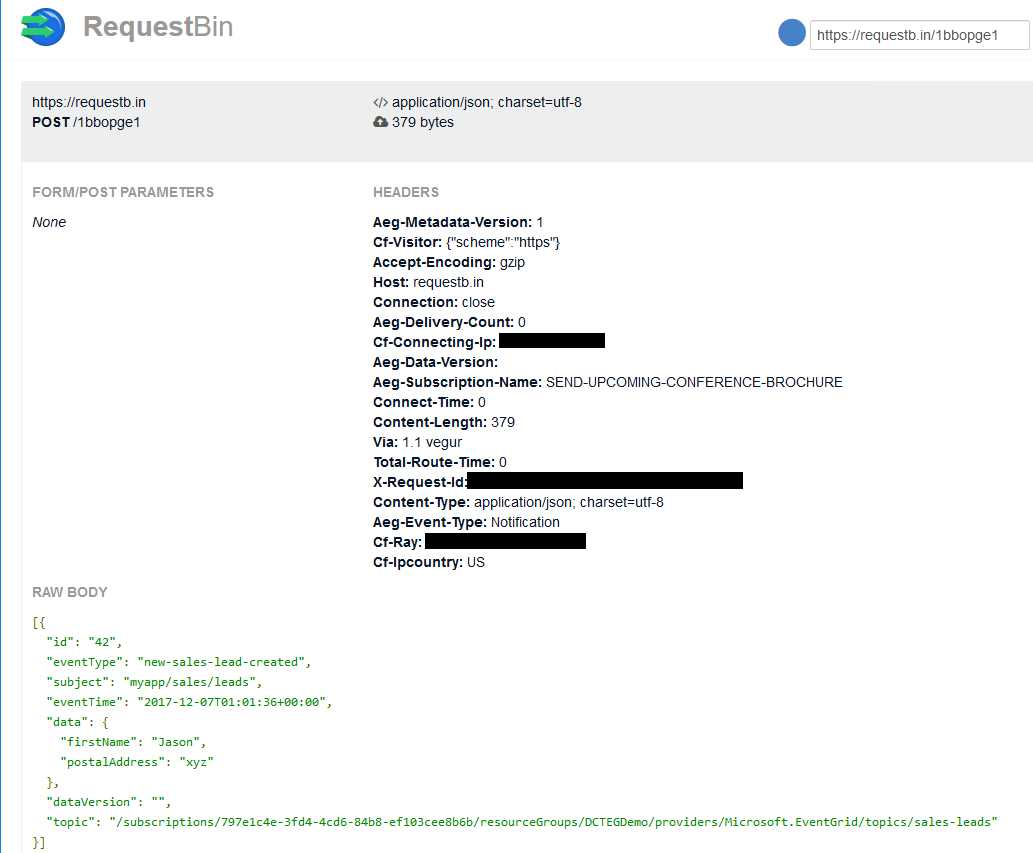
RequestBin receiving Azure Event Grid event

Because the event subscription is filtered on an event type of new-sales-lead-created, if we send a different event type from Postman (e.g.: "eventType": "new-sales-lead-rejected",), the subscription won’t activate nor push the event to RequestBin.

If you want to fill in the gaps in your C# knowledge be sure to check out my C# Tips and Traps training course from Pluralsight – get started with a free trial.

SHARE:

Understanding Azure Event Grid

Azure Event Grid (currently in preview) is a managed publisher-subscriber service that pushes events to registered subscribers.

Azure Event Grid does not replace other services such as Azure Service Bus and it has a different focus. Whereas Azure Service Bus might be employed where you need very high reliability, message ordering etc, Azure Event Grid is more about emitting notifications of things that have happened.

Azure Event Grid uses a push model (with some retry logic built in) to push events to subscribers both inside and outside of Azure.

Messages and Events

One way to differentiate when Azure Event Grid may be more appropriate is to think of the publisher’s expectations. Firstly lets use a very general definition of a message as being a single piece of information that is produced somewhere and is (possibly) consumed somewhere. It this case we’re thinking about messages as individual “datagrams” as opposed to an ongoing/continuous stream of data.

If the sender of the message has an expectation when the message is sent we can think of this as a “message with intent”.

If the sender of the message has no expectation of what happens when the messages is sent we can think of this as a “message with no intent”.

For the sake of this article, we’ll call a “message with intent” a command and a “message with no intent” an event. Commands are messages  instructing the consumer to do something and that maybe return a result to the sender; events are messages  that represent a fact about something that has happened in the system.

Use Case

One use case for Azure Event Grids is to allow easier system extensibility beyond the core business functionality. For example in a sales system new sales leads are captured and stored in a database, this is the core system. This core system could also publish events with no expectation or knowledge about who may be responding to them. An example of an event could be when a new sales lead is added. When the new lead is entered into the core system, a “new-lead” event is published into Azure Event Grid. Now anyone who is interesting in knowing when a new lead has been added can subscribe to this type of event and do something with it.

Azure Event Grid Terminology

An Azure Event Grid event describes what happened in the system represented as JSON data. It contains the custom data specific to the type of event, in addition to information that is contained in all events such as the event source, event time, and a unique event identifier. The full Azure Event Grid event schema is available as part of the docs.

An event source is the place the event happened, for example the sales system, Azure Storage, etc. Event sources publish events. At present the docs list the following supported event sources (with more to be added in the future):

  • Resource group management operations
  • Azure subscriptions management operations
  • Event Hubs
  • Storage Blobs
  • Custom Topics (HTTP POST-able endpoints)

A topic is an arbitrary categorization of events. Once created, topics have endpoints that event sources publish event to. Events of different types can be sent to the same topic, for example a “sales-leads” topic that holds both “new-lead” and “converted-lead” events.

Event subscriptions wire up topics to event handlers. A topic can have 0, 1, or many subscriptions.

An Event Grid event handler is the place where a subscription sends an event to, for example sending the event using the HTTP webhook event handler. At present the docs list the following Azure event handlers (with more to be added in the future):

  • Azure Functions
  • Logic Apps
  • Azure Automation
  • WebHooks
  • Microsoft Flow

An event consumer (while not explicitly stated in the docs) can be thought of as the thing that the event handler pushes the event to. The event consumer receives the pushed event and uses it, for example an Azure Function responding to a “new-lead” event and sending out a conference invitation letter/email.

Costs

The cost of using Azure Event Grid is based on usage at the “operation” level with an “operation” being defined as “all ingress events, advanced match, delivery attempt, and management calls”. At the time of writing the preview cost is USD $0.30 per million operations with 100,000 free operations per month. You can find the latest  pricing here.

To learn more, check out the Azure Event Grid  docs.

If you want to fill in the gaps in your C# knowledge be sure to check out my C# Tips and Traps training course from Pluralsight – get started with a free trial.

SHARE:

Inspecting HTTP Requests With RequestBin

EDIT: Since this post was originally published, the originally quoted Request Bin URL was closed down, there are other alternatives that may be of use such as: https://beeceptor.com/ https://hookbin.com/ https://requestbin.com/ etc.

RequstBin is a free community project from Runscope. It allows you to generate a test URL that will capture requests sent to it and allow you to view details of those requests. This may be useful when developing push functionality, webhooks, etc. You should of course not send sensitive data, passwords, etc. and use only non-real test data.

You start by heading over to https://requestb.in/ and creating your own “request bin” which gives you a unique URL which you can send HTTP request to:

Creating a RequestBin

Once you’ve clicked the “Create a RequestBin” button you’ll be given a “Bin URL” to send requests to(you can also restrict viewing to your current browser which uses a cookie behind the scenes):

RequestBin created

Now the the bin is set up and you have your bin URL, you can send HTTP requests to it, for example by setting up a test webhook to call the bin URL, setting up your test application to push to the bin URL, or as an example here using Postman:

Sending a request using Postman

Heading back to the browser window and refreshing it will show you the last (several) requests captured, including any form/post data that was sent, header information such as:

  • Content-Type
  • Cf-Ipcountry
  • Postman-Token
  • Total-Route-Time
  • Cache-Control
  • Host
  • User-Agent
  • Cf-Connecting-Ip
  • Connection
  • Content-Length
  • Cf-Visitor
  • Connect-Time
  • Cf-Ray
  • Accept-Encoding
  • Cookie
  • Via
  • X-Request-Id
  • Accept

And any raw body content such as:

{
    "arbitrary" : "Jason",
    "data" : "Roberts"
}

You can also check out the project on GitHub.

SHARE:

New Pluralsight Course: Writing and Testing Precompiled Azure Functions in Visual Studio 2017

Azure Functions have come a long way in a short time. With newer releases you can now create functions in Visual Studio using standard C# class files along with specific attributes to help define triggers, bindings, etc. This means that all the familiar powerful Visual Studio tools, workflows, NuGet packages, etc. can be used to develop Azure Functions. Visual Studio also provides publish support so you can upload your functions to the cloud once you are happy with them. Another feature that makes developing functions in Visual Studio easier is the local functions runtime that let’s you run and debug functions on your local development machine, without needing to publish to the cloud just to test them.

In my new Writing and Testing Precompiled Azure Functions in Visual Studio 2017 Pluralsight course you will learn how to:

  • Set up your local development environment
  • Develop and test Azure Functions locally
  • Publish functions to Azure
  • Create functions triggered from incoming HTTP requests
  • Trigger functions from Azure Storage queues and blobs
  • Trigger functions from Azure Service Bus and Azure Event Hubs
  • Trigger functions periodically on a timer
  • Unit test Azure Function business logic

Check out the full course outline for more details.

You can start watching with a Pluralsight free trial.

SHARE:

FeatureToggle v4 Released

Version 4 of FeatureToggle is now released. This release adds initial support for .NET Core.

Example code.

Release notes.

Breaking Changes:

  • Min framework now 4.6.1 / .NET Standard 1.4
  • Windows 8.n, Windows phone 8.n, Windows Phone Silverlight 8.n no longer supported
  • Namespace changes: most types needed for application developers are now under root FeatureToggle namespace
  • Types not usually required by client code moved to FeatureToggle.Internal
  • Windows UWP now supported explicitly from build 14393

.NET Core Limitations/Specifics

This is in some ways somewhat of an interim release, it is envisaged that when version 5 comes around the implementation will move to a pure .NET Standard implementation.

SHARE:

Mocking with FeatureToggle

I was asked a question on Twitter so I thought I’d write it up here.

When using the FeatureToggle library you may have some some code that behaves differently if a toggle is enabled.

When writing a test, you can create a mock IFeatureToggle and set it up to be enabled (or not) and then assert the result is as expected.

The following code show a simple console app that has an OptionsConsoleWriter.Generate method that uses a toggle to output a printing feature option:

using static System.Console;
using System.Text;
using FeatureToggle.Toggles;
using FeatureToggle.Core;

namespace ConsoleApp1
{
    public class Printing : SimpleFeatureToggle {}

    public class OptionsConsoleWriter
    {
        public string Generate(IFeatureToggle printingToggle)
        {
            var sb = new StringBuilder();

            sb.AppendLine("Options:");
            sb.AppendLine("(e)xport");
            sb.AppendLine("(s)ave");

            if (printingToggle.FeatureEnabled)
            {
                sb.AppendLine("(p)rinting");
            }

            return sb.ToString();
        }
    }

    class Program
    {
        static void Main(string[] args)
        {
            Printing printingToggle = new Printing();

            string options = new OptionsConsoleWriter().Generate(printingToggle);

            Write(options);            

            ReadLine();
        }
    }
}

To write a couple of simple tests for this method, you can use a mocking framework such as Moq to generate a mocked IFeatureToggle and pass it to the Generate method:

using Xunit;
using Moq;
using FeatureToggle.Core;
using ConsoleApp1;

namespace ClassLibrary1.Tests
{
    public class OptionsConsoleWriterTests
    {
        [Fact]
        public void ShouldGeneratePrintingOption()
        {
            var sut = new OptionsConsoleWriter();

            var mockPrintingToggle = new Mock<IFeatureToggle>();
            mockPrintingToggle.SetupGet(x => x.FeatureEnabled)
                              .Returns(true);

            string options = sut.Generate(mockPrintingToggle.Object);

            Assert.Contains("(p)rinting", options);
        }

        [Fact]
        public void ShouldNotGeneratePrintingOption()
        {
            var sut = new OptionsConsoleWriter();

            var mockPrintingToggle = new Mock<IFeatureToggle>();
            mockPrintingToggle.SetupGet(x => x.FeatureEnabled)
                              .Returns(false);

            string options = sut.Generate(mockPrintingToggle.Object);

            Assert.DoesNotContain("(p)rinting", options);
        }
    }
}

SHARE:

New Free C# 7.1: What's New Quick Start eBook

My new free eBook “C# 7.0: What’s New Quick Start” is now complete and available for download.

C# 7.0: What’s New Quick Start Cover Page

The book has the following chapters:

  • Enabling C# 7.1 Features
  • Asynchronous Main Methods
  • Tuple Name Inference
  • Target-typed “default” Literal
  • Better Pattern-matching with Generics

You can download now for free or pay whatever you can.

If you want to fill in the gaps in your C# knowledge be sure to check out my C# Tips and Traps training course from Pluralsight – get started with a free trial.

SHARE:

Running and Filtering Tests with the .NET Core Command Line Test Runner

In a previous article we saw how to use Visual Studio’s Test Explorer to filter and run subsets of automated tests.

If we’re working with .NET Core, in addition to using Test Explorer (or other 3rd party runners such as ReSharper) we can also execute tests at the command line.

Assuming we have two test projects (as follows), the tests contained within these test projects can be executed with the dotnet test command.

ClassLibrary1.sln
│
├───XUnitTestProject1
│   │   TestClass1.cs
│   │   TestClass2.cs
│   └───XUnitTestProject1.csproj
│
└───XUnitTestProject2
    │   TestClass3.cs
    │   TestClass4.cs
    │   XUnitTestProject2.csproj
    │
    └───SomeNameSpace
            TestClass5.cs

Assuming were at the  command/PowerShell prompt, and we’re at the root directory (where the .sln is), we can run the following command to list (but not run) all the tests that are discovered:

dotnet test --list-tests

This produces the following:

Build started, please wait...
Build completed.

Test run for C:\root\XUnitTestProject1\bin\Debug\netcoreapp2.0\XUnitTestProject1.dll(.NETCoreApp,Version=v2.0)
Microsoft (R) Test Execution Command Line Tool Version 15.3.0-preview-20170628-02
Copyright (c) Microsoft Corporation.  All rights reserved.

The following Tests are available:
Build completed.

Test run for C:\root\XUnitTestProject2\bin\Debug\netcoreapp2.0\XUnitTestProject2.dll(.NETCoreApp,Version=v2.0)
Microsoft (R) Test Execution Command Line Tool Version 15.3.0-preview-20170628-02
Copyright (c) Microsoft Corporation.  All rights reserved.

The following Tests are available:
[xUnit.net 00:00:00.3003911]   Discovering: XUnitTestProject1
[xUnit.net 00:00:00.3646372]   Discovered:  XUnitTestProject1
    XUnitTestProject1.TestClass1.Test1
    XUnitTestProject1.TestClass1.Test2
    XUnitTestProject1.TestClass1.Test3
    XUnitTestProject1.TestClass1.Test4
    XUnitTestProject1.TestClass2.Test1
    XUnitTestProject1.TestClass2.Test2
    XUnitTestProject1.TestClass2.Test3
    XUnitTestProject1.TestClass2.Test4
[xUnit.net 00:00:00.2826272]   Discovering: XUnitTestProject2
    XUnitTestProject2.TestClass3.Test1
    XUnitTestProject2.TestClass3.Test2
    XUnitTestProject2.TestClass3.Test3
    XUnitTestProject2.TestClass3.Test4
    XUnitTestProject2.TestClass4.Test1
    XUnitTestProject2.TestClass4.Test2
    XUnitTestProject2.TestClass4.Test3
    XUnitTestProject2.TestClass4.Test4
    XUnitTestProject2.SomeNameSpace.TestClass5.Test1
    XUnitTestProject2.SomeNameSpace.TestClass5.Test2
[xUnit.net 00:00:00.3863338]   Discovered:  XUnitTestProject2
    XUnitTestProject2.SomeNameSpace.TestClass5.Test3
    XUnitTestProject2.SomeNameSpace.TestClass5.Test4

In the preceding output we can see that dotnet test has built the two test projects and then discovered the test classes and test methods within.

To actually run the test we can simply call dotnet test with no additional arguments; this will rebuild the projects and then execute all the tests.

Filtering Tests

If we don’t want all the tests executed we can limit them, for example just running the tests from one of the test projects:

dotnet test XUnitTestProject1

The ––filter option can be used to fine tune which tests are executed.

For example to run the single test Test1 in TestClass1:

dotnet test --filter DisplayName=XUnitTestProject1.TestClass1.Test1

To run all the tests in a single test class, the ~ “contains” operator can be used, for example:

dotnet test --filter DisplayName~XUnitTestProject1.TestClass1

To run all tests with a specific category (trait), for example all the “Smoke Tests” (in xUnit.net this would be the attribute [Trait("Category", "Smoke Test")]):

dotnet test --filter Category="Smoke Test"

The ! “not” operator can be used as part of the filter expression, for example to run all tests except for Test1:

dotnet test --filter FullyQualifiedName!=XUnitTestProject1.TestClass1.Test1

For more info and examples, check out the docs or my xUnit.net course from Pluralsight - You can start watching with a Pluralsight free trial.

SHARE: