This is the seventh part in a series demonstrating how to setup continuous deployment of an Azure Functions App using Azure DevOps build and release pipelines.
Demo app source code is available on GitHub.
In the previous instalment we created the release pipeline and now have continuous deployment working. Currently if the unit tests pass (and the rest of the build is ok) in the build pipeline, the release pipeline will automatically execute and deploy the Function App to Azure.
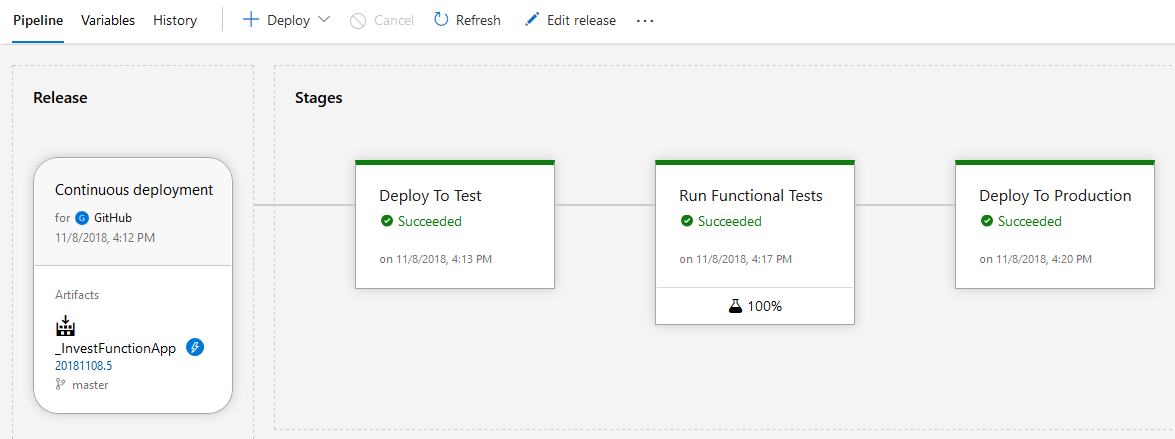
In this instalment of this series we’ll add some additional stages in the release pipeline to deploy first to a test Function App in Azure, then run some functional test against this test deployment, and only if those tests pass, deploy to the production Function App.
Deploying a Function App to Test
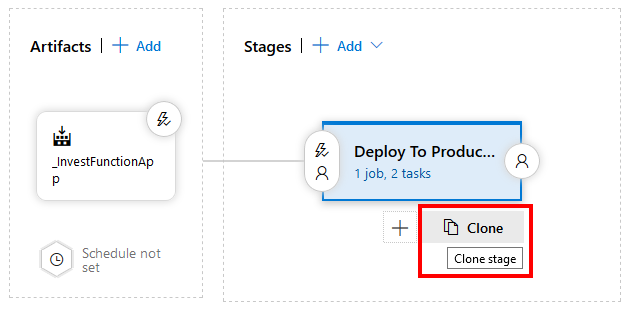
The first step is to edit the release pipeline that we created earlier in this series and add a new stage. A quick way to do this is to click the Clone button on the existing “Deploy to Production” stage:
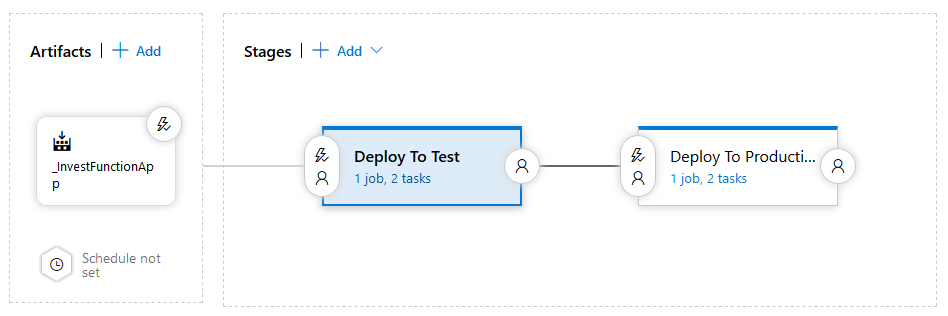
Change the name of the cloned stage to “Deploy to Production” and the original stage to “Deploy to Test”, it should now look like the following screenshot:
Next edit the tasks in the “Deploy to Test” phase, click the Disable Testing Functions task and click Remove to delete the task from the test stage.
We need to change the deployment target, so click the Azure App Service Deploy task and change the App Service name to “InvestFunctionAppDemoTest” – we want to deploy to the test Azure Function App not the production one.
Creating Functional End-to-End Tests
If you check out the demo source code on GitHub you can see the end-to-end test project.
The AddToPortfolioFunctionShould test class contains a test called BuyStocks. This test performs the following logical steps:
- Create a new test Investor in Azure Table storage (by calling the test Azure function CreateInvestor)
- Call the Portfolio function to add funds to a portfolio
- Wait for a while
- Check that the test Investor created in step 1 has had its stock value updated – this is done by called the test function GetInvestor
Side Note: In this example we’ve create 2 additional Azure Functions to help facilitate testing, one to create a test investor and one to retrieve Investor details so we can assert against the final result. We could have just manipulated Azure Table storage directly within the test methods but I wanted to show this approach to demonstrate a number of features such as automating function disabling as part of deployments and passing pipeline variables to test code. Normally we don’t want to deploy testing-related items to production for a whole host of reasons (performance, security, data integrity, etc.), but this approach if properly managed and secured can be quite a useful quick win. If you do implement these kind of test functions you must ensure that they cannot be called if deployed to production by restricting them at multiple layers: first by securing the functions with a secret function key and second by ensuring as part of the deployment the testing functions are disabling in the app settings. You could even add a 3rd level of checking by asserting that the function is executing in a testing environment with like an AssertInTestEnvironment being called at the start of each test function. All that being said, deploying test functions to production adds all this additional complexity and risk and so is best avoided.
There’s a few things that this end-to-end test needs.
Firstly it needs to know the Azure Function keys for the two test functions and also the Portfolio function. We don’t want to commit these keys to source control, so we can instead create pipeline variables for them and then access them via environment variables in the C# test code by using Environment.GetEnvironmentVariable(variableName).
Secondly there is an extra level of checking around the test functions being able to be called in production. The functions will be disabled in production, in addition to being protected by a function key. Whilst these two things should make it impossible for them to be called, there is an extra check implemented in the following class:
internal class Testing
{
    internal const string TestFunctionRoute = "testing";
    internal const string TestEnvironmentConfigKey = "InvestFunctionApp.IsTestEnvironment";

    /// <summary>
    /// Testing functions should be disabled in Azure, this is an additional level of checking.
    /// </summary>
    internal static void AssertInTestEnvironment(ILogger log)
    {
        var value = Environment.GetEnvironmentVariable(TestEnvironmentConfigKey);

        var isTestingEnvonment = value != null && value == "true";

        if (!isTestingEnvonment)
        {
            log.LogError("This function should be disabled in non-testing environments but was called. Check that all testing functions are disabled in production.");
            throw new InvalidOperationException();
        }
    }
}
The AssertInTestEnvironment method is called in the test functions that should be disabled in production, for example:
namespace InvestFunctionApp.TestFunctions
{
    public static class CreateInvestor
    {
        [FunctionName("CreateInvestor")]
        [return: Table("Portfolio")]
        public static async Task<Investor> Run(
            [HttpTrigger(AuthorizationLevel.Function, "post", Route = Testing.TestFunctionRoute + "/createinvestor")] HttpRequest req,
            ILogger log)
        {
            Testing.AssertInTestEnvironment(log);

            log.LogInformation("C# HTTP trigger function processed a request.");

            string requestBody = await new StreamReader(req.Body).ReadToEndAsync();

            return JsonConvert.DeserializeObject<Investor>(requestBody);
        }
    }
}
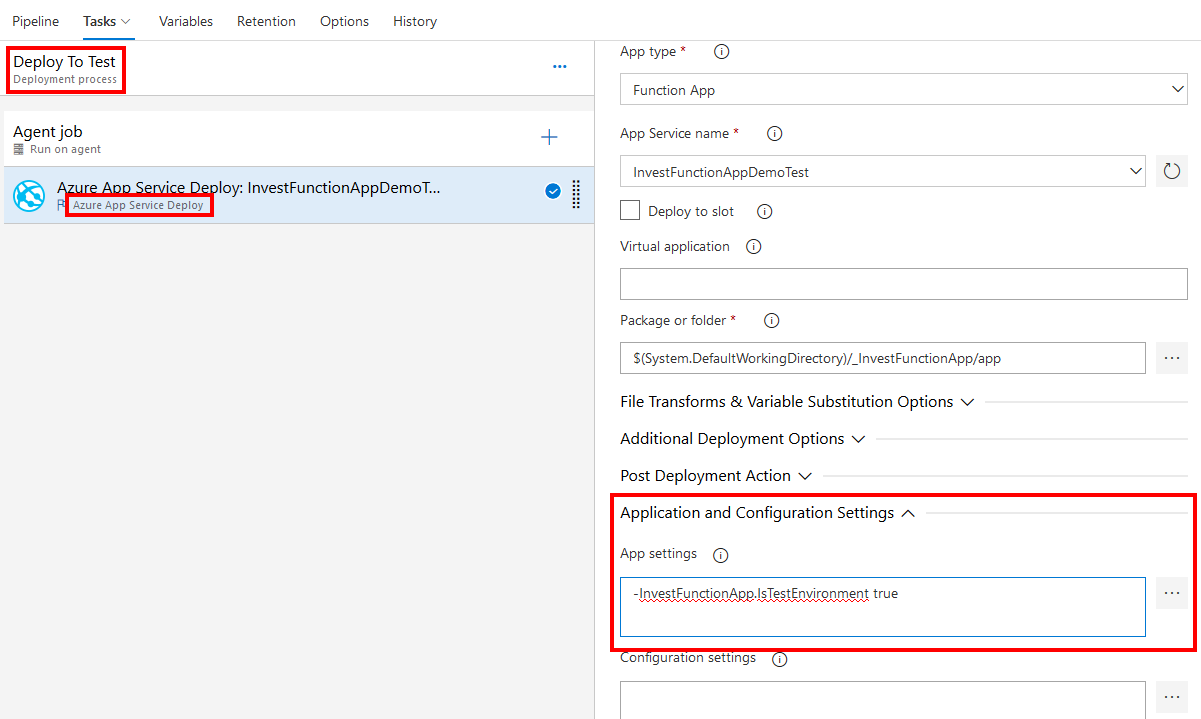
For the test functions to be enabled in the test Azure Function App, there needs to be an application setting called “InvestFunctionApp.IsTestEnvironment” set to “true”.
Adding Function Keys as Pipeline Variables
As we did earlier in the build pipeline, we can add variables to the release pipeline, the variables are called CreateInvestorFunctionKey, GetInvestorInvestorFunctionKey, and PortfolioFunctionKey. The values of these should be the function keys of those functions deployed to the test environment. You may need to create a release and run the release pipeline first to deploy the app to test before you can get the test function keys (a bit of the chicken and the egg here).

Notice in the preceding screenshot that we’re not marking these test keys as secret, though we should ideally go and do that but it introduces a little extra complexity if we want to access them as environment variables in the C# test code.
Adding a Functional End-to-End Test Stage
Now we have the app deployed to test, we want to run the functional tests against it.
To do this we create a new empty stage called “Run Functional Tests” and modify the “Deploy to Production” stage trigger to be run after the new testing stage completes as the following screenshot shows:

Notice here that we’re creating a completely new stage to run the functional tests, this is for demonstration purposes to show the flexibility of being able to design your release pipeline however you want though this approach doesn’t align fully with the conceptual idea of a stage being a: “logical and independent entity that represents where you want to deploy a release generated from a release pipeline.” [Microsoft] . It does however conform to the idea that a stage is a “logical entity that can be used to perform any automation”[Microsoft]. In any case, it is more likely that in a real scenario we wouldn’t create a new stage just to run the functional tests. What we could have instead are a couple of stages, one called “QA” (a testing environment deployment) and one called “Production”. We could then run the functional tests as a separate task in the “QA” stage. You should make sure you read the documentation to fully understand what stages are and the nuances such as “Having one or more release pipelines, each with multiple stages intended to run test automation for a build, is a common practice. This is fine if each of the stages deploys the build independently, and then runs tests. However, if you set up the first stage to deploy the build, and subsequent stages to test the same shared deployment, you risk overriding the shared stage with a newer build while testing of the previous builds is still in progress” [Microsoft].Another option would be to create a new Function App in Azure (with a unique name) for each execution of the stage, run the functional tests against it, and then delete the Function App.The great thing about Azure Pipelines is the flexibility they offer, however this flexibility comes at the cost of potentially shooting yourself in the foot.In the future I intend to write more about good practices and concepts when designing pipelines.
Continuing with the demo scenario, we now need a task in the new testing stage to execute dotnet test on the functional end-to-end test project.
To do this we can add a .Net Core task, set the command to test and the path to project as “$(System.DefaultWorkingDirectory)/_InvestFunctionApp/e2etests/InvestFunctionApp.EndToEndTests/InvestFunctionApp.EndToEndTests.csproj” (notice in this path we’re accessing the e2etests artifact created in the YAML build).
Setting Test Azure Function Application Settings
When deploying to the test Function App in Azure we need to set the application setting “InvestFunctionApp.IsTestEnvironment” to “true”. Rather than using Azure CLI we can do this as part of the Azure App Service Deploy task in the Application and Configurations Settings as the following screenshot shows:
Testing the Updated Release Pipeline
Once you’ve made all these changes and saved them you can queue up another manual release to see if everything works. Just click the + Release button and choose “Create a release”. Specify the latest build in the artifacts section and click Create.
This will queue and start a new release:
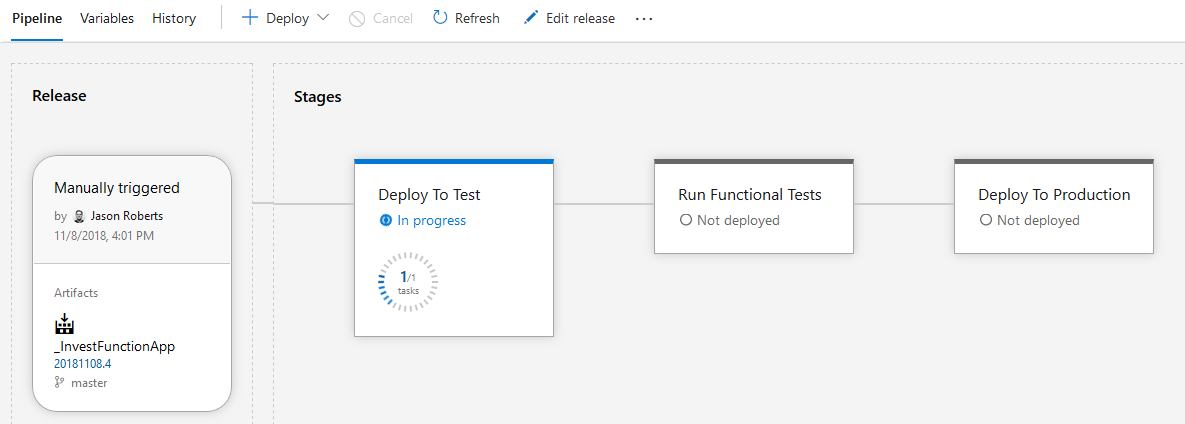
After a while the release should complete and all stages should complete successfully:
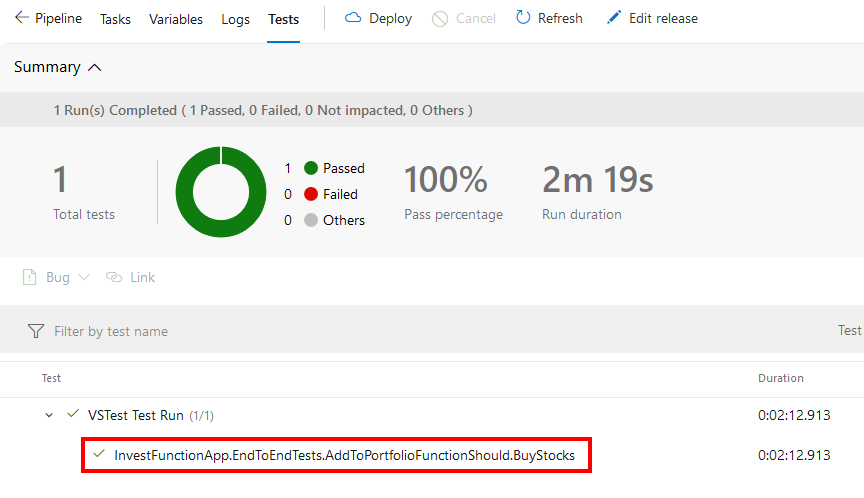
Clicking on the “Run Functional Tests” stage and then the Tests tab you can see the “AddToPortfolioFunctionShould.BuyStocks” test executed and passed:
In the final part of this series, we’ll see how to execute a smoke test against the deployed production Function App to verify at a high level that all is well with the deployment.
If you want to fill in the gaps in your C# knowledge be sure to check out my C# Tips and Traps training course from Pluralsight – get started with a free trial.


SHARE: