Testing for Thrown Exceptions in xUnit.net

When writing tests it is sometimes useful to check that the correct exceptions are thrown at the expected time.

When using xUnit.net there are a number of ways to accomplish this.

As an example consider the following simple class:

public class TemperatureSensor
{
    bool _isInitialized;

    public void Initialize()
    {
        // Initialize hardware interface
        _isInitialized = true;
    }

    public int ReadCurrentTemperature()
    {
        if (!_isInitialized)
        {
            throw new InvalidOperationException("Cannot read temperature before initializing.");
        }

        // Read hardware temp
        return 42; // Simulate for demo code purposes
    }        
}

The first test we could write against the preceding class is to check the “happy path”:

[Fact]
public void ReadTemperature()
{
    var sut = new TemperatureSensor();

    sut.Initialize();

    var temperature = sut.ReadCurrentTemperature();

    Assert.Equal(42, temperature);
}

Next a test could be written to check that if the temperature is read before initializing the sensor, an exception of type InvalidOperationException is thrown. To do this the xUnit.net Assert.Throws method can be used. When using this method the generic type parameter indicates the type of expected exception and the method parameter takes an action that should cause this exception to be thrown, for example:

[Fact]
public void ErrorIfReadingBeforeInitialized()
{
    var sut = new TemperatureSensor();

    Assert.Throws<InvalidOperationException>(() => sut.ReadCurrentTemperature());
}

In the preceding test, if an InvalidOperationException is not thrown when the ReadCurrentTemperature method is called the test will fail.

The thrown exception can also be captured in a variable to make further asserts against the exception property values, for example:

[Fact]
public void ErrorIfReadingBeforeInitialized_CaptureExDemo()
{
    var sut = new TemperatureSensor();

    var ex = Assert.Throws<InvalidOperationException>(() => sut.ReadCurrentTemperature());

    Assert.Equal("Cannot read temperature before initializing.", ex.Message);
}

The Assert.Throws method expects the exact type of exception and not derived exceptions. In the case where you want to also allow derived exceptions, the Assert.ThrowsAny method can be used.

Similar exception testing features also exist in MSTest and NUnit frameworks.

To learn more about using exceptions to handle errors in C#, check out my Error Handling in C# with Exceptions Pluralsight course.You can start watching with a Pluralsight free trial.

SHARE:

Customizing C# Object Member Display During Debugging

In a previous post I wrote about Customising the Appearance of Debug Information in Visual Studio with the DebuggerDisplay Attribute. In addition to controlling the high level  debugger appearance of an object we can also exert a lot more control over how the object appears in the debugger by using the DebuggerTypeProxy attribute.

For example, suppose we have the following (somewhat arbitrary) class:

class DataTransfer
{
    public string Name { get; set; }
    public string ValueInHex { get; set; }
}

By default, in the debugger it would look like the following:

Default Debugger View

To customize the display of the object members, the DebuggerTypeProxy attribute can be applied.

The first step is to create a class to act as a display proxy. This class takes the original object as part of the constructor and then exposes the custom view via public properties.

For example, suppose that we wanted a decimal display of the hex number that originally is stored in a string property in the original DataTransfer object:

class DataTransferDebugView
{
    private readonly DataTransfer _data;

    public DataTransferDebugView(DataTransfer data)
    {
        _data = data;
    }

    public string NameUpper => _data.Name.ToUpperInvariant();
    public string ValueDecimal
    {
        get
        {
            bool isValidHex = int.TryParse(_data.ValueInHex, System.Globalization.NumberStyles.HexNumber, null, out var value);

            if (isValidHex)
            {
                return value.ToString();
            }

            return "INVALID HEX STRING";
        }
    }
}

Once this view object is defined, it can be selected by decorating the DataTransfer class with the DebuggerTypeProxy attribute as follows:

[DebuggerTypeProxy(typeof(DataTransferDebugView))]
class DataTransfer
{
    public string Name { get; set; }
    public string ValueInHex { get; set; }
}

Now in the debugger, the following can be seen:

Custom debug view showing hex value as a decimal

Also notice in the preceding image, that the original object view is available by expanding the Raw View section.

To learn more about C# attributes and even how to create your own custom ones, check out my C# Attributes: Power and Flexibility for Your Code Pluralsight course.You can start watching with a Pluralsight free trial.

SHARE:

MSTest V2

In the (relatively) distant past, MSTest was often used by organizations because it was provided by Microsoft “in the box” with Visual Studio/.NET. Because of this, some organizations trusted MSTest over open source testing frameworks such as NUnit. This was at a time when the .NET open source ecosystem was not as advanced as it is today and before Microsoft began open sourcing some of their own products.

Nowadays MSTest is cross-platform and open source and is known as MSTest V2, and as the documentation states: “is a fully supported, open source and cross-platform implementation of the MSTest test framework with which to write tests targeting .NET Framework, .NET Core and ASP.NET Core on Windows, Linux, and Mac.”.

MSTest V2 provides typical assert functionality such as asserting on the values of: strings, numbers, collections, thrown exceptions, etc. Also like other testing frameworks, MSTest V2 allows the customization of the test execution lifecycle such as the running of additional setup code before each test executes. The framework also allows the creation of data driven tests (a single test method executing  multiple times with different input test data) and the ability to extend the framework with custom asserts and custom test attributes.

You can find out more about MSTest V2 at the GitHub repository, the documentation, or check out my Pluralsight course: Automated Testing with MSTest V2.

You can start watching with a Pluralsight free trial.

SHARE:

Prevent Secrets From Accidentally Being Committed to Source Control in ASP.NET Core Apps

One problem when dealing with developer “secrets” in development is accidentally checking them into source control. These secrets could be connection strings to dev resources, user IDs, product keys, etc.

To help prevent this from accidentally happening, the secrets can be stored outside of the project tree/source control repository. This means that when the code is checked in, there will be no secrets in the repository.

Each developer will have their secrets stored outside of the project code. When the app is run, these secrets can be retrieved at runtime from outside the project structure.

One way to accomplish this in ASP.NET Core  projects is to make use of the Microsoft.Extensions.SecretManager.Tools NuGet package to allow use of the command line tool. (also if you are targeting .NET Core 1.x , install the Microsoft.Extensions.Configuration.UserSecrets NuGet package).

Setting Up User Secrets

After creating a new ASP.NET Core project, add a tools reference to the NuGet package to the project, this will add the following item in the project file:

<DotNetCliToolReference Include="Microsoft.Extensions.SecretManager.Tools" Version="2.0.0" />

Build the project and then right click the project and you will see a new item called “Manage User Secrets” as the following screenshot shows:
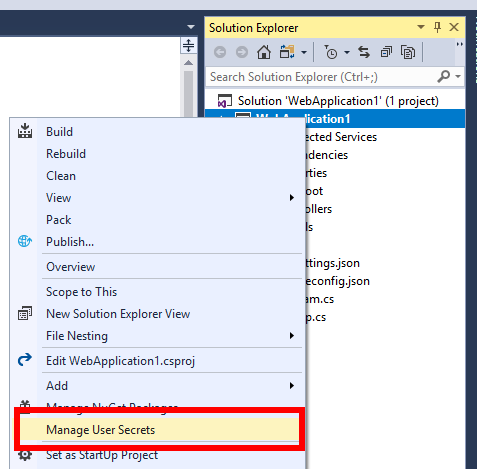
Managing user secrets in Visual Studio

Clicking menu item will open a secrets.json file and also add an element named UserSecretsId to the project file. The content of this element is a GUID, the GUID is arbitrary but should be unique for each and every project.

<UserSecretsId>c83d8f04-8dba-4be4-8635-b5364f54e444</UserSecretsId>

User secrets will be stored in the secrets.json file which will be in %APPDATA%\Microsoft\UserSecrets\<user_secrets_id>\secrets.json on Windows or ~/.microsoft/usersecrets/<user_secrets_id>/secrets.json on Linux and macOS. Notice these paths contain the user_secrets_id that matches the GUID in the project file. In this way each project has a separate set of user secrets.

The secrets.json file contains key value pairs.

Managing User Secrets

User secrets can be added by editing the json file or by using the command line (from the project directory).

To list user secrets type: dotnet user-secrets list At the moment his will return “No secrets configured for this application.”

To set (add) a secret: dotnet user-secrets set "Id" "42"

The secrets.json file now contains the following:

{
  "Id": "42"
}

Other dotnet user-secrets  commands include:

  • clear - Deletes all the application secrets
  • list - Lists all the application secrets
  • remove - Removes the specified user secret
  • set - Sets the user secret to the specified value

Accessing User Secrets in Code

To retrieve users secrets, in the startup class, access the item by key, for example:

public void ConfigureServices(IServiceCollection services)
{
    services.AddMvc();

    var secretId = Configuration["Id"]; // returns 42
}

One thing to bear in mind is that secrets are not encrypted in the secrets.json file, as the documentation states: “The Secret Manager tool doesn't encrypt the stored secrets and shouldn't be treated as a trusted store. It's for development purposes only. The keys and values are stored in a JSON configuration file in the user profile directory.” & “You can store and protect Azure test and production secrets with the Azure Key Vault configuration provider.”

There’s a lot more information in the documentation and if you plan to use this tool you should read through it.

If you want to fill in the gaps in your C# knowledge be sure to check out my C# Tips and Traps training course from Pluralsight – get started with a free trial.

SHARE:

Testing Precompiled Azure Functions Overview

Just because serverless allows us to quickly deploy value, it doesn’t mean that testing is now obsolete. (click to Tweet)

If we’re using Azure Functions as our serverless platform we can write our code (for example C#) and test it before deploying to Azure. In this case we’re talking about precompiled Azure Functions as opposed to earlier incarnations of Azure Functions that used .csx script files.

Working with precompiled functions means the code can be developed and tested on a local development machine. The code we write is familiar C# with some additional attributes to integrate the code with the Azure Functions runtime.

Because the code is just regular C#, we can use familiar testing tools such as MSTest, xUnit.net, or NUnit. Using these familiar testing frameworks it’s possible to write tests that operate at different levels of granularity.

One way to categorize these tests are into:

  • Unit tests to check core business logic/value
  • Integration tests to check function run methods are operating correctly
  • End-to-end workflow tests that check multiple functions working together

To enable effective automated testing it may be necessary to write functions in such a way as to make them testable, for example by allowing function run method dependencies to be automatically injected at runtime, whereas at test time mock versions can be supplied for example using a framework such as AzureFunctions.Autofac.

There are other tools that allow us to more easily test functions locally such as the local functions runtime and the Azure storage emulator.

To learn more about using these tools and techniques to test Azure Functions, check out my Pluralsight course Testing Precompiled Azure Functions: Deep Dive.

You can start watching with a Pluralsight free trial.

SHARE:

Stack Overflow Developer Survey 2018 Overview for .NET Developers

The 2018 Stack Overflow Developer Survey was recently released.

This article summarizes some interesting points that .NET developers may find interesting, in additional to some other general items of potential  interest.

.NET Points of Interest

  • C# is the 8th most popular programming language among professional developers at 35.3%.
  • TypeScript is the 12th most popular language among profession developers at 18.3%
  • VB.NET is the 18th most popular programming language at 6.9%.
  • .NET Core is the 4th most popular framework among professional developers at 27.2%.
  • SQL Server is the 2nd most used database among professional developers  at 41.6%.
  • Windows Desktop or Server is the 2nd most developed-for platform among professional developers  at 35.2%.
  • Azure is the 10th most developed-for platform among professional developers at 11.4%.
  • TypeScript is the 4th most loved language at 67%.
  • C# is the 8th most loved language.
  • VB.NET is the 4th most dreaded language
  • .NET Core is the 5th most loved framework, the 8th most dreaded framework, and the 5th most wanted framework.
  • Azure is the 5th most loved database (Tables, CosmosDB, SQL, etc.)
  • SQL Server is the 10th most loved database.
  • Visual Studio Code and Visual Studio are the top two most popular development environments respectively (among all respondents).
  • Professional developers primarily use Windows (49.4%) as their development operating system.
  • F# is associated with the highest salary worldwide, with C# 16th highest.
  • .NET development technologies cluster around C#, Azure, .NET Core, SQL Server etc.

General Points of Interest

  • 52.7% of developers spend 9-12 hours per day on a computer.
  • 37.4% of developers don’t typically exercise.
  • 93.1% of professional developers identify as male.
  • 74.3% of professional developers identify as white or of European descent.
  • 85.9% of professional developers use Agile development methodologies.
  • 88.4% of professional developers use Git for version control.

The survey offers a wealth of additional information and you can find the full set of results over at Stack Overflow.

SHARE:

Automatic Input Blob Binding in Azure Functions from Queue Trigger Message Data

Reading additional blob content when an Azure Function is triggered can be accomplished by using an input blob binding by defining a parameter in the function run method and decorating it with the [Blob] attribute.

For example, suppose you have a number of blobs that need converting in some way. You could initiate a process whereby the list of blob files that need processing are added to a storage queue. Each queue message contains the name of the blob that needs processing. This would allow the conversion function to scale out to convert multiple blobs in parallel.

The following code demonstrates one approach to do this. The code is triggered from a queue message that contains text representing the input bob filename that needs reading, converting, and then outputting to an output blob container.

using System.IO;
using Microsoft.Azure.WebJobs;
using Microsoft.WindowsAzure.Storage;
using Microsoft.WindowsAzure.Storage.Blob;

namespace FunctionApp1
{
    public static class ConvertNameCase
    {
        [FunctionName("ConvertNameCase")]
        public static void Run([QueueTrigger("capitalize-names")]string inputBlobPath)
        {
            string originalName = ReadInputName(inputBlobPath);

            var capitalizedName = originalName.ToUpperInvariant();

            WriteOutputName(inputBlobPath, capitalizedName);
        }
        
        private static string ReadInputName(string blobPath)
        {
            CloudStorageAccount account = CloudStorageAccount.DevelopmentStorageAccount;
            CloudBlobClient blobClient = account.CreateCloudBlobClient();
            CloudBlobContainer container = blobClient.GetContainerReference("names-in");

            var blobReference = container.GetBlockBlobReference(blobPath);

            string originalName = blobReference.DownloadText();

            return originalName;
        }

        private static void WriteOutputName(string blobPath, string capitalizedName)
        {
            CloudStorageAccount account = CloudStorageAccount.DevelopmentStorageAccount;
            CloudBlobClient blobClient = account.CreateCloudBlobClient();
            CloudBlobContainer container = blobClient.GetContainerReference("names-out");

            CloudBlockBlob cloudBlockBlob = container.GetBlockBlobReference(blobPath);
            cloudBlockBlob.UploadText(capitalizedName);            
        }

    }
}

In the preceding code, there is a lot of blob access code (which could be refactored). This function could however be greatly simplified by the use of one of the built-in binding expression tokens. Binding expression tokens can be used in binding expressions and are specified inside a pair of curly braces {…}. The {queueTrigger} binding token will extract the content of the incoming queue message that triggered a function.

For example, the code could be refactored as follows:

using System.IO;
using Microsoft.Azure.WebJobs;

namespace FunctionApp1
{
    public static class ConvertNameCase
    {
        [FunctionName("ConvertNameCase")]
        public static void Run(
        [QueueTrigger("capitalize-names")]string inputBlobPath,
        [Blob("names-in/{queueTrigger}", FileAccess.Read)] string originalName,
        [Blob("names-out/{queueTrigger}")] out string capitalizedName)
        {
                capitalizedName = originalName.ToUpperInvariant();         
        }
}

In the preceding code, the two [Blob] binding paths make use of the {queueTrigger} token. When the function is triggered, the queue message contains the name of the file to be processed. In the two [Blob] binding expressions, the {queueTrigger} token part will automatically be replaced with the text contents of the incoming message. For example if the message contained the text “File1.txt” then the two blob bindings would be set to names-in/File1.txt and names-out/File1.txt respectively. This means the input blob nameBlob string will automatically be read when the function is triggered,

To learn more about creating precompiled Azure Functions in Visual Studio, check out my Writing and Testing Precompiled Azure Functions in Visual Studio 2017 Pluralsight course.

You can start watching with a Pluralsight free trial.

SHARE:

Dynamic Binding in Azure Functions with Imperative Runtime Bindings

When creating precompiled Azure Functions, bindings (such as a blob output bindings) can be declared in the function code, for example the following code defines a blob output binding:

[Blob("todo/{rand-guid}")]

This binding creates a new blob with a random (GUID) name. This style of binding is called declarative binding, the binding details are declared as part of the binding attribute.

In addition to declarative binding, Azure Functions also offers imperative binding. With this style of binding, the details of the binding can be chosen at runtime. These details could be derived from the incoming function trigger data or from an external place such as a configuration value or database item

To create imperative bindings, rather than using a specific binding attribute, a parameter of type IBinder is used. At runtime, a binding can be created (such as a blob binding, queue binding, etc.) using this IBinder. The Bind<T> method of the IBinder can be used with T representing an input/output type that is supported by the binding you intend to use.

The following code shows imperative binding in action. In this example blobs are created and the blob path is derived from the incoming JSON data, namely the category.

public static class CreateToDoItem
{
    [FunctionName("CreateToDoItem")]
    public static async Task<HttpResponseMessage> Run(
        [HttpTrigger(AuthorizationLevel.Function, "post", Route = null)]HttpRequestMessage req,
        IBinder binder,
        TraceWriter log)
    {
        ToDoItem item = await req.Content.ReadAsAsync<ToDoItem>();
        item.Id = Guid.NewGuid().ToString();

        BlobAttribute dynamicBlobBinding = new BlobAttribute(blobPath: $"todo/{item.Category}/{item.Id}");

        using (var writer = binder.Bind<TextWriter>(dynamicBlobBinding))
        {
            writer.Write(JsonConvert.SerializeObject(item));
        }

        return req.CreateResponse(HttpStatusCode.OK, "Added " + item.Description);
    }
}

If the following 2 POSTS are made:

{
    "Description" : "Lift weights",
    "Category" : "Gym"
}
{
    "Description" : "Feed the dog",
    "Category" : "Home"
}

Then 2 blobs will be output with the following paths - note the random filenames and imperatively-bound paths: Gym and Home :

http://127.0.0.1:10000/devstoreaccount1/todo/Gym/5dc4eb72-0ae6-42fc-9a8b-f4bf646dcd28

http://127.0.0.1:10000/devstoreaccount1/todo/Home/530373ef-02bc-4200-a4e7-948448ac081b

SHARE:

Using the Actor Model and Akka.NET for IoT Systems

In additional to cloud-based offerings such as Microsoft’s Azure IoT Suite, it’s also possible to create representations of Internet of Things devices using the Actor Model and Akka.NET. For example, in addition to hosting an Akka.NET actor system in the cloud, you can also have them running on-premises; for example you may have an actor system monitoring an underground railway network for a city. In this case you may already have the infrastructure in place and decide that hosting in the cloud is unnecessary or risky, and deploy to servers geographically close to the underground with some disaster recovery/backup servers located elsewhere.

The Actor Model is a good fit for IoT scenarios due to the inherent concurrency controls, fault-tolerance, and performance/scalability. Akka.NET is a “toolkit and runtime for building highly concurrent, distributed, and fault tolerant event-driven applications on .NET & Mono”[1].

In the Actor Model, the smallest unit of computation is the actor. An actor can receive messages from other actors, perform computations, manage their state, and send messages to other actors.

For IoT scenarios, actors can model the system in a number of ways. For example, for every physical device in the real world there can be an actor instance to represent that device. This means you may have many actor instances, one for each physical device. When a sensor registers a new reading (temperature, proximity, pressure, etc.) this sensor can communicate with the actor responsible for it, the actor receives a message and can update its internal state to represent the latest reading. The actor representing the device can also respond to another type of message to access the last updated value. The device actor may also be responsible for sending messages to the physical device to update it’s configuration (for example) or this functionality may be broken down into its own actor definition depending on the exact requirements. The device actor may communicate with another actor that is purely responsible for handling the network interfacing required to communicate with devices. In this way if the “network actor” crashed and restarts the actors representing the device don’t crash and lose their state.

Groups of “device actors” can created with the supervision hierarchy that the Actor Model provides to protect groups of actors/devices from crashing other groups of actors/devices. These hierarchies can also provide device management semantics such as the registering of a new device that has just come online. Actors can also represent “abstract” concepts such as the creation of a dedicated actor to perform querying of groups of actors.

To learn more about using Akka.NET with IoT scenarios, check out my Representing IoT Systems with the Actor Model and Akka.NET Pluralsight course.

You can start watching with a Pluralsight free trial.

SHARE:

Investing In You

I grew up in humble surroundings, my family was for the most part “working class”, I moved around a bit as a kid, moved schools a few times, and lived in state/council housing. At one point as a child (due to some unfortunate circumstances) we lived for a short time in a “homeless” hostel – a transitional place whilst waiting for state housing to be allocated. In one area that I lived as a child I had a knife pulled on me outside a local shop, I learned then how quickly I could run! Today I live in a nice safe suburb, drive a decent car, and generally don’t have to worry too much about personal safety or not having a roof over my head. This is due to some kindnesses I’ve been shown along the way and also by investing. Investing in myself…

I recently completed reading Tony Robbins  Money Master the Game, it is a good book for those new to investing - with a few chapters being somewhat US-centric. (Other books you may find interesting if you’re just starting out your investing journey include The Little Book of Common Sense Investing and A Random Walk Down Wall Street.) While Money Master the Game contains a lot of information about how to attempt to maximize your financial returns and  ways to diversify your portfolio, in it Tony also talks about  how you can add more value.

One way to improve your financial investments is by by investing in yourself.

One nice idea is that by investing in yourself you can add more value and if you can add more value you can earn more and if you can earn more you can invest more.

I had some help and kindnesses shown to me in my journey and like everyone I’ve also some challenges to deal with along the way. Even though I come from a somewhat humble  background, and as a white heterosexual male I’ve never had to deal with prejudice, I am lucky that I have always loved to learn. I became fascinated by computers and programming from an early age and was lucky enough to borrow one for a time when I was younger. Eventually my interest and enthusiasm meant I was lucky enough to get my own machine.

Over the many years I continued to learn and was eventually privileged enough to be able to attend university to study computing. Even after starting my first job I continued to learn in my own time, in the evenings and at weekends, always interested in learning more.

As I look back now, at the time I was just following my natural curiosity, but looking back what I was really doing was investing in myself.

About 2 and a half years ago I stepped into a gym for the first time in my life. I look back now and smile, my first experience was not pleasant, I didn’t know what exercises to do, I tried bench pressing with an empty bar and wobbled all over the place, while the muscular guy next to be hoisted 50kg dumbbells to the sky. I went home feeling awful and a little stupid. Two days later I went back, and I kept going back. I devoured Arnold Schwarzenegger's Encyclopedia of Modern Bodybuilding and eventually paid for some personal training sessions to learn how to clean and press and bench press properly. Whilst I am not a shredded muscular bodybuilder, I did lose 14kgs over 2 years and add some amount of muscle mass and some strength. This is another example of investing in you, this time the physical you. Oftentimes, as developers we don’t always take the best care of ourselves, but I believe investing in the physical you carries over to the work/business you.

As the adage goes, "if you want better answers, ask better questions". One question I’m asking myself this year is: how can I continue to add more value than anyone else? As a software developer and “techie-minded”, in the past I would have thought of a question like this as being big-headed or management-speaky. But if you want to help others you need to help yourself and if you want to help yourself you need to offer value to others.

If you want better answers, ask better questions

It’s good to take a step back sometimes and ask ourselves some questions, especially as we get laser focused on the test we’re writing or the feature we’re working on or the sprint that we’re in, or the next project that might be coming along.

I’m grateful for the opportunities I’ve been given in life, I’m grateful for the challenges and failures and what I’ve learned from them, and I’m grateful for the gift of my lifelong love of learning.

Whilst somewhat dramatic, there is some truth to the phrase “if you’re not growing you’re dying” and if you want to grow you have to invest in you.

SHARE: