This is the fifth part in a series demonstrating how to setup continuous deployment of an Azure Functions App using Azure DevOps build and release pipelines.
Demo app source code is available on GitHub.
In the demo app solution there is a testing project. This project contains unit tests that can be run automatically as part of the build pipeline.
As an example, take the following function:
public static class Portfolio
{
    [FunctionName("Portfolio")]
    [return: Queue("deposit-requests")]
    public static async Task<DepositRequest> Run(
        [HttpTrigger(AuthorizationLevel.Function, "post", Route = "portfolio/{investorId}")]HttpRequest req,
        [Table("Portfolio", InvestorType.Individual, "{investorId}")] Investor investor,
        string investorId,
        ILogger log)
    {
        log.LogInformation($"C# HTTP trigger function processed a request.");

        string requestBody = await new StreamReader(req.Body).ReadToEndAsync();

        log.LogInformation($"Request body: {requestBody}");

        var deposit = JsonConvert.DeserializeObject<Deposit>(requestBody);

        if (investor == null)
        {
            throw new ArgumentException($"Invalid investorId '{investorId}.");
        }
        if (deposit is null)
        {
            throw new ArgumentException($"Invalid deposit.");
        }
        if (deposit.Amount <= 0)
        {
            throw new ArgumentException($"Deposit amount must be greater than 1.");
        }

        // Additional validation omitted for demo purposes

        var depositRequest = new DepositRequest
        {
            Amount = deposit.Amount,
            Investor = investor
        };

        log.LogInformation($"Deposit created: {depositRequest}");

        return depositRequest;
    }
}
The function Run method has a number of parameters that need to be satisfied when executed: HttpRequest, Investor, investorId, and an ILogger. The ILogger and HttpRequest can be mocked using Moq:
public class AddToPortfolioShould
{
    [Fact]
    public async Task ReturnCorrectDepositInformation()
    {
        var deposit = new Deposit { Amount = 42 };
        var investor = new Investor { };

        Mock<HttpRequest> mockRequest = CreateMockRequest(deposit);

        DepositRequest result = await Portfolio.Run(mockRequest.Object, investor, "42", new Mock<ILogger>().Object);

        Assert.Equal(42, result.Amount);
        Assert.Same(investor, result.Investor);
    }

    [Fact]
    public async Task ErrorWhenInvestorDoesNotExist()
    {
        var deposit = new Deposit { Amount = 42 };

        Mock<HttpRequest> mockRequest = CreateMockRequest(deposit);

        await Assert.ThrowsAsync<ArgumentException>(() => Portfolio.Run(mockRequest.Object, null, "42", new Mock<ILogger>().Object));
    }

    private static Mock<HttpRequest> CreateMockRequest(object body)
    {
        var ms = new MemoryStream();
        var sw = new StreamWriter(ms);

        var json = JsonConvert.SerializeObject(body);

        sw.Write(json);
        sw.Flush();

        ms.Position = 0;

        var mockRequest = new Mock<HttpRequest>();
        mockRequest.Setup(x => x.Body).Returns(ms);

        return mockRequest;
    }
}
Side note: In the preceding code, the CreateMockRequest method makes use of .NET streams, if you’re not familiar with streams or want to understand them better, check out my Working with Files and Streams in C# Pluralsight course.
There are also CalculatePortfolioAllocationShould and NaiveInvestementAllocatorShould test classes.
Executing .Net Core Unit Tests in an Azure Pipeline
Recall from earlier in this series that we defined the build using a YAML file.
There are a couple of steps that are related to unit tests.
The first is to execute dotnet test:
- script: dotnet test 'src/InvestFunctionApp/InvestFunctionApp.Tests' --configuration $(buildConfiguration) --logger trx
  displayName: 'Run unit tests'
Notice in the preceding YAML that the test project being executed is “src/InvestFunctionApp/InvestFunctionApp.Tests” and the trx option is being specified to log test results into a Visual Studio Test Results File (TRX) format file.
Once the tests execute, the results need to be made available to the pipeline so we can see/explore the test results in the GUI. To do this the PublishTestResults@2 task can be used:
- task: PublishTestResults@2
  inputs:
    testRunner: VSTest
    testResultsFiles: '**/*.trx'
If the test(s) fail the build will fail and the release pipeline won’t execute and try and deploy a build with failing tests.
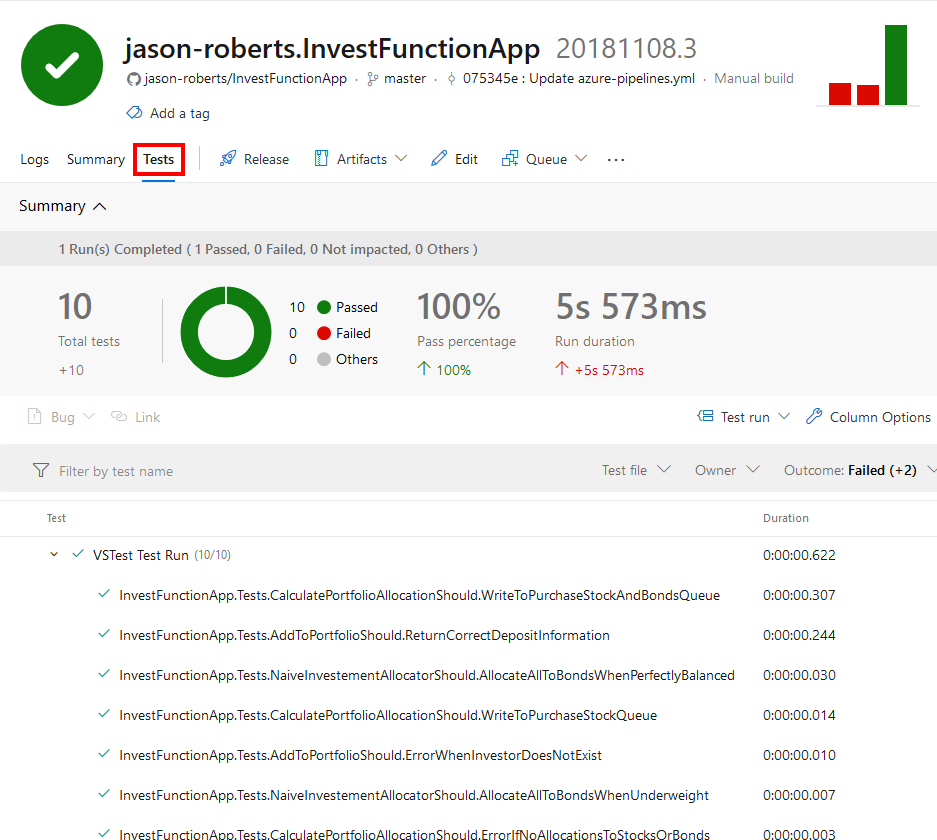
Once a pipeline build job has executed, the test results can be viewed by clicking on the Tests tab for a specific build job as the following screenshot shows:

Note that in this series we’re using xUnit.net as the testing framework and Moq as the mocking library but you could use MSTest or NUnit and a different mocking library if you wish. If you want to learn more about xUnit.net or Moq, check out my Pluralsight courses: Testing .NET Core Code with xUnit.net: Getting Started and Mocking in .NET Core Unit Tests with Moq: Getting Started.
In the next part of this series, now that we have a build pipeline that will run tests and create artifacts, we can create a release pipeline to automatically deploy the app to production if the build succeeds.
If you want to fill in the gaps in your C# knowledge be sure to check out my C# Tips and Traps training course from Pluralsight – get started with a free trial.


SHARE: