Azure Functions Dependency Injection with Autofac

This post refers specifically to Azure Function V2.

If you want to write automated tests for Azure Functions methods and want to be able to control dependencies (e.g. to inject mock versions of things) you can set up dependency injection.

One way to do this is to install the AzureFunctions.Autofac NuGet package into your functions project.

Once installed, this package allows you to inject dependencies into your function methods at runtime.

Step 1: Create DI Mappings

The first step (after package installation) is to create a class that configures the dependencies. As an example suppose there was a function method that needed to make use of an implementation of an IInvestementAllocator. The following class can be added to the functions project:

using Autofac;
using AzureFunctions.Autofac.Configuration;

namespace InvestFunctionApp
{
    public class DIConfig
    {
        public DIConfig(string functionName)
        {
            DependencyInjection.Initialize(builder =>
            {
                builder.RegisterType<NaiveInvestementAllocator>().As<IInvestementAllocator>(); // Naive

            }, functionName);
        }
    }
}

In the preceding code, a constructor is defined that receives the name of the function that’s being injected into. Inside the constructor, types can be registered for dependency injection. In the preceding code the IInvestementAllocator interface is being mapped to the concrete class NaiveInvestementAllocator.

Step 2: Decorate Function Method Parameters

Now the DI registrations have been configured, the registered types can be injected in function methods. To do this the [Inject] attribute is applied to one or more parameters as the following code demonstrates:

[FunctionName("CalculatePortfolioAllocation")]
public static void Run(
    [QueueTrigger("deposit-requests")]DepositRequest depositRequest,
    [Inject] IInvestementAllocator investementAllocator,
    ILogger log)
    {
        log.LogInformation($"C# Queue trigger function processed: {depositRequest}");

        InvestementAllocation r = investementAllocator.Calculate(depositRequest.Amount, depositRequest.Investor);
    }

Notice in the preceding code the [Inject] attribute is applied to the IInvestementAllocator investementAllocator parameter. This IInvestementAllocator is the same interface that was registered earlier in the DIConfig class.

Step 3: Select DI Configuration

The final step to make all this work is to add an attribute to the class that contains the function method (that uses [Inject]). The attribute used is the DependencyInjectionConfig attribute that takes the type containing the DI configuration as a parameter, for example: [DependencyInjectionConfig(typeof(DIConfig))]

The full function code is as follows:

using AzureFunctions.Autofac;
using Microsoft.Azure.WebJobs;
using Microsoft.Extensions.Logging;

namespace InvestFunctionApp
{
    [DependencyInjectionConfig(typeof(DIConfig))]
    public static class CalculatePortfolioAllocation
    {
        [FunctionName("CalculatePortfolioAllocation")]
        public static void Run(
            [QueueTrigger("deposit-requests")]DepositRequest depositRequest,
            [Inject] IInvestementAllocator investementAllocator,
            ILogger log)
        {
            log.LogInformation($"C# Queue trigger function processed: {depositRequest}");

            InvestementAllocation r = investementAllocator.Calculate(depositRequest.Amount, depositRequest.Investor);
        }
    }
}

At runtime, when the CalculatePortfolioAllocation runs, an instance of an NaiveInvestementAllocator will be supplied to the function.

The library also supports features such as named dependencies and multiple DI configurations, to read more check out GitHub.

If you want to fill in the gaps in your C# knowledge be sure to check out my C# Tips and Traps training course from Pluralsight – get started with a free trial.

SHARE:

Getting Started with Azure Event Grid

In a previous article we got an introduction to Azure Event Grid, if you’re new to Event Grid you should check it out first to familiarise yourself with some basic concepts.

In this article we’ll create an Azure Event Grid topic and subscription and see it in action.

First off, if you want to create a free Azure Account you can do so, then log into the Azure portal.

Next go and create a new resource group, Azure Event Grid is currently in preview and only available in selected locations such as West US 2.
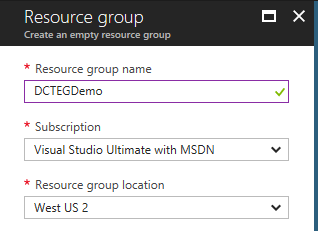
Creating a new resource group

Once the resource group is created, head down to the More services option and search for Event Grid.
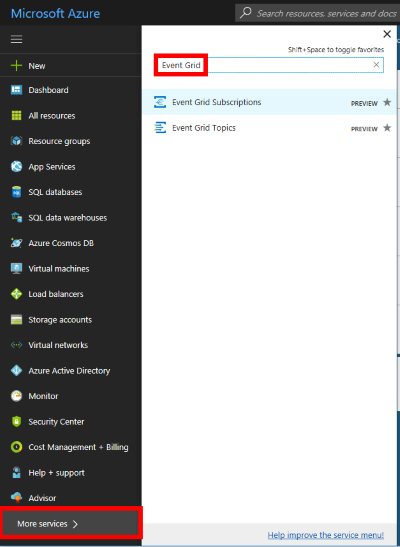
Navigating to Event Grid Topics

There are topics provided by Azure services (such as blob storage ) and there is also the ability to create your own custom topics for custom applications/third parties/etc.

Click Event Grid Topics and this will take you to a list of all your topics. Click the +Add button to begin creation of a custom topic. Give the topic a name sales-leads and choose the resource group created earlier, once again choose West US 2.
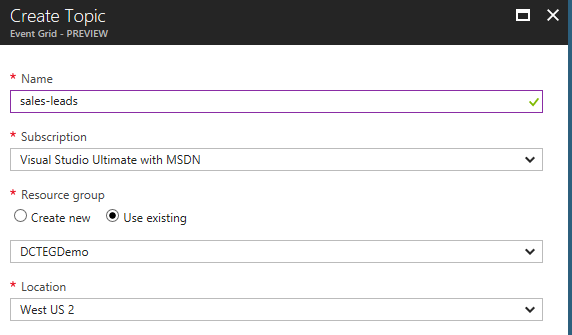
Creating a new Azure Event Grid Topic

Click create, wait for the deployment to complete and hit refresh in the topics list to see your new topic:

Azure Event Grid topic added

Click on the newly added sales-leads topic, notice the overview showing publish metrics:
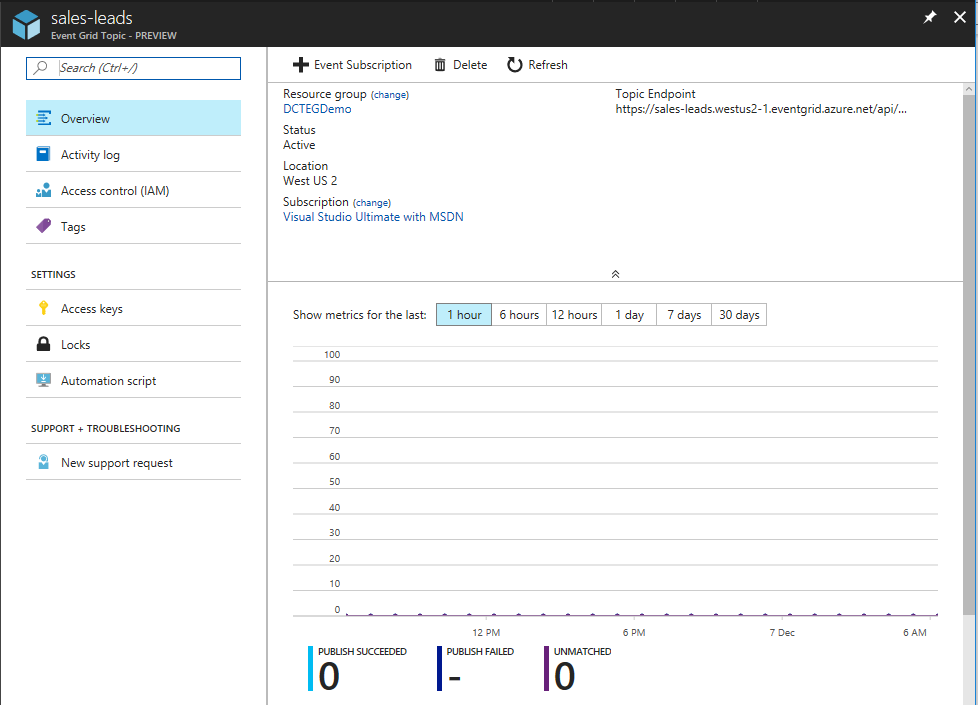
Event Grid Topic details

At the top right hover over the Topic Endpoint and click the button to copy this to the clipboard (we’ll use this later):

Getting Event Grid Topic endpoint

In this example the copied endpoint is: https://sales-leads.westus2-1.eventgrid.azure.net/api/events

We’ll also need an access key to be able to HTTP POST to this custom topic later, to do this click the Access keys option and copy Key 1 for later use:
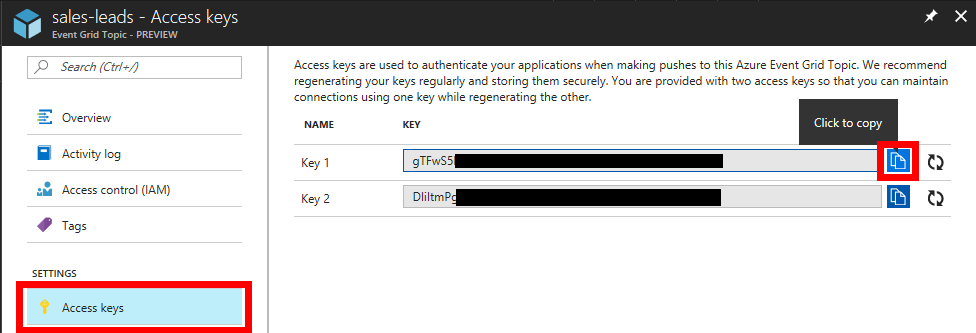
Getting access key for Azure Event Grid topic

Click back on Overview and click the +Event Subscription button:
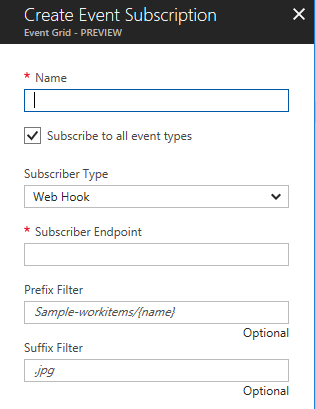
Creating a new Azure Event Grid Subscription

In this example we’ll create a subscription that will call an external (to Azure) service that will mail a conference brochure to all new sales leads. In this example we are simulating a temporary extension to the sales system for a limited period during the run-up to a sales conference. This is one use case for Azure Event Grid that allows extension of a core system without needing to modify it (assuming that events are being emitted).

To simulate this external service we’ll use RequestBin which you can learn more about in this article. Once you’ve created your request bin, take a note of the Bin URL.
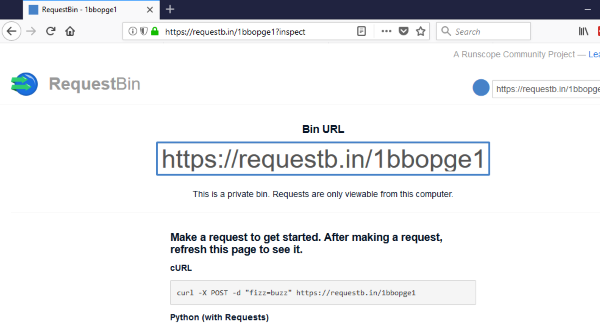
Creating a RequestBin URL

Fill out the new event subscription details:

  • Name: send-upcoming-conference-brochure
  • Subscribe to all event types: Untick
  • Event Types: new-sales-lead-created
  • Subscriber endpoint: https://requestb.in/1bbopge1 (this is the RequestBin URL created above)
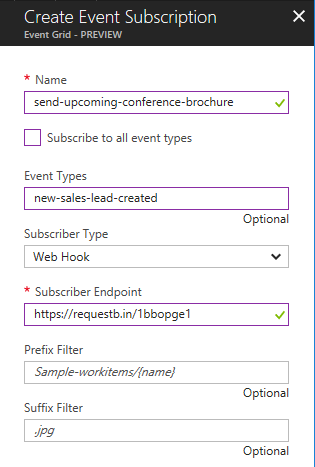
Event subscription details

Click Create.

To recap, there is now a custom topic called sales-leads that we can publish events to at its URL: https://sales-leads.westus2-1.eventgrid.azure.net/api/events. There is also an event subscription set up for this topic but that is limited to only those events published of type new-sales-lead-created. This event subscription uses the Azure Event Grid WebHooks event handler to HTTP push events to the RequestBin URL.

To see this in action, open Postman and select POST and paste the topic URL (https://sales-leads.westus2-1.eventgrid.azure.net/api/events). Add a header called aeg-sas-key and paste in the key that was copied earlier:
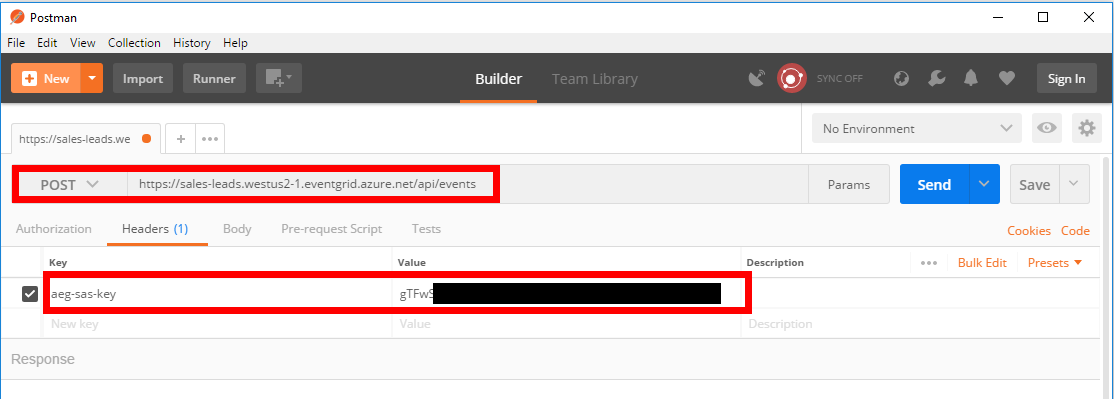
Basic Postman setup

The final thing to do is define the event data that we want to publish:

[
    {
        "id": "42",
        "eventType": "new-sales-lead-created",
        "subject": "myapp/sales/leads",
        "eventTime": "2017-12-07T01:01:36+00:00",
        "data":{
            "firstName": "Jason",
            "postalAddress": "xyz"
        }
    }
]
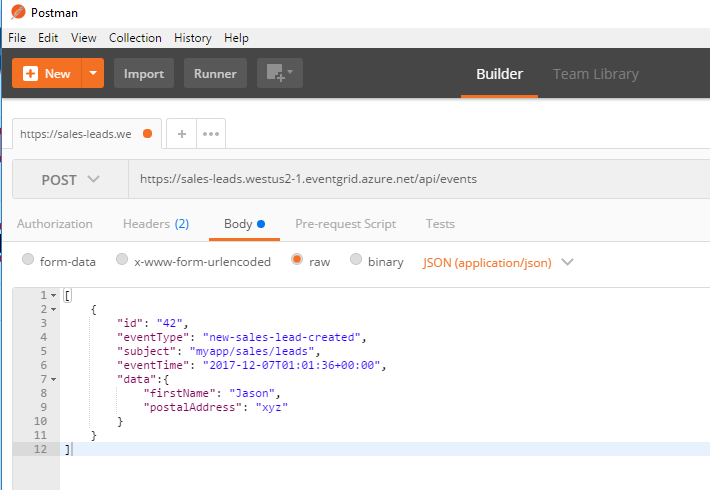
Event JSON data

And then click Send in Postman. You should get a 200 OK response.

Heading back to the RequestBin window and refreshing the page shows the subscription working and the event being pushed to RequestBin:
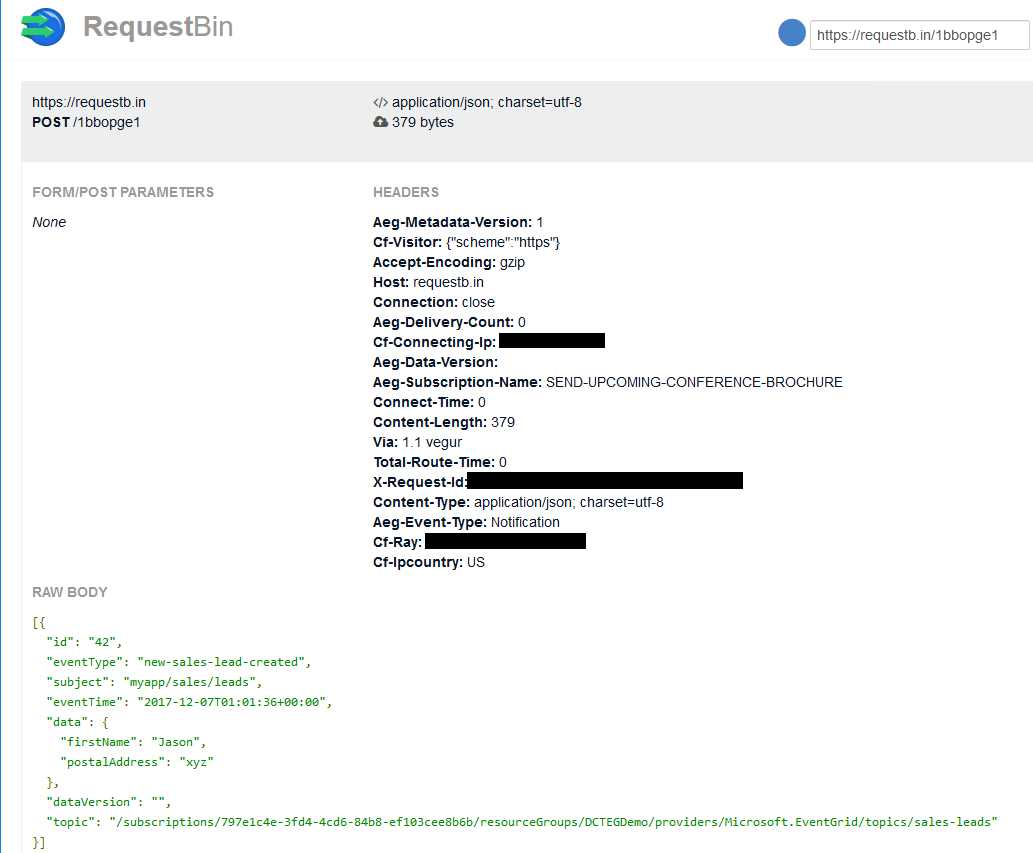
RequestBin receiving Azure Event Grid event

Because the event subscription is filtered on an event type of new-sales-lead-created, if we send a different event type from Postman (e.g.: "eventType": "new-sales-lead-rejected",), the subscription won’t activate nor push the event to RequestBin.

If you want to fill in the gaps in your C# knowledge be sure to check out my C# Tips and Traps training course from Pluralsight – get started with a free trial.

SHARE:

Understanding Azure Event Grid

Azure Event Grid (currently in preview) is a managed publisher-subscriber service that pushes events to registered subscribers.

Azure Event Grid does not replace other services such as Azure Service Bus and it has a different focus. Whereas Azure Service Bus might be employed where you need very high reliability, message ordering etc, Azure Event Grid is more about emitting notifications of things that have happened.

Azure Event Grid uses a push model (with some retry logic built in) to push events to subscribers both inside and outside of Azure.

Messages and Events

One way to differentiate when Azure Event Grid may be more appropriate is to think of the publisher’s expectations. Firstly lets use a very general definition of a message as being a single piece of information that is produced somewhere and is (possibly) consumed somewhere. It this case we’re thinking about messages as individual “datagrams” as opposed to an ongoing/continuous stream of data.

If the sender of the message has an expectation when the message is sent we can think of this as a “message with intent”.

If the sender of the message has no expectation of what happens when the messages is sent we can think of this as a “message with no intent”.

For the sake of this article, we’ll call a “message with intent” a command and a “message with no intent” an event. Commands are messages  instructing the consumer to do something and that maybe return a result to the sender; events are messages  that represent a fact about something that has happened in the system.

Use Case

One use case for Azure Event Grids is to allow easier system extensibility beyond the core business functionality. For example in a sales system new sales leads are captured and stored in a database, this is the core system. This core system could also publish events with no expectation or knowledge about who may be responding to them. An example of an event could be when a new sales lead is added. When the new lead is entered into the core system, a “new-lead” event is published into Azure Event Grid. Now anyone who is interesting in knowing when a new lead has been added can subscribe to this type of event and do something with it.

Azure Event Grid Terminology

An Azure Event Grid event describes what happened in the system represented as JSON data. It contains the custom data specific to the type of event, in addition to information that is contained in all events such as the event source, event time, and a unique event identifier. The full Azure Event Grid event schema is available as part of the docs.

An event source is the place the event happened, for example the sales system, Azure Storage, etc. Event sources publish events. At present the docs list the following supported event sources (with more to be added in the future):

  • Resource group management operations
  • Azure subscriptions management operations
  • Event Hubs
  • Storage Blobs
  • Custom Topics (HTTP POST-able endpoints)

A topic is an arbitrary categorization of events. Once created, topics have endpoints that event sources publish event to. Events of different types can be sent to the same topic, for example a “sales-leads” topic that holds both “new-lead” and “converted-lead” events.

Event subscriptions wire up topics to event handlers. A topic can have 0, 1, or many subscriptions.

An Event Grid event handler is the place where a subscription sends an event to, for example sending the event using the HTTP webhook event handler. At present the docs list the following Azure event handlers (with more to be added in the future):

  • Azure Functions
  • Logic Apps
  • Azure Automation
  • WebHooks
  • Microsoft Flow

An event consumer (while not explicitly stated in the docs) can be thought of as the thing that the event handler pushes the event to. The event consumer receives the pushed event and uses it, for example an Azure Function responding to a “new-lead” event and sending out a conference invitation letter/email.

Costs

The cost of using Azure Event Grid is based on usage at the “operation” level with an “operation” being defined as “all ingress events, advanced match, delivery attempt, and management calls”. At the time of writing the preview cost is USD $0.30 per million operations with 100,000 free operations per month. You can find the latest  pricing here.

To learn more, check out the Azure Event Grid  docs.

If you want to fill in the gaps in your C# knowledge be sure to check out my C# Tips and Traps training course from Pluralsight – get started with a free trial.

SHARE:

Pushing To AppHarbor Using Mercural via Bitbucket

Rather than pushing Git to AppHarbor, you can create a (free) Mercurial repo on Bitbucket, grant read permissions to an AppHarbor user, set up a Bitbucket push to an AppHarbor build URL, then when you push to Bitbucket, AppHarbor will automatically pull your changes, build your app, run unit tests and auto deploy. Phew, long sentence :)

http://support.appharbor.com/kb/api/integrating-with-bitbucket

SHARE: