Screen Scraping As A Service with Azure Functions in 5 Mins

If you have some data in a web page but there is no API to get the same data, it’s possible to use (the often brittle and error prone) technique of screen scraping to read the values out of the HTML.

By leveraging Azure Functions, it’s trivial (depending on how horrendous the HTML is) to create a HTTP Azure Function that loads a web page, parses the HTML, and returns the data as JSON.

The fist step is to create an HTTP-triggered Azure Function:

Creating a new Azure Function with a HTTP Trigger

To help with the parsing, we can use the HTML Agility Pack NuGet package. To add this to the function, create a project.json file and add the NuGet reference:

Using NuGet Packages in Azure Functions

{
  "frameworks": {
    "net46":{
      "dependencies": {
        "HtmlAgilityPack": "1.4.9.5"
      }
    }
   }
}

Once this file is saved, the NuGet package will be installed and a using directive can be added: using HtmlAgilityPack;

Now we can download the required HTML page as a string, in the example below the archive page from Don’t Code Tired, use some LINQ to get the post titles, and return this as the HTTP response. Correctly selecting/parsing the required data from the HTML page is likely to be the most time-consuming part of the function creation.

The full function source code is as follows. Notice that there’s no error checking code to simplify the demo code. Screen scraping should usually be a last resort because of its very nature it can often break if the UI changes or unexpected data exists in the HTML. It also requires the whole page of HTML be downloaded which may raise performance concerns.

using System.Net;
using HtmlAgilityPack;

public static async Task<HttpResponseMessage> Run(HttpRequestMessage req, TraceWriter log)
{
    HttpClient client = new HttpClient();

    string html = await client.GetStringAsync("http://dontcodetired.com/blog/archive");    

    HtmlDocument doc = new HtmlDocument();
    doc.LoadHtml(html); 
    
    var postTitles = doc.DocumentNode
                        .Descendants("td")
                        .Where(x => x.Attributes.Contains("class") && x.Attributes["class"].Value.Contains("title"))
                        .Select(x => x.InnerText);

    return req.CreateResponse(HttpStatusCode.OK, postTitles);
}

We can now call the function via HTTP and get back a list of all Don’t Code Tired article titles as the following Postman screenshot shows:

Using Postman to call Azure Functions

To jump-start your Azure Functions knowledge check out my Azure Function Triggers Quick Start Pluralsight course.

You can start watching with a Pluralsight free trial.

SHARE:

Azure HTTP Function Authorization with Function Keys

When creating an Azure Function triggered via HTTP, one way to authorize use of the function is to configure the HTTP function trigger to require the caller to provide a function key.

Azure Function HTTP Trigger Authorization Modes

With the authorization set to Anonymous, as expected anyone can call it.

When set to Function Authorization, the caller needs to provide the function key either as a URL query string parameter or in a header.

The function key can be found by navigating to Manage tab as the following screenshot shows:

Finding the Azure Function Key

Once Function Authorization is enabled, if the client does not provide it correctly the function will return a 401 Unauthorized.

To supply the function key in the URL, the “code” query string parameter can be used, e.g. “https://myazurecloudfunctions.azurewebsites.net/api/SayHi?code=udXhf3pviSICFMtViW/pqmV/1Q5vLH5aMcRWXfD/q6NXk2VVxRlfYw==”.

Alternatively an “x-functions-key” header can be added containing the key as the following Postman screenshot shows:

Calling Azure Function with Postman and Function Key

To jump-start your Azure Functions knowledge check out my Azure Function Triggers Quick Start Pluralsight course.

You can start watching with a Pluralsight free trial.

SHARE:

Reducing Database Round Trips With Included Documents in Marten

Marten is a .NET document database library that uses an underlying PostgreSQL database to store objects as JSON.

In the  previous article (Enforcing Referential Integrity Between Documents with Marten and PostgreSQL) we saw how we can enable referential integrity between documents and the example showed a Customer document may have many related Order documents.

When creating LINQ queries with Marten, one feature is the idea of included documents. So for example we might want to get a Customer document and all the Order documents for that customer.

We could write some code as follows to get Customer 4001 and a list of their Orders:

// 2 trips to database, 2 queries
using (var session = store.QuerySession())
{
    Customer customer = session.Query<Customer>()
                               .Single(x => x.Id == 4001);

    Console.WriteLine(customer.Name);

    IEnumerable<Order> orders = session.Query<Order>()
                                       .Where(x => x.CustomerId == 4001);

    foreach (var order in orders)
    {
        Console.WriteLine($" Order {order.Id} for {order.Quantity} items");
    }
}

The preceding code however will result in two round trips to the database which may result in a performance problem:

select d.data, d.id, d.mt_version 
from public.mt_doc_customer as d 
where d.id = 4001 LIMIT 2
select d.data, d.id, d.mt_version
from public.mt_doc_order as d 
where d.customer_id = 4001


The .Include() extension method of Marten allows a single round trip to be made to the database that executes a SQL join and returns both the Customer data and Orders.

The following code shows how to accomplish this, notice that we need to declare an “output” variable to hold the “included” customer.

// 1 trip to database, 1 query
using (var session = store.QuerySession())
{                
    Customer customer = null;

    List<Order> orders = 
         session.Query<Order>()
                .Include<Customer>(joinOnOrder => joinOnOrder.CustomerId, includedCustomer => customer = includedCustomer)
                .Where(x => x.CustomerId == 4001)
                .ToList();


    Console.WriteLine(customer.Name);

    foreach (var order in orders)
    {
        Console.WriteLine($" Order {order.Id} for {order.Quantity} items");
    }  
}

The preceding code now only makes a single request to the database with the following SQL:

select d.data, d.id, d.mt_version, customer_id.data, customer_id.id, customer_id.mt_version 
from public.mt_doc_order as d 
INNER JOIN public.mt_doc_customer as customer_id ON d.customer_id = customer_id.id 
where d.customer_id = 4001

To learn more about the document database features of Marten check out my Pluralsight courses: Getting Started with .NET Document Databases Using Marten and Working with Data and Schemas in Marten.

You can start watching with a Pluralsight free trial.

SHARE:

Enforcing Referential Integrity Between Documents with Marten and PostgreSQL

Even though Marten is a library to enable document database storage semantics, because it’s built on top of (the advanced JSON features) of PostgreSQL, and PostgreSQL itself is relational, we can add constraints between document instances just as we would do in relational normalised databases.

For example, the following two simplified classes represent an order that points to a customer document:

class Customer
{
    public int Id { get; set; }
    public string Name { get; set; }
    
    // etc.
}

class Order
{
    public int Id { get; set; }
    public int CustomerId { get; set; }
    public int Quantity { get; set; }
    
    // etc.
}

By default there is no referential integrity enforcing the idea that the CustomerId in the Order class must point to an existing Customer document in the database. This means that the following code succeeds with no errors:

const string connectionString = "host = localhost; database = OrderDb; password = g7qo84nck22i; username = postgres";

var store = DocumentStore.For(connectionString);

using (var session = store.OpenSession())
{
    var order = new Order
    {
        Quantity=42,
        CustomerId = 34567 // non-existent
    };

    session.Store(order);

    session.SaveChanges(); // no error
}

The preceding code will result in an order document being stored with an invalid CustomerId.

Marten can be configured to enforce this by either adding the [ForeignKey(typeof(Customer))] attribute to the CustomerId property or by configuring the document store as the following code shows:

var store = DocumentStore.For(configure =>
{
    configure.Connection(connectionString);
    configure.Schema.For<Order>().ForeignKey<Customer>(x => x.CustomerId);
});

Now running the code again will result in an exception: insert or update on table "mt_doc_order" violates foreign key constraint "mt_doc_order_customer_id_fkey”.

If the code is modified to create a valid customer in the same session, Marten will generate a customer Id that can then be used in the order. When SaveChanges() is called, Marten will save the dependent customer document first and then the order document that points to it. The following code executes successfully:

using (var session = store.OpenSession())
{
    var customer = new Customer {Name = "Sarah"};

    session.Store(customer);
    
    // customer now has an Id auto-generated 

    var order = new Order
    {
        Quantity = 42,
        CustomerId = customer.Id // valid existing customer ID
    };

    session.Store(order);

    session.SaveChanges();
}

To learn more about the document database features of Marten check out my Pluralsight courses: Getting Started with .NET Document Databases Using Marten and Working with Data and Schemas in Marten.

You can start watching with a Pluralsight free trial.

SHARE:

Creating a Tweet Buffer with Azure Queues and Microsoft Flow

There are apps and services that allow the scheduling or buffering of the sending of Tweets. Using the features of Microsoft Flow, it’s possible to create a solution that allows Tweets to be quickly created as simple text files in a OneDrive folder and these will then be buffered to be sent every 15 minutes (or whatever schedule you fancy). The actual buffering mechanism used below is an Azure Queue.

There are two Flows as part of this solution: Flow 1 to pick up text files from OneDrive, extract the content and write a new message to an Azure Queue. Flow 2 runs on a schedule, picks a message off the queue, grabs the message content and sends it a s a Tweet.

Flow 1: Queuing Tweets

The first step is to create an Azure Storage account and create an Azure Queue. The easiest way to create a new queue is to use the Azure Storage Explorer. Once installed and connected, creating a queue is a simple right-click operation:

Using Azure Storage Explorer to create a new Azure Queue

We’ll call the queue “tweet-queue”.

We’ll also create OneDrive folders: OneDrive\FlowDemo\TweetQ\In

Now we can create a new Flow that grabs files from this path and adds them to tweet-queue as the following screenshot shows (notice we're also deleting the file after adding to the queue):

Microsoft Flow reading a file from OneDrive and adding to Azure Queue

Now if we create a .txt file (for example with the content “Testing - this Tweet came from Microsoft Flow via OneDrive and an Azure Queue” in the OneDrive\FlowDemo\TweetQ\In directory, wait for the Flow to run and check out the queue in Storage Explorer we can see a new message as the following screenshot shows:

Azure Storage Explorer showing Azure Queue message content

Now we have a way of queuing Tweets we can create a second flow to send them on a timer.

Flow 2: Sending Tweets

The second Flow will be triggered every 15 minutes, grab a message from the queue, use the message body as the Tweet content, then delete the message from the queue.

The following screenshot shows the first 2 phases:

Getting Azure Queue messages on a timer

Even though we’ve specified 1 message, when we add the next action in the Flow, we’ll automatically get an “Apply to each” added as the following screenshot shows:

Posting Tweet from Azure Queue

Notice in the preceding screenshot that we also need to add an action to delete the message from the queue.

Now once we save this Flow, every 15 minutes a message will be retrieved and posted as a Tweet:

SHARE:

Triggering a Microsoft Flow from an HTTP Post

Microsoft Flow allows the building of workflows in the cloud. One way to trigger a Flow is to set up a HTTP endpoint that can be posted to.

For example, a Flow can be created that takes some JSON data and writes it out to OneDrive or Dropbox.

The first step is to create a new Flow and add a Request trigger. When the Flow is saved, a URL will be generated that can be posted to.

As part of this Request trigger, a JSON schema can be specified that allows individual JSON properties to be surfaced and referenced by name in later actions.

For example the following JSON schema could be specified:

{
  "$schema": "http://json-schema.org/draft-04/schema#",
  "title": "Customer",
  "description": "A generic customer",
  "type": "object",
  "properties": {
    "id": {
      "description": "The unique identifier for a customer",
      "type": "integer"
    },
    "name": {
      "description": "The full name of the customer excluding title",
      "type": "string"
    }
  },
  "required": [
    "id",
    "name"
  ]
}

Now in later steps, the “id” and the “name” properties from the incoming JSON can be used as dynamic content.

Next action(s) can be added that make use of the the data in these properties when an HTTP post occurs. For example we could create a file in OneDrive where the filename is {id}.txt that contains the customer name. This is a simple example but serves to demonstrate the flexibility.

The following screenshot shows the full flow and the JSON schema properties in use:

Microsoft Flow using request trigger and OneDrive

We can now post to the generated URL. For example the following screenshot shows a test post using Postman and the resulting file that was created in OneDrive:

HTTP post to trigger a Microsoft Flow

SHARE:

Serverless Computing and Workflows with Azure Functions and Microsoft Flow

Microsoft Flow is a tool for creating workflows to automate tasks. It’s similar in concept to If This Then That but feels like it exists more towards the end of the spectrum of the business user rather than the end consumer – though both have a number of channels/services in common. Flow has a number of advanced features such as conditions, loops, timers, and delays.

Flow has a number of services including common ones such as Dropbox, OneDrive, Twitter, and Facebook. There are also generic services for calling HTTP services, including those created as Azure Functions. Essentially, services are the building blocks of a Flow.

Screenshot of Microsoft Flow Services

Once the free sign up is complete you can create Flows from existing templates or create your own from scratch.

Screenshot of Microsoft Flow pre-built templates

To create a new custom Flow, the web-based workflow designer can be used.

Integrating a Flow with Azure Functions

In the following example, a Flow will be created that picks up files with a specific naming convention from a OneDrive folder, sends the text content to an Azure Function that simply converts to uppercase and returns the result to the Flow. The Flow then writes out the uppercase version to another OneDrive folder.

Reading Files From OneDrive

The first step in the Flow is to monitor a specific OneDrive folder for new files.

A Flow triggered by new OneDrive files

As an example of conditions, an “if statement” can be added to only process files that contain the word “data”:

Microsoft Flow condition

Now if the filename is correct we can go ahead and call an Azure Function (or other HTTP endpoint).

Calling an Azure Function from Microsoft Flow

Now that we are reading specific files, we want to call an Azure Function to convert the text content of the file to upper case.

The following code and screenshot shows the function that will be called – this code is stripped down and doesn’t contain any error checking/handling code for simplicity:

Azure Function app screenshot

using System.Net;

public static async Task<HttpResponseMessage> Run(HttpRequestMessage req, TraceWriter log)
{
    log.Info($"C# HTTP trigger function processed a request. RequestUri={req.RequestUri}");

    dynamic data = await req.Content.ReadAsAsync<object>();
    
    string text = data.text;

    return  req.CreateResponse(HttpStatusCode.OK, text.ToUpperInvariant());
}

We can test the API in Postman:

Calling Azure Function from Postman

Now that we have a working function we can add a new action of type “HTTP” to the Flow and pass the contents of the OneDrive file as JSON data in the request. The final step is to take the response of calling the Azure Function and writing out to a new file in OneDrive as the following screenshot shows:

Calling Azure Function passing OneDrive file content as JSON data

Now we can create a file “OneDrive\FlowDemo\In\test1data.txt”, the Flow will be trigged, and the output file “OneDrive\FlowDemo\Out\test1data.txt” created.

Output file

Microsoft Flow also has a really nice visual representation of runs (individual executions) of Flows:

Microsoft Flow run visualization

Microsoft Flow by itself enables a whole host of workflow scenarios, and combined with all the power of Azure Functions (and other Azure features) could enable some really interesting uses.

To jump-start your Azure Functions knowledge check out my Azure Function Triggers Quick Start Pluralsight course.

You can start watching with a Pluralsight free trial.

SHARE:

.NET Document Databases with Marten

Document databases are a form of NoSQL database that store items (objects) as single documents rather than potentially splitting the data among multiple relational database tables.

Marten is a .NET library that enables the storing, loading, deleting, and querying of documents. Objects in the application can be stored into the document database and retrieved back as an object from the database. In this approach there is no requirement for the additional “plumbing code” of ORMs.

Marten is not a database itself but rather a library that interacts with the (advanced JSON features) of the open source, cross platform PostgreSQL database.

Once the Marten NuGet package is installed there are a number of steps to storing .NET objects as documents.

First the “document” to be stored is defined. At the most basic level this is a class that has a field or property that represents the document identity as stored in the database. There are a number of ways to define  identity, one of which is to follow the naming convention “Id” as the following class shows:

class Customer
{
    public int Id { get; set; }
    public string Name { get; set; }
    public List<Address> Addresses { get; set; } = new List<Address>();
}

internal class Address
{
    public string Line1 { get; set; }
    public string Line2 { get; set; }
    public string Line3 { get; set; }
}

Notice in the preceding code that the Address class does not have an Id. This is because the address information will be storing in the overall Customer document, rather than for example in a relational database as rows in a separate Address table.

To work with the database a document store instance is required, this can be created with additional configuration or with the simple code shown below:

var connectionString = "host = localhost; database = CustomerDb; password = YOURPASSWORD; username = postgres";

var store = DocumentStore.For(connectionString);

Working with documents happens by way of a session instance, there are a number of types/configurations of sessions available.

To create a new customer object and store it the following code could be used:

// Store document (& auto-generate Id)
using (var session = store.LightweightSession())
{
    var customer =  new Customer
    {
        Name = "Arnold",
        Addresses =
        {
            new Address {Line1="Address 1 Line 1", Line2="Address 1 Line 2",Line3="Address 1 Line 3"},
            new Address {Line1="Address 2 Line 1", Line2="Address 2 Line 2",Line3="Address 2 Line 3"}
        }
    };

    // Add customer to session
    session.Store(customer);

    // Persist changes to the database
    session.SaveChanges();
}

Once the above code executes, the customer will be stored in a PostgreSQL table called “mt_doc_customer”. The Customer object will be serialized to JSON and stored in a special JSONB field in PostgreSQL. The JSON data also contains all the addresses.
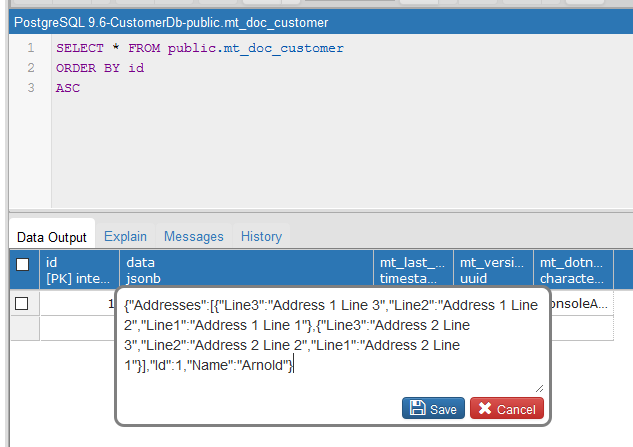
Screenshot of pgAdmin showing Marten table

{
  "Addresses": [
    {
      "Line3": "Address 1 Line 3",
      "Line2": "Address 1 Line 2",
      "Line1": "Address 1 Line 1"
    },
    {
      "Line3": "Address 2 Line 3",
      "Line2": "Address 2 Line 2",
      "Line1": "Address 2 Line 1"
    }
  ],
  "Id": 1,
  "Name": "Arnold"
}

There are a number of ways to retrieve documents and convert them back into .NET objects. One method is to use the Marten LINQ support as the following code shows:

// Retrieve by query
using (var session = store.QuerySession())
{
    var customer = session.Query<Customer>().Single(x => x.Name == "Arnold");
                
    Console.WriteLine(customer.Id);
    Console.WriteLine(customer.Name);
}

When executed, this code displays the retrieved customer details as the following screenshot shows:
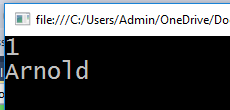
Console application showing Marten document data

To learn more about the document database features of Marten check out my Pluralsight courses: Getting Started with .NET Document Databases Using Marten and Working with Data and Schemas in Marten.

You can start watching with a Pluralsight free trial.

SHARE:

C# 7.0: What’s New Quick Start eBook Early Access

Just as I created the free C# 6.0: What’s New Quick Start eBook, I will be writing a new book for the new C# 7.0 features.

C# 7.0 eBook Cover image

If you would like to be notified when the book is available you can register your interest.

If you want to fill in the gaps in your C# knowledge be sure to check out my C# Tips and Traps training course from Pluralsight – get started with a free trial.

SHARE:

Sending a Regular SMS with Azure Functions and Twilio

Azure Functions allow the creation of Serverless event driven applications with minimal effort. We can create Azure Functions using C# (or other languages) right inside the Azure Web app.

Functions sit inside a function app and each function can be configured to be executed in response to a number of triggers such as a BlobTrigger, EventHubTrigger, etc. One of the triggers is the Timer trigger that can be configured to execute the function on a specified schedule.

To get get started, once you’ve created an Azure account and logged in, head to http://functions.azure.com/ and this will allow a quickstart experience to develop your function (you may be asked to create a new Function App as a container for your functions so go ahead and follow the prompts to do this).

image

Click “Create this function” and you’ll be taken to the editor.

image

In the code section (within the Run method) we can write code that is executed when the function executes.

Clicking on the Integrate tab allows the specification of the schedule in CRON format.

image

To have the function execute every five minutes we would specify: 0 */5 * * * *

A function can have Outputs, one of which is a Twilio output. At the time of writing this is in an early beta/experimental phase and I couldn’t get it to work correctly. However because we can write C#, we can send an SMS by using the Twilio REST API. You need to sign up for a Twilio trial account and this will give you a Twilio AccountSID and an authorisation token.

Click the Develop tab and add the following code (using your Twilio SID and auth token):

using System;
using Twilio;

public static void Run(TimerInfo myTimer, TraceWriter log)
{
    log.Info($"C# Timer trigger function executed at: {DateTime.Now}");    

    string accountSid = "YOUR SID HERE";
    string authToken = "YOUR TOKEN HERE";

    var client = new TwilioRestClient(accountSid, authToken);

        client.SendMessage(
            "+614xxxxxxxx", // Insert your Twilio from SMS number here
            "+614xxxxxxxx", // Insert your verified (trial) to SMS number here
            "hello from Azure Functions!" + DateTime.Now            
        );
}

(+614 is the dialling code for Australian mobiles so you should replace this with whatever makes sense for the Twilio account phone numbers you’ve created.)

Click Save and you’ll get some compilation errors because we haven’t yet added the Twilio NuGet package to be used by our code.

Click the View Files link under the code editing window and add a new file (by clicking the plus icon). Add a file called project.json with the following content:

image

Click Save and in the logs section you should see the package installed:

image

Now every five minutes you’ll get a text message sent!

image

Just remember to disable/delete the function or you will continue to get messages sent. You can do this by clicking on the Manage tab and choosing the appropriate option:

image

SHARE: