Developing Tizen Samsung Galaxy Watch Apps with .NET and C# - Getting Started

This article assumes you have set up the Tizen/Visual Studio development environment as outlined in this previous article.

Installing the Watch Emulator

The first step is to install the relevant emulator so you don’t need a physical Samsung Galaxy Watch. To do this open Visual Studio and click  Tools –> Tizen –> Tizen Emulator Manager

This will bring up the Emulator Manager, click the Create button, then Download new image, check the WEARABLE profile, and click OK. This will open the Package Manager and download the emulator.
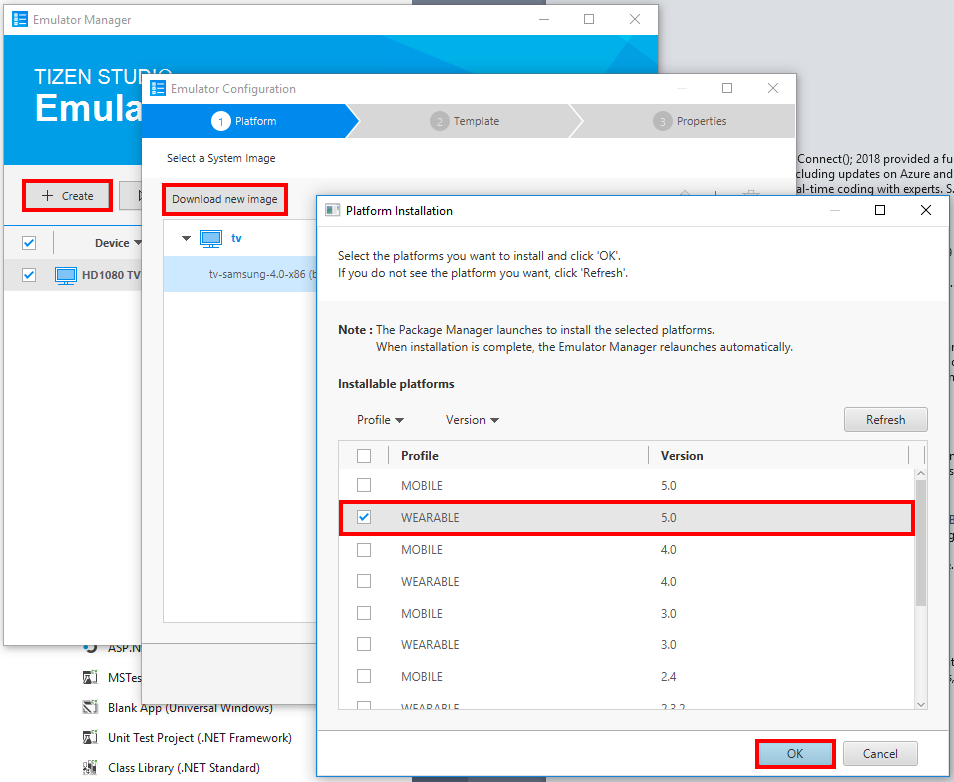
Installing the Tizen Wearable emulator in Visual Studio

Once the installation is complete, if you open the Emulator Manager, select Wearable-circle and click Launch you should see the watch emulator load as shown in the following screenshot:
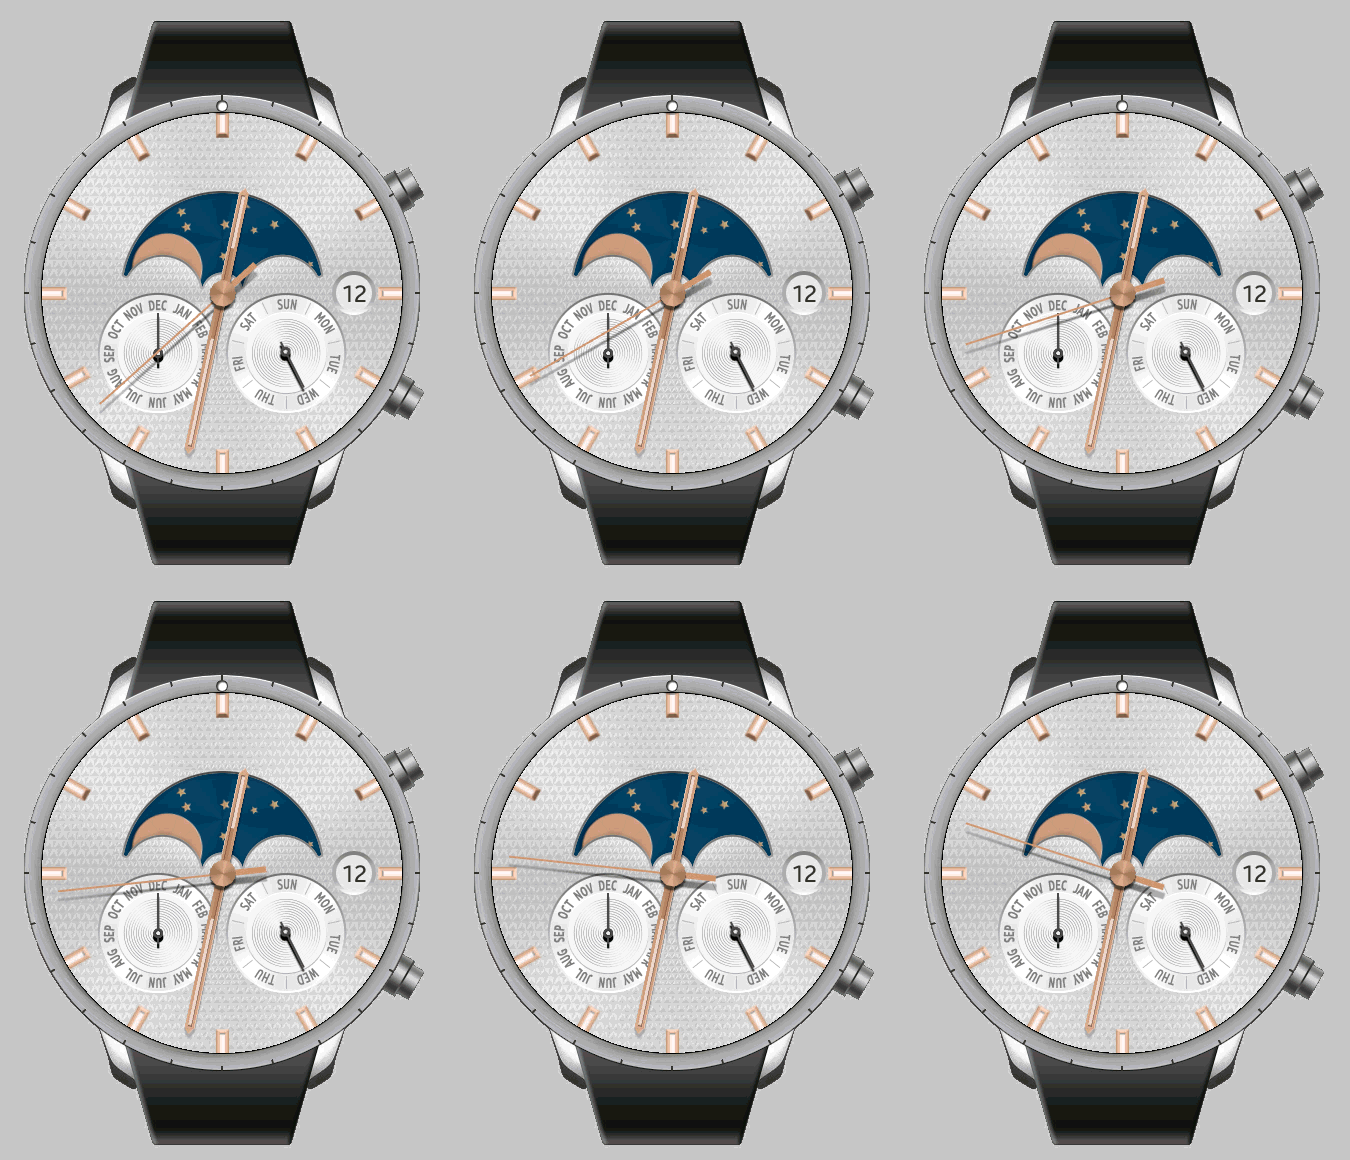
watchemulator

Creating a Watch Project

In Visual Studio, create a new Tizen Wearable Xaml App project  which comes under the Tizen 5.0 section.

Once the project is created and the with the emulator running, click the play button in Visual Studio (this will be something like “W-5.0-circle-x86…” ).

The app will build and be deployed to the emulator – you may have to manually switch back to the emulator if it isn’t brought to the foreground automatically. You should now see the emulator with the text “Welcome to Xamarin.Forms!”.

This text comes from the MainPage.xaml:

<?xml version="1.0" encoding="utf-8" ?>
<c:CirclePage xmlns="http://xamarin.com/schemas/2014/forms"
             xmlns:x="http://schemas.microsoft.com/winfx/2009/xaml"
             xmlns:c="clr-namespace:Tizen.Wearable.CircularUI.Forms;assembly=Tizen.Wearable.CircularUI.Forms"
             x:Class="TizenWearableXamlApp1.MainPage">
  <c:CirclePage.Content>
    <StackLayout>
      <Label Text="Welcome to Xamarin.Forms!"
          VerticalOptions="CenterAndExpand"
          HorizontalOptions="CenterAndExpand" />
    </StackLayout>
  </c:CirclePage.Content>
</c:CirclePage>

Modifying the Basic Template

As a very simple (and quick and dirty, no databinding, MVVM, etc.) example, the MainPage.xaml can be changed to:

<?xml version="1.0" encoding="utf-8" ?>
<c:CirclePage xmlns="http://xamarin.com/schemas/2014/forms"
             xmlns:x="http://schemas.microsoft.com/winfx/2009/xaml"
             xmlns:c="clr-namespace:Tizen.Wearable.CircularUI.Forms;assembly=Tizen.Wearable.CircularUI.Forms"
             x:Class="TizenWearableXamlApp1.MainPage">
    <c:CirclePage.Content>
        <StackLayout HorizontalOptions="CenterAndExpand" VerticalOptions="CenterAndExpand">
            <Label x:Name="HappyValue" Text="5" HorizontalTextAlignment="Center"></Label>
            <Slider x:Name="HappySlider" Maximum="10" Minimum="1" Value="5" ValueChanged="HappySlider_ValueChanged" ></Slider>
            <Button Text="Go" Clicked="Button_Clicked"></Button>
    </StackLayout>
  </c:CirclePage.Content>
</c:CirclePage>

And the code behind MainPage.xaml.cs:

using System;
using System.Collections.Generic;
using System.Linq;
using System.Text;
using System.Threading.Tasks;

using Xamarin.Forms;
using Xamarin.Forms.Xaml;
using Tizen.Wearable.CircularUI.Forms;
using System.Net.Http;

namespace TizenWearableXamlApp1
{
    [XamlCompilation(XamlCompilationOptions.Compile)]
    public partial class MainPage : CirclePage
    {
        private int _happyValue = 5;

        public MainPage()
        {
            InitializeComponent();
        }

        private async void Button_Clicked(object sender, EventArgs e)
        {
            HttpClient client = new HttpClient();

            var content = new StringContent($"{{ \"HappyLevel\" : {_happyValue} }}", Encoding.UTF8, "application/json");

            var url = "https://prod-29.australiasoutheast.logic.azure.com:443/workflows/[REST OF URL REDACTED FOR PRIVACY/SECURITY]";

            var result = await client.PostAsync(url, content);
            
        }

        private void HappySlider_ValueChanged(object sender, ValueChangedEventArgs e)
        {
            _happyValue = (int)Math.Round(HappySlider.Value);

            HappyValue.Text = _happyValue.ToString();
        }
    }
}

The preceding code essentially allows the user to specify how happy they are using a slider, and then hit the Go button. This button makes an HTTP POST to a URL, in this example the URL is a Microsoft Flow HTTP request trigger.

The flow is shown in the following screenshot, it essentially takes the JSON data in the HTTP POST, uses the HappyLevel JSON value and sends a mobile notification to the Flow app on my iPhone.
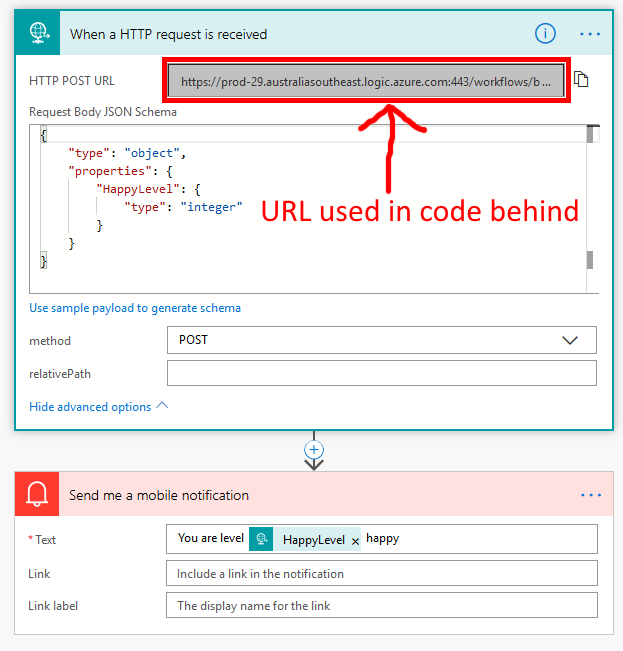
Microsoft Flow triggered from HTTP request

Testing the App

To test the app, run it in Visual Studio:
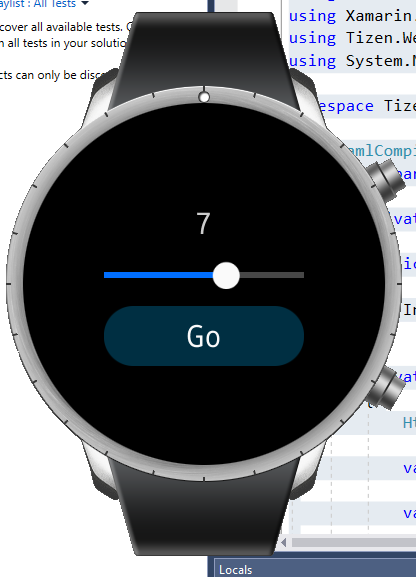
Xamarin Forms app running in Samsung Galaxy Watch emulator

Tapping the Go button will make the HTTP request and initiate the Microsoft Flow, and after a few moments, the notification being sent to the phone:
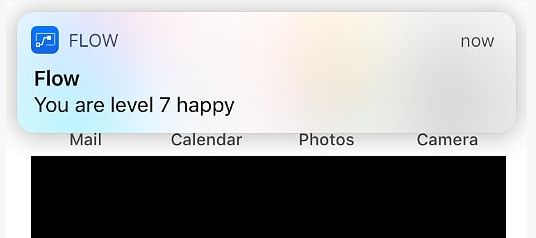
Microsoft Flow notification on iPhone

If you want to fill in the gaps in your C# knowledge be sure to check out my C# Tips and Traps training course from Pluralsight – get started with a free trial.

SHARE:

Using Azure Functions and Microsoft Flow to Send Notifications for NuGet Package Downloads

One of the NuGet packages I maintain is approaching 100,000 downloads. I thought it would be nice to get a notification on my phone when the number of downloads hit 100,000.

To implement this I installed the Flow app on my iPhone, wrote an Azure Function that executes on a timer, and calls into Flow.

Creating a Flow

The first step is to create a new Microsoft Flow that is triggered by a HTTP Post being sent to it.

The flow uses a Request trigger and a URL is auto generated by which the flow can be initiated.

The second step is the Notification action that results in a notification being raised in the Flow app for iOS.

Azure Function calling Microsoft Flow

Creating an Azure Function with Timer Trigger

Now that there is a URL to POST to to create notifications, a timer-triggered Azure Function can be created.

This function screen scrapes the NuGet page (I’m sure there’s a more elegant/less brittle way of doing this) and grabbing the HTML element containing the total downloads. If the total number of downloads >= 100,000 , then the flow URL will be called with a message in the body. The timer schedule runs once per day. I’ll have to manually disable the function once > 100,000 downloads are met.

The function code:

using System.Net;
using HtmlAgilityPack;
using System.Globalization;
using System.Text;

public static async Task Run(TimerInfo myTimer, TraceWriter log)
{       
    try
    {
        string html = new WebClient().DownloadString("https://www.nuget.org/packages/FeatureToggle");

        HtmlDocument doc = new HtmlDocument();
        doc.LoadHtml(html);     
                            
        HtmlNode downloadsNode = doc.DocumentNode
                                    .Descendants("p")
                                    .First(x => x.Attributes.Contains("class") &&  
                                                x.Attributes["class"].Value.Contains("stat-number"));                        

        int totalDownloads = int.Parse(downloadsNode.InnerText, NumberStyles.AllowThousands);
        
        bool thresholdMetOrExceeded = totalDownloads >= 1; // 1 for test purposes, should be 100000

        if (thresholdMetOrExceeded)
        {
            var message = $"FeatureToggle now has {totalDownloads} downloads";

            log.Info(message);

            await SendToFlow(message);            
        }        
    }
    catch (Exception ex)
    {
        log.Info(ex.ToString());
        await SendToFlow($"Error: {ex}");
    }
}

public static async Task SendToFlow(string message)
{
    const string flowUrl = "https://prod-16.australiasoutheast.logic.azure.com:443/workflows/[redacted]/triggers/manual/paths/invoke?api-version=2015-08-01-preview&sp=%2Ftriggers%2Fmanual%2Frun&sv=1.0&sig=[redacted]";

    using (var client = new HttpClient())
    {
        var content = new StringContent(message, Encoding.UTF8, "text/plain");
        
        await client.PostAsync(flowUrl, content);
    }
}

Manually running the function (with test threshold of 1 download) results in the following notification on from the Flow iOS app:

This demonstrates the nice thing about Azure Functions, namely that it’s easy to throw something together to solve a problem.

iOS Flow App Notification

To jump-start your Azure Functions knowledge check out my Azure Function Triggers Quick Start Pluralsight course.

SHARE:

Push Notifications and Buttons with Microsoft Flow: Part 3

In part 1 we crated a Flow to enable/disable the sending of push notifications and in part 2 we created an Azure Function to generate random phrases of positivity.

In this third and final part of this series we’ll go and create the second Flow that sends the push notifications to the phone.

This Flow will be automatically triggered every 15 minutes by using a Recurrence action followed by an action to get the blob content containing whether or not we should send a notification as the following screenshot shows:

Running a Microsoft Flow every 15 minutes

Now that we have the blob content, we can examine it in an If condition. If the content of the blob is “enabled” we can continue the Flow:

If condition in Microsoft Flow

If the condition is satisfied (“IF YES”) two actions are  performed: the first an HTTP GET to the Azure function, the second a push notification action that as content uses what was returned in the body of the HTTP GET. Notice in the HTTP GET, the URI includes the function authorization key as a query string parameter.

flow4

After saving the new Flow, we can head back to the Flow app and hit the button to enable “positivity pushes”:

Microsoft Flow iOS app button

Then every 15 minutes (until we turn them off by hitting the button again) we’ll get a positivity notification on the phone:

iOS push notifications from Microsoft Flow

SHARE:

Push Notifications and Buttons with Microsoft Flow: Part 2

In part 1 we created a Flow to toggle the sending of push notifications on and off by storing the configuration in Azure blob storage.

Now that we have a way of enabling/disabling notifications we can start to build the second Flow.

Before jumping into the Flow designer, we need to consider how to generate random positivity phrases and how to integrate this into the second Flow. One option to do this is to create a simple Azure Function with an HTTP trigger. The Flow can then use an HTTP action to issue a GET to the server that will return the string content to be sent via push notifications.

In the Azure Portal function editor a new function can be created with a HTTP trigger configured to GET only as the following screenshot shows:

Creating an Azure Function with a HTTP trigger

Notice in the preceding screenshot the authorization level has bee set to “function”. This means the key needs to be provided when the function is called.

We can now write some code in the function code editor window as follows:

using System.Net;

public static HttpResponseMessage Run(HttpRequestMessage req, TraceWriter log)
{
    log.Info("C# HTTP trigger function processed a request.");

    string phrase = GeneratePhrase();

    return req.CreateResponse(HttpStatusCode.OK, phrase);
}

public static string  GeneratePhrase()
{
    var phrases = new string[]
    {
        "Don't worry, be happy :)",
        "All is well",
        "Will it matter in 100 years?",
        "Change what you can, don't worry about what you can't"
    };

    var rnd = new Random();
    
    return phrases[rnd.Next(phrases.Length)];
}

Azure Function code editor window

Clicking the Run button will test the function and we can see the random phrases being returned with a 200 status as shown in the following screenshot:

Azure function HTTP test output

In the final part of  this series we’ll go and create the second Flow that uses this function and the configuration value created in the previous article to actually send random positivity push notifications on a 15 minute schedule.

To jump-start your Azure Functions knowledge check out my Azure Function Triggers Quick Start Pluralsight course.

SHARE:

Push Notifications and Buttons with Microsoft Flow: Part 1

Microsoft Flow allows the creation of serverless cloud workflows. It is similar to services such as If This Then That and has more of a business focus. It allows custom Flows to integrate with Azure services such as blob storage, the calling of arbitrary HTTP services, in addition to a whole host of services such as Facebook, Dropbox, OneDrive, etc.

In addition to executing in the cloud, Flows can create push notification to the Flow app on iOS and Android.

Once installed, the Flow app can be used to design/edit Flows, view Flow activity/recent executions, and initiate the execution of flows via “buttons” as shown in the following screenshot.

Microsoft Flow iOS app

Tapping this software button will trigger the Flow in the cloud.

Example Scenario

To see buttons and push notification in action, imagine a scenario where sometimes you want cheering up with regular messages of positivity.

In this scenario, when enabled, you’ll get a push notification on your phone every 15 minutes with a random positive phase such as “Don't worry, be happy :)”.

To accomplish this two separate (but related) Flows can be created. The first Flow uses a button in the phone Flow app to toggle wether the “positivity pushes” will be sent. The second Flow is triggered automatically every 15 minutes and if enabled, sends a push notification.

Creating the Toggle Positivity Push Flow

This Flow will enable/disable the push notifications. To do this, a manual button trigger will be added to the Flow that will be pushed on the phone. To hold the enabled/disabled state, we can use the content of a blob in Azure blob storage. When triggered, the Flow will retrieve the content of the blob which can be the string “enabled” or “disabled”.

Microsoft Flow reading content from blob storage

Once the blob content has been retrieved, its content can be examined in a If condition. If the content of the blob is currently “enabled” it will be updated to “disabled” and vice versa. Finally we’ll send a push notification to confirm the state.

Microsoft Flow examining blob content

Pressing the button in the app a couple of times results in the expected push notifications:

Microsoft Flow sending push notifications to iOS

The blob content also gets toggled as expected:

Blob content being toggled from Microsoft Flow

In part 2 of this series we’ll start the process of creating another Flow to actually send the random positivity phrases to the phone.

SHARE:

Creating a Tweet Buffer with Azure Queues and Microsoft Flow

There are apps and services that allow the scheduling or buffering of the sending of Tweets. Using the features of Microsoft Flow, it’s possible to create a solution that allows Tweets to be quickly created as simple text files in a OneDrive folder and these will then be buffered to be sent every 15 minutes (or whatever schedule you fancy). The actual buffering mechanism used below is an Azure Queue.

There are two Flows as part of this solution: Flow 1 to pick up text files from OneDrive, extract the content and write a new message to an Azure Queue. Flow 2 runs on a schedule, picks a message off the queue, grabs the message content and sends it a s a Tweet.

Flow 1: Queuing Tweets

The first step is to create an Azure Storage account and create an Azure Queue. The easiest way to create a new queue is to use the Azure Storage Explorer. Once installed and connected, creating a queue is a simple right-click operation:

Using Azure Storage Explorer to create a new Azure Queue

We’ll call the queue “tweet-queue”.

We’ll also create OneDrive folders: OneDrive\FlowDemo\TweetQ\In

Now we can create a new Flow that grabs files from this path and adds them to tweet-queue as the following screenshot shows (notice we're also deleting the file after adding to the queue):

Microsoft Flow reading a file from OneDrive and adding to Azure Queue

Now if we create a .txt file (for example with the content “Testing - this Tweet came from Microsoft Flow via OneDrive and an Azure Queue” in the OneDrive\FlowDemo\TweetQ\In directory, wait for the Flow to run and check out the queue in Storage Explorer we can see a new message as the following screenshot shows:

Azure Storage Explorer showing Azure Queue message content

Now we have a way of queuing Tweets we can create a second flow to send them on a timer.

Flow 2: Sending Tweets

The second Flow will be triggered every 15 minutes, grab a message from the queue, use the message body as the Tweet content, then delete the message from the queue.

The following screenshot shows the first 2 phases:

Getting Azure Queue messages on a timer

Even though we’ve specified 1 message, when we add the next action in the Flow, we’ll automatically get an “Apply to each” added as the following screenshot shows:

Posting Tweet from Azure Queue

Notice in the preceding screenshot that we also need to add an action to delete the message from the queue.

Now once we save this Flow, every 15 minutes a message will be retrieved and posted as a Tweet:

SHARE:

Triggering a Microsoft Flow from an HTTP Post

Microsoft Flow allows the building of workflows in the cloud. One way to trigger a Flow is to set up a HTTP endpoint that can be posted to.

For example, a Flow can be created that takes some JSON data and writes it out to OneDrive or Dropbox.

The first step is to create a new Flow and add a Request trigger. When the Flow is saved, a URL will be generated that can be posted to.

As part of this Request trigger, a JSON schema can be specified that allows individual JSON properties to be surfaced and referenced by name in later actions.

For example the following JSON schema could be specified:

{
  "$schema": "http://json-schema.org/draft-04/schema#",
  "title": "Customer",
  "description": "A generic customer",
  "type": "object",
  "properties": {
    "id": {
      "description": "The unique identifier for a customer",
      "type": "integer"
    },
    "name": {
      "description": "The full name of the customer excluding title",
      "type": "string"
    }
  },
  "required": [
    "id",
    "name"
  ]
}

Now in later steps, the “id” and the “name” properties from the incoming JSON can be used as dynamic content.

Next action(s) can be added that make use of the the data in these properties when an HTTP post occurs. For example we could create a file in OneDrive where the filename is {id}.txt that contains the customer name. This is a simple example but serves to demonstrate the flexibility.

The following screenshot shows the full flow and the JSON schema properties in use:

Microsoft Flow using request trigger and OneDrive

We can now post to the generated URL. For example the following screenshot shows a test post using Postman and the resulting file that was created in OneDrive:

HTTP post to trigger a Microsoft Flow

SHARE:

Serverless Computing and Workflows with Azure Functions and Microsoft Flow

Microsoft Flow is a tool for creating workflows to automate tasks. It’s similar in concept to If This Then That but feels like it exists more towards the end of the spectrum of the business user rather than the end consumer – though both have a number of channels/services in common. Flow has a number of advanced features such as conditions, loops, timers, and delays.

Flow has a number of services including common ones such as Dropbox, OneDrive, Twitter, and Facebook. There are also generic services for calling HTTP services, including those created as Azure Functions. Essentially, services are the building blocks of a Flow.

Screenshot of Microsoft Flow Services

Once the free sign up is complete you can create Flows from existing templates or create your own from scratch.

Screenshot of Microsoft Flow pre-built templates

To create a new custom Flow, the web-based workflow designer can be used.

Integrating a Flow with Azure Functions

In the following example, a Flow will be created that picks up files with a specific naming convention from a OneDrive folder, sends the text content to an Azure Function that simply converts to uppercase and returns the result to the Flow. The Flow then writes out the uppercase version to another OneDrive folder.

Reading Files From OneDrive

The first step in the Flow is to monitor a specific OneDrive folder for new files.

A Flow triggered by new OneDrive files

As an example of conditions, an “if statement” can be added to only process files that contain the word “data”:

Microsoft Flow condition

Now if the filename is correct we can go ahead and call an Azure Function (or other HTTP endpoint).

Calling an Azure Function from Microsoft Flow

Now that we are reading specific files, we want to call an Azure Function to convert the text content of the file to upper case.

The following code and screenshot shows the function that will be called – this code is stripped down and doesn’t contain any error checking/handling code for simplicity:

Azure Function app screenshot

using System.Net;

public static async Task<HttpResponseMessage> Run(HttpRequestMessage req, TraceWriter log)
{
    log.Info($"C# HTTP trigger function processed a request. RequestUri={req.RequestUri}");

    dynamic data = await req.Content.ReadAsAsync<object>();
    
    string text = data.text;

    return  req.CreateResponse(HttpStatusCode.OK, text.ToUpperInvariant());
}

We can test the API in Postman:

Calling Azure Function from Postman

Now that we have a working function we can add a new action of type “HTTP” to the Flow and pass the contents of the OneDrive file as JSON data in the request. The final step is to take the response of calling the Azure Function and writing out to a new file in OneDrive as the following screenshot shows:

Calling Azure Function passing OneDrive file content as JSON data

Now we can create a file “OneDrive\FlowDemo\In\test1data.txt”, the Flow will be trigged, and the output file “OneDrive\FlowDemo\Out\test1data.txt” created.

Output file

Microsoft Flow also has a really nice visual representation of runs (individual executions) of Flows:

Microsoft Flow run visualization

Microsoft Flow by itself enables a whole host of workflow scenarios, and combined with all the power of Azure Functions (and other Azure features) could enable some really interesting uses.

To jump-start your Azure Functions knowledge check out my Azure Function Triggers Quick Start Pluralsight course.

You can start watching with a Pluralsight free trial.

SHARE: