New Free C# 7.1: What's New Quick Start eBook

My new free eBook “C# 7.0: What’s New Quick Start” is now complete and available for download.

C# 7.0: What’s New Quick Start Cover Page

The book has the following chapters:

  • Enabling C# 7.1 Features
  • Asynchronous Main Methods
  • Tuple Name Inference
  • Target-typed “default” Literal
  • Better Pattern-matching with Generics

You can download now for free or pay whatever you can.

If you want to fill in the gaps in your C# knowledge be sure to check out my C# Tips and Traps training course from Pluralsight – get started with a free trial.

SHARE:

Getting Started Testing .NET Core Code with xUnit.net

xUnit.net is a testing framework that can be used to write automated tests for .NET (full) framework and also .NET Core.

To get started, first create a .NET Core application, in the following example a .NET Core console app.

Creating a .NET core console project

A testing project can now be added to the solution:

Adding an xUnit test project in Visual Studio 2017

This test project will come pre-configured with the relevant NuGet packages installed to start writing test code, though you may want to update the pre-configured packages to the newest NuGet versions.

The xUnit Test Project template will also create the following default test class:

using System;
using Xunit;

namespace ConsoleCalculator.Tests
{
    public class UnitTest1
    {
        [Fact]
        public void Test1()
        {

        }
    }
}

Notice in the preceding code, the Test1 method is decorated with the [Fact] attribute. This is an xUnit.net attribute that tells a test runner that it should execute the method, treat it as a test, and report on if the test passed or not.

Next add a project reference from the test project to the project that contains the code that is to be tested, this gives the test project access to the production code.

In the production project, the following class can be added:

namespace ConsoleCalculator
{
    public class Calculator
    {
        public int Add(int a, int b)
        {            
            return a + b;
        }
    }
}

Now the test class can be renamed (for example to “CalculatorTests”) and the test method changed to create a test:

using Xunit;

namespace ConsoleCalculator.Tests
{
    public class CalculatorTests
    {
        [Fact]
        public void ShouldAddTwoNumbers()
        {
            Calculator calculator = new Calculator();

            int result = calculator.Add(7, 3);

            Assert.Equal(10, result);
        }
    }
}

In the preceding code, once again the [Fact] attribute is being used, then the thing being tested is created (the Calculator class instance). The next step is to perform some kind of action on the thing being tested, in this example calling the Add method. The final step is to signal to the test runner if the test has passed or not, this is done by using one of the many xUnit.net Assert methods; in the preceding code the Assert.Equal method is being used. The first parameter is the expected value of 10, the second parameter is the actual value produced by the code being tested. So if  result is 10 the test will pass, otherwise it will fail.

One way to execute tests is to use Visual Studio’s Test Explorer which can be found under the Test –> Windows –> Test Explorer menu item. Once the test project is built, the test will show up and can be executed as the following screenshot shows:

Running xUnit tests in Visual Studio Test Explorer

To learn more about how to get started testing code with xUnit.net check out my Pluralsight course

You can start watching with a Pluralsight free trial.

SHARE:

Using PostgreSQL Document Databases with Azure Functions and Marten

With the appearance of managed PostgreSQL databases on Azure, we can now harness the simplicity of Marten to create document databases that Azure Functions can utilize.

Marten is on open source library headed by Jeremy Miller and offers simple document database style persistence for .NET apps which means it can also be used from Azure Functions.

Creating a PostgreSQL Azure Server

Log in to the Azure Portal and create a new “Azure Database for PostgreSQL”:

Creating a PostgreSQL Azure Server

You can follow these detailed steps to create and setup the PostgreSQL instance. Be sure to follow the firewall instructions to be able to connect to the database from an external source.

Creating a PostgreSQL Azure Server

Connecting and Creating a Database Using pgAdmin

pgAdmin is a tool for working with PostgreSQL database. Once installed, a new connection can be added to the Azure database server (you’ll need to provide the server, username, and password).

Connecting and Creating a Database Using pgAdmin

Once connected, right-click the newly added Azure server instance and choose Create –> Database. In this example a “quotes” database was added:

Connecting and Creating a Database Using pgAdmin

Notice in the preceding screenshot there are currently no tables in the database.

Reading and Writing to an Azure PostgreSQL Database from an Azure Function

Now we have a database, we can access it from an Azure Function using Marten.

First create a new Azure Functions project in Visual Studio 2017, reference Marten, and add a new POCO class called Quote:

public class Quote
{
    public int Id { get; set; }
    public string Text { get; set; }
}

Next add a new HTTP-triggered function called QuotesPost that will allow new quotes to be added to the database:

using System.Net;
using System.Net.Http;
using System.Threading.Tasks;
using Marten;
using Microsoft.Azure.WebJobs;
using Microsoft.Azure.WebJobs.Extensions.Http;
using Microsoft.Azure.WebJobs.Host;

namespace MartenAzureDocDbDemo
{
    public static class QuotesPost
    {
        [FunctionName("QuotesPost")]
        public static async Task<HttpResponseMessage> Run(
            [HttpTrigger(AuthorizationLevel.Anonymous, "post", Route = "quotes")]HttpRequestMessage req, 
            TraceWriter log)
        {
            log.Info("C# HTTP trigger function processed a request.");

            Quote quote = await req.Content.ReadAsAsync<Quote>();

            using (var store = DocumentStore
                .For("host=dctquotesdemo.postgres.database.azure.com;database=quotes;password=3ncei*3!@)nco39zn;username=dctdemoadmin@dctquotesdemo"))
            {
                using (var session = store.LightweightSession())
                {
                    session.Store(quote);

                    session.SaveChanges();
                }
            }

            return req.CreateResponse(HttpStatusCode.OK, $"Added new quote with ID={quote.Id}");
        }
    }
}

Next add another new function called QuotesGet that will read quote data:

using System.Net;
using System.Net.Http;
using Marten;
using Microsoft.Azure.WebJobs;
using Microsoft.Azure.WebJobs.Extensions.Http;
using Microsoft.Azure.WebJobs.Host;

namespace MartenAzureDocDbDemo
{
    public static class QuotesGet
    {
        [FunctionName("QuotesGet")]
        public static HttpResponseMessage Run(
            [HttpTrigger(AuthorizationLevel.Anonymous, "get", Route = "quotes/{id}")]HttpRequestMessage req, 
            int id, 
            TraceWriter log)
        {
            log.Info("C# HTTP trigger function processed a request.");

            using (var store = DocumentStore
                .For("host=dctquotesdemo.postgres.database.azure.com;database=quotes;password=3ncei*3!@)nco39zn;username=dctdemoadmin@dctquotesdemo"))
            {
                using (var session = store.QuerySession())
                {
                    Quote quote = session.Load<Quote>(id);
                    return req.CreateResponse(HttpStatusCode.OK, quote);
                }
            }                        
        }
    }
}

Testing the Azure Functions Locally

Hit F5 in Visual Studio to start the local functions runtime, and notice the info messages, e.g.

Http Function QuotesGet: http://localhost:7071/api/quotes/{id}
Http Function QuotesPost: http://localhost:7071/api/quotes

We can now use a tool like Postman to hit these endpoints.

We can POST to “http://localhost:7071/api/quotes” the JSON: { "Text" : "Be yourself; everyone else is already taken." } and get back the response “"Added new quote with ID=3001"”.

If we use pgAdmin, we can see the mt_doc_quote table has been created by Marten and the new quote added with the id of 3001.

Querying Azure PostgreSQL with pgAdmin


Doing a GET to “http://localhost:7071/api/quotes/3001” returns the quote data:

{
    "Id": 3001,
    "Text": "Be yourself; everyone else is already taken."
}

Pricing details are available here.

To learn more about Marten, check out the docs or my Pluralsight courses Getting Started with .NET Document Databases Using Marten and Working with Data and Schemas in Marten.

To learn more about Azure Functions check out the docs, my other posts or my Pluralsight course Azure Function Triggers Quick Start .

You can start watching with a Pluralsight free trial.

SHARE:

Creating Precompiled Azure Functions with Visual Studio 2017

As the Azure Functions story continues to unfold, the latest facility is the ease of creation of precompiled functions. Visual Studio 2017 Update 3 (v15.3) brings the release of functionality to create function code in C# using all the familiar tools and abilities of Visual Studio development (you can also use the Azure Functions CLI).

Precompiled functions allow familiar techniques to be used such as separating shared business logic/entities into separate class libraries and creating unit tests. They also offer some cold start performance benefits.

To create your first precompiled Azure Function, first off install Visual Studio 2017 Update 3 (and enable the "Azure development tools" workload during installation) and once installed also ensure the Azure Functions and Web Jobs Tools Visual Studio extension is installed/updated.
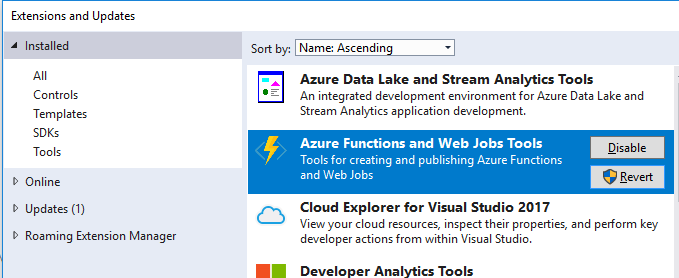
Azure Functions and Web Jobs Tools Visual Studio 2017 extension

After you’ve created an Azure account (free trials may be available), open Visual Studio and create a new Azure Functions project (under the Cloud section):
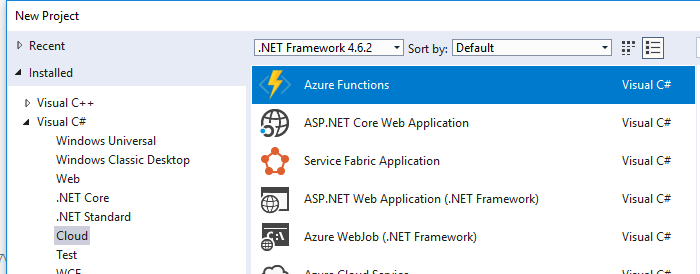
Creating a new Azure Functions project in Visual Studio

This will create a new project with a .gitignore, a host.json, and a local.settings.json file.

To add a new function, right click the project, choose add –> new item. Then select Azure Function:

Adding a new function to and Azure Function app

The name of the .cs file can be anything, the actual name of the function in Azure is not tied to the class file name.

Next the type of function (trigger) can be selected, such as a function triggered by an HTTP request:
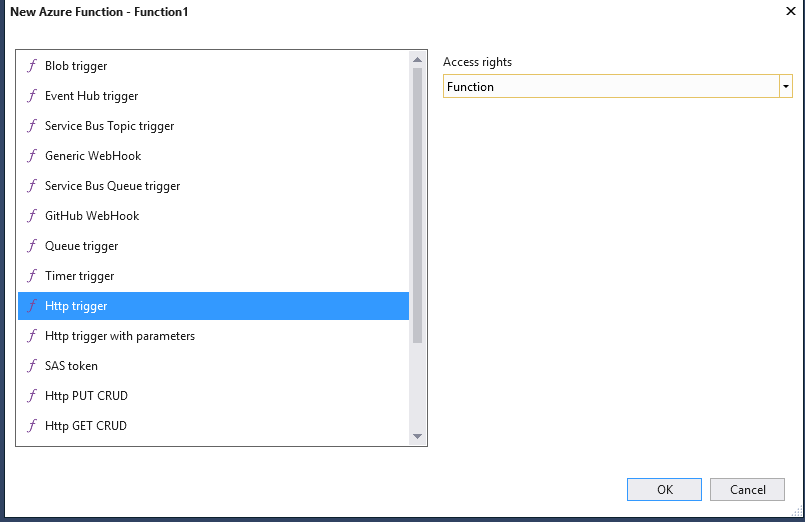
Choosing a function trigger type

Adding this will create the following code (note the name of the function has been changed in the [FunctionName] attribute):

namespace MirrorMirrorOnTheWall
{
    public static class Function1
    {
        [FunctionName("WhosTheFairestOfThemAll")]
        public static async Task<HttpResponseMessage> Run(
            [HttpTrigger(AuthorizationLevel.Function, "get", "post", Route = null)]HttpRequestMessage req, 
            TraceWriter log)
        {
            log.Info("C# HTTP trigger function processed a request.");

            // parse query parameter
            string name = req.GetQueryNameValuePairs()
                .FirstOrDefault(q => string.Compare(q.Key, "name", true) == 0)
                .Value;

            // Get request body
            dynamic data = await req.Content.ReadAsAsync<object>();

            // Set name to query string or body data
            name = name ?? data?.name;

            return name == null
                ? req.CreateResponse(HttpStatusCode.BadRequest, "Please pass a name on the query string or in the request body")
                : req.CreateResponse(HttpStatusCode.OK, "Hello " + name);
        }
    }
}

We can simplify this code to:

namespace MirrorMirrorOnTheWall
{
    public static class Function1
    {
        [FunctionName("WhosTheFairestOfThemAll")]
        public static HttpResponseMessage Run(
            [HttpTrigger(AuthorizationLevel.Function, "get", "post", Route = null)]HttpRequestMessage req, 
            TraceWriter log)
        {
            log.Info("C# HTTP trigger function processed a request.");

            return req.CreateResponse(HttpStatusCode.OK, "You are.");
        }
    }
}

Hitting F5 in Visual Studio will launch the local Azure Functions environment and host the newly created function:
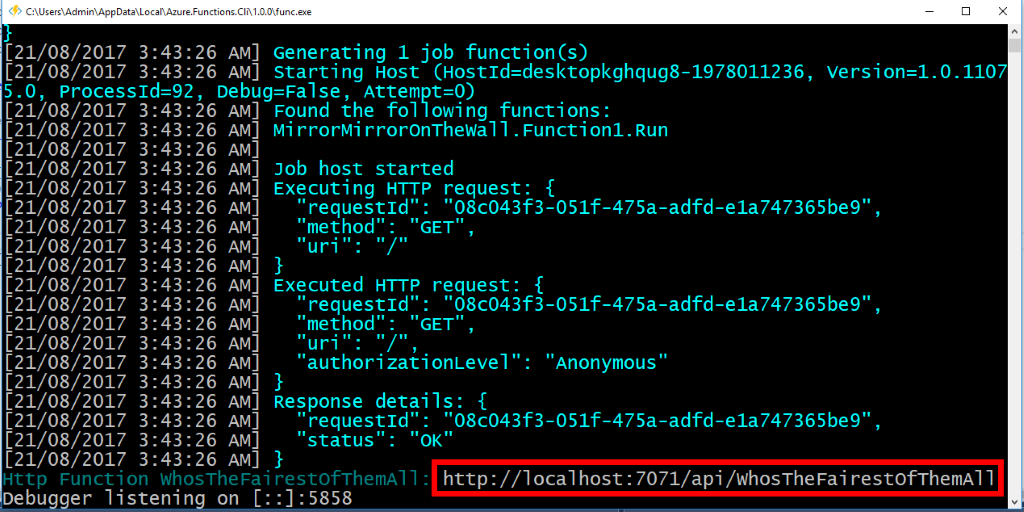
Local Azure Functions runtime environment

Note in the preceding screenshot, the “WhosTheFairestOfThemAll” function is loaded and is listening on “http://localhost:7071/api/WhosTheFairestOfThemAll”. If we hit that URL, we get back “You are.”.

Publishing to Azure

Right click the project in Visual Studio and choose publish, this will start the publish wizard:
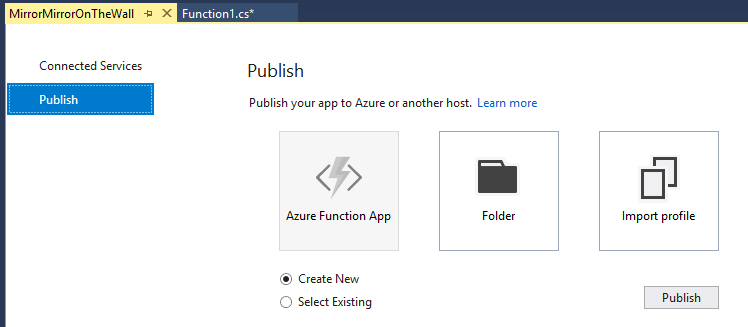
Publish Wizard

Choose to create a new Function App and follow the prompts, you need to select your Azure Account at the top right and choose an App Name (in this case “mirrormirroronthewall”). You also need to choose existing items or create new ones for Resource Groups, etc.
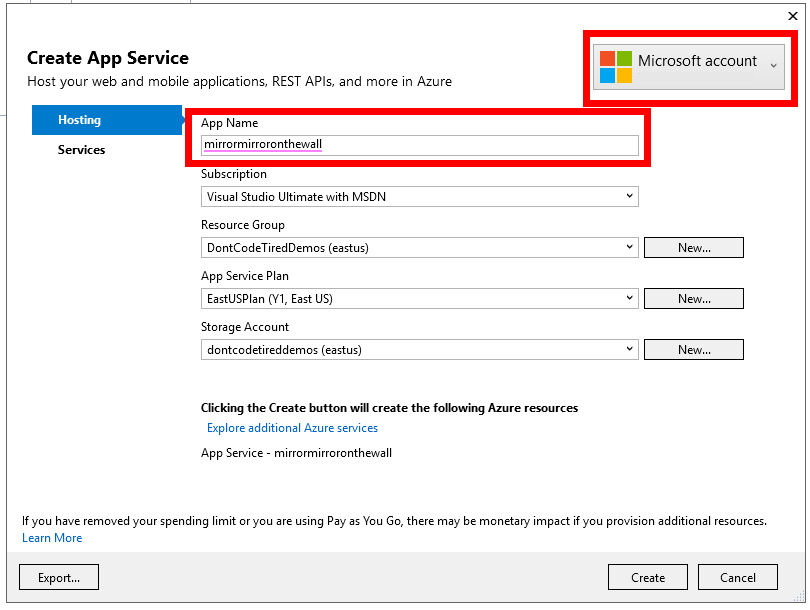
App Service settings for Azure Function app

Click create and the deployment will start.

Once deployed, the function is now listening in the cloud at “https://mirrormirroronthewall.azurewebsites.net/api/WhosTheFairestOfThemAll”.

Because earlier we specified an Access Rights setting of Function, a key needs to be provided to be able to invoke the function. This key can be found in the Azure portal for the newly created function app:
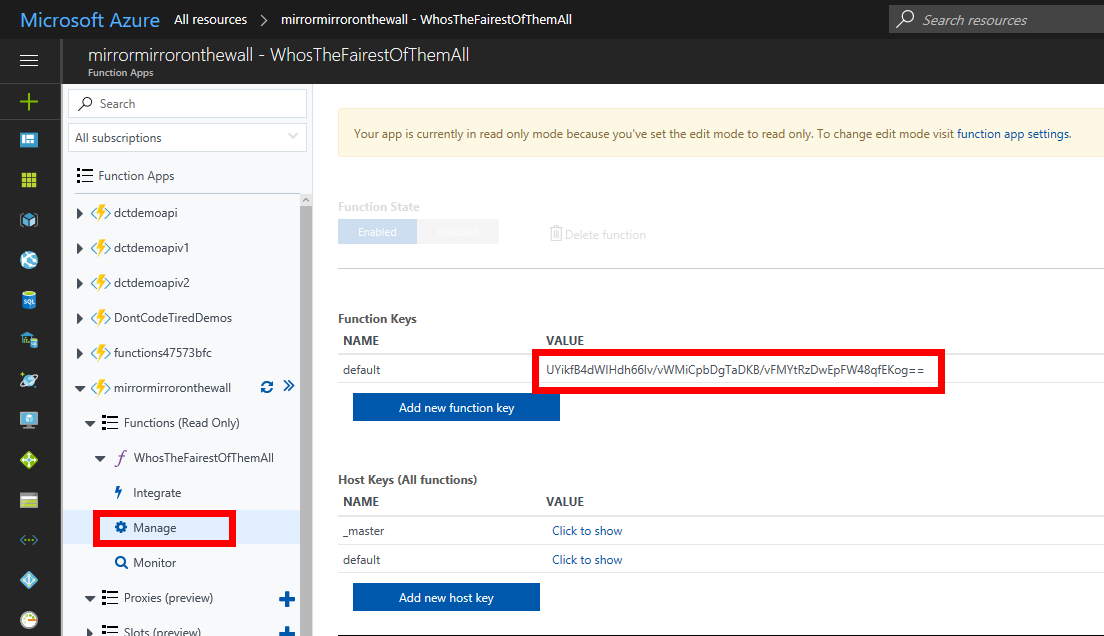
Getting an Azure Function key

Now we can add the key as a querystring parameter to get: “https://mirrormirroronthewall.azurewebsites.net/api/WhosTheFairestOfThemAll?code=UYikfB4dWIHdh66Iv/vWMiCpbDgTaDKB/vFMYtRzDwEpFW48qfEKog==”. Hitting up this URL now returns the result “You are.” as it did in the local environment.

To learn how to create precompiled Azure Functions in Visual Studio, check out my Writing and Testing Precompiled Azure Functions in Visual Studio 2017 Pluralsight course.

You can start watching with a Pluralsight free trial.

SHARE:

Using C# 7.1 Features

With the release of Visual Studio 2017 update 3, the new C# 7.1 features became available.

To use the new features, the .csproj file can be modified and the <LangVersion> element set to either “latest” (the newest release including minor releases) or explicitly to “7.1” , for example:

<LangVersion>latest</LangVersion>

or

<LangVersion>7.1</LangVersion>

To select one of these in Visual Studio,  go to the project properties and the build tab and choose the “Advanced…” button as the following screenshot shows:

Visual Studio 2017 Screenshot showing C# 7.1 enabled

Now the new features of C# 7.1 including  asynchronous main methods are available.

C# 7.1 Async Main Methods

With C# 7.0, in a console app the entry point could not be marked async requiring some workarounds/boilerplate code, for example:

class Program
{
    static void Main(string[] args)
    {
       MainAsync().GetAwaiter().GetResult();
    }

    private static async Task MainAsync()
    {
        using (StreamWriter writer = File.CreateText(@"c:\temp\anewfile.txt"))
        {
            await writer.WriteLineAsync("Hello");
        }
    }
}

With C# 7.1, the main method can be async, as the following code shows:

class Program
{
    static async Task Main(string[] args)
    {
        using (StreamWriter writer = File.CreateText(@"c:\temp\anewfile.txt"))
        {
            await writer.WriteLineAsync("Hello");
        }
    }
}

You can check out the C#7.1 features on GitHub such as:

If you want to fill in the gaps in your C# knowledge be sure to check out my C# Tips and Traps training course from Pluralsight – get started with a free trial.

SHARE:

Architecting Azure Functions: Function Timeouts and Work Fan-Out with Queues

When moving to Azure Functions or other FaaS offerings it’s possible to fall into the trap of “desktop development’ thinking, whereby a function is implemented as if it were a piece of desktop code. This may negate the benefits of Azure Functions and may even cause function failures because of timeouts. An Azure Function can execute for 5 minutes before being shut down by the runtime when running under a Consumption Plan. This limit can be configured to be longer in the host.json (currently to a mx of 10 minutes). You could also investigate something like Azure Batch.

Non Fan-Out Example

Azure functions flow

In this initial attempt, a blob-triggered function is created that receives a blob containing a data file. Each line has some processing performed on it (simulated in the following code) and then writes multiple output blobs, one for each processed line.

using System.Threading;
using System.Diagnostics;

public static void Run(TextReader myBlob, string name, Binder outputBinder, TraceWriter log)
{
    var executionTimer = Stopwatch.StartNew();

    log.Info($"C# Blob trigger function Processed blob\n Name:{name}");

    string dataLine;
    while ((dataLine = myBlob.ReadLine()) != null)
    {
        log.Info($"Processing line: {dataLine}");
        string processedDataLine = ProcessDataLine(dataLine);
        
        string path = $"batch-data-out/{Guid.NewGuid()}";
        using (var writer = outputBinder.Bind<TextWriter>(new BlobAttribute(path)))
        {
            log.Info($"Writing output line: {dataLine}");
            writer.Write(processedDataLine);
        }
    }

    executionTimer.Stop();

    log.Info($"Procesing time: {executionTimer.Elapsed}");
     
}

private static string ProcessDataLine(string dataLine)
{
    // Simulate expensive processing
    Thread.Sleep(1000);

    return dataLine;
}

Uploading a normal sized input data file may not result in any errors, but if a larger file is attempted then you may get a function timeout:

Microsoft.Azure.WebJobs.Host: Timeout value of 00:05:00 was exceeded by function: Functions.ProcessBatchDataFile.

Fan-Out Example

Embracing Azure Functions more, the following pattern can be used, whereby there is no processing in the initial function. Instead the function just divides up each line of the file and puts it on a storage queue. Another function is triggered from these queue messages and does the actual processing. This means that as the number of messages in the queue grows, multiple instances of the queue-triggered function will be created to handle the load.

Azure functions fan-out flow

public async static Task Run(TextReader myBlob, string name, IAsyncCollector<string> outputQueue, TraceWriter log)
{
    log.Info($"C# Blob trigger function Processed blob\n Name:{name}");

    string dataLine;
    while ((dataLine = myBlob.ReadLine()) != null)
    {
        log.Info($"Processing line: {dataLine}");
               
        await outputQueue.AddAsync(dataLine);
    }
}

And the queue-triggered function that does the actual work:

using System;
using System.Threading; 

public static void Run(string dataLine, out string outputBlob, TraceWriter log)
{
    log.Info($"Processing data line: {dataLine}");

    string processedDataLine = ProcessDataLine(dataLine);

    log.Info($"Writing processed line to blob: {processedDataLine}");
    outputBlob = processedDataLine;
}


private static string ProcessDataLine(string dataLine)
{
    // Simulate expensive processing
    Thread.Sleep(1000);

    return dataLine;
}

When architecting processing this way there are other limits which may also cause problems such as (but not limited to) queue scalability limits.

To learn more about Azure Functions, check out my Pluralsight courses: Azure Function Triggers Quick Start  and  Reducing C# Code Duplication in Azure Functions.

SHARE:

Multiple Platform Targeting in Visual Studio 2017

Suppose you are creating a library that has a central set of features and also additional features that are only available on some platforms. This means that when the project is built there are multiple assemblies created, one for each platform.

One way to achieve multi platform targeting is to create a number of separate projects, for example one for .NET Core , one for UWP, another one for .NET framework, etc. Then a shared source code project can be added and referenced by each of these individual projects; when each project is built separate binaries are produced. I’ve used this approach in the past, for example when working on FeatureToggle but is a little clunky and results in many projects in the solution.

Another approach is to have a single project that is not limited to a single platform output, but rather compiles  to multiple platform assemblies.

For example, in Visual Studio 2017, create a new .NET Core class library project called TargetingExample and add a class called WhoAmI as follows:

using System;

namespace TargetingExample
{
    public static class WhoAmI
    {
        public static string TellMe()
        {
            return ".NET Core";
        }
    }
}

After building the following will be created: "…\MultiTargeting\TargetingExample\TargetingExample\bin\Debug\netcoreapp1.1\TargetingExample.dll". Notice the platform directory “netcoreapp1.1”.

If we add a new .NET Core console app project and reference the TargetingExample project:

using System;
using TargetingExample;

namespace ConsoleApp1
{
    class Program
    {
        static void Main(string[] args)
        {
            Console.WriteLine(WhoAmI.TellMe());
            Console.ReadLine();
        }
    }
}

This produces the output: .NET Core

If we edit the FeatureToggle.csproj file it looks like the following (notice the TargetFramework element has a single value netcoreapp1.1):

<Project Sdk="Microsoft.NET.Sdk">
  <PropertyGroup>
    <TargetFramework>netcoreapp1.1</TargetFramework>
  </PropertyGroup>
</Project>

The file can be modified as follows (notice the plural <TargetFrameworks>):

<Project Sdk="Microsoft.NET.Sdk">
  <PropertyGroup>
    <TargetFrameworks>netcoreapp1.1;net461;</TargetFrameworks>
  </PropertyGroup>
</Project>

Building now produces: "…\MultiTargeting\TargetingExample\TargetingExample\bin\Debug\netcoreapp1.1\TargetingExample.dll" and  "…\MultiTargeting\TargetingExample\TargetingExample\bin\Debug\net461\TargetingExample.dll"”.

A new Windows Classic Desktop Console App project can now be added (and the .NET framework version changed to 4.6.1) and a reference to TargetingExample  added.

using System;
using TargetingExample;

namespace ConsoleApp2
{
    class Program
    {
        static void Main(string[] args)
        {
            Console.WriteLine(WhoAmI.TellMe());
            Console.ReadLine();
        }
    }
}

The new console app contains the preceding code and when run produces the output: .NET Core.

Now we have a single project compiling for multiple target platforms. We can take things one step further by having different functionality depending on the target platform. One simple way to do this is to use conditional compiler directives as the following code shows:

using System;

namespace TargetingExample
{
    public static class WhoAmI
    {
        public static string TellMe()
        {
#if NETCOREAPP1_1
            return ".NET Core";
#elif NETFULL
            return ".NET Framework";
#else
            throw new NotImplementedException();  // Safety net in case of typos in symbols
#endif
        }
    }
}

The preceding code relies on the conditional compilation symbols being defined, this can be done by editing the project file once again as follows:

<Project Sdk="Microsoft.NET.Sdk">
  <PropertyGroup>
    <TargetFrameworks>netcoreapp1.1;net461;</TargetFrameworks>
  </PropertyGroup>

  <PropertyGroup Condition=" '$(TargetFramework)' == 'netcoreapp1.1' ">
    <DefineConstants>NETCOREAPP1_1</DefineConstants>
  </PropertyGroup>
  
  <PropertyGroup Condition=" '$(TargetFramework)' == 'net461' ">
    <DefineConstants>NETFULL</DefineConstants>
  </PropertyGroup>
</Project>

Now when the project is built, the netcoreapp1.1\TargetingExample.dll will return “.NET Core” and net461\TargetingExample.dll will return “.NET Framework”. Each dll has been compiled with different functionality depending on the platform.

Update: The explicit <DefineConstants> for the different platforms are not required if you want to use the defaults, e.g. "NETCOREAPP1_1", "NET461", etc as per this Twitter thread and GitHub.

SHARE:

Free eBook C# 7.0: What’s New Quick Start Complete

My new free eBook “C# 7.0: What’s New Quick Start” is now complete and available for download.

C# 7.0: What’s New Quick Start eBook Cover Image

The book covers the following:

  • Literal Digit Separators and Binary Literals
  • Throwing Exceptions in Expressions
  • Local Functions
  • Expression Bodied Accessors, Constructors and Finalizers
  • Out Variables
  • By-Reference Local Variables and Return Values
  • Pattern Matching
  • Switch Statements
  • Tuples

You can download it for free or pay what you think it is worth.

Happy reading!

If you want to fill in the gaps in your C# knowledge be sure to check out my C# Tips and Traps training course from Pluralsight – get started with a free trial.

SHARE:

Creating Versioned APIs with Azure Functions and Proxies

One of the interesting possibilities with the (currently in preview) Azure Function Proxies is the ability to create HTTP APIs that can be versioned and also deployed/managed independently.

For example, suppose there is a API that lives at the root “https://dctdemoapi.azurewebsites.net/api". We could have multiple resources under this root such as customer, products, etc.

So to get the product with an id of 42 we’d construct: “https://dctdemoapi.azurewebsites.net/api/products?id=42”.

If we wanted the ability to version the API we could construct “https://dctdemoapi.azurewebsites.net/api/v1/products?id=42” for version 1 and “https://dctdemoapi.azurewebsites.net/api/v2/products?id=42” for version 2, etc.

Using proxies we can use the format “https://dctdemoapi.azurewebsites.net/api/[VERSION]/[RESOURCE]?[PARAMS]”

Now we can create 2 proxies (for example in an Azure Function called “dctdemoapi”) that forwards the HTTP requests to other Function Apps (in this example dctdemoapiv1 and dctdemoapiv2).

Screenshots of the proxies are as follows:

Azure Function proxy settings for API version 1

Azure Function proxy settings for API version 2

And the respective proxies.json config file:

{
    "proxies": {
        "v1": {
            "matchCondition": {
                "route": "api/v1/{*restOfPath}"
            },
            "backendUri": "https://dctdemoapiv1.azurewebsites.net/api/{restOfPath}"
        },
        "v2": {
            "matchCondition": {
                "route": "api/v2/{*restOfPath}"
            },
            "backendUri": "https://dctdemoapiv2.azurewebsites.net/api/{restOfPath}"
        }
    }
}

Notice in the proxy config the use of the wildcard term “{*restOfPath}” – this will pass the remainder of the path segments to the backend URL, for example “products”, meaning a request to “https://dctdemoapi.azurewebsites.net/api/v1/products?id=42” will be sent to “https://dctdemoapiv1.azurewebsites.net/api/products?id=42”; and “https://dctdemoapi.azurewebsites.net/api/v2/products?id=42” will be sent to “https://dctdemoapiv2.azurewebsites.net/api/products?id=42”.

Now versions of the API can be updated/monitored/managed/etc independently because they are separate Function App instances, but code duplication is a potential problem; common business logic could however be compiled into an assembly and referenced in both Function Apps.

To jump-start your Azure Functions knowledge check out my Azure Function Triggers Quick Start Pluralsight course.

SHARE:

Push Notifications and Buttons with Microsoft Flow: Part 2

In part 1 we created a Flow to toggle the sending of push notifications on and off by storing the configuration in Azure blob storage.

Now that we have a way of enabling/disabling notifications we can start to build the second Flow.

Before jumping into the Flow designer, we need to consider how to generate random positivity phrases and how to integrate this into the second Flow. One option to do this is to create a simple Azure Function with an HTTP trigger. The Flow can then use an HTTP action to issue a GET to the server that will return the string content to be sent via push notifications.

In the Azure Portal function editor a new function can be created with a HTTP trigger configured to GET only as the following screenshot shows:

Creating an Azure Function with a HTTP trigger

Notice in the preceding screenshot the authorization level has bee set to “function”. This means the key needs to be provided when the function is called.

We can now write some code in the function code editor window as follows:

using System.Net;

public static HttpResponseMessage Run(HttpRequestMessage req, TraceWriter log)
{
    log.Info("C# HTTP trigger function processed a request.");

    string phrase = GeneratePhrase();

    return req.CreateResponse(HttpStatusCode.OK, phrase);
}

public static string  GeneratePhrase()
{
    var phrases = new string[]
    {
        "Don't worry, be happy :)",
        "All is well",
        "Will it matter in 100 years?",
        "Change what you can, don't worry about what you can't"
    };

    var rnd = new Random();
    
    return phrases[rnd.Next(phrases.Length)];
}

Azure Function code editor window

Clicking the Run button will test the function and we can see the random phrases being returned with a 200 status as shown in the following screenshot:

Azure function HTTP test output

In the final part of  this series we’ll go and create the second Flow that uses this function and the configuration value created in the previous article to actually send random positivity push notifications on a 15 minute schedule.

To jump-start your Azure Functions knowledge check out my Azure Function Triggers Quick Start Pluralsight course.

SHARE: