Creating Versioned APIs with Azure Functions and Proxies

One of the interesting possibilities with the (currently in preview) Azure Function Proxies is the ability to create HTTP APIs that can be versioned and also deployed/managed independently.

For example, suppose there is a API that lives at the root “https://dctdemoapi.azurewebsites.net/api". We could have multiple resources under this root such as customer, products, etc.

So to get the product with an id of 42 we’d construct: “https://dctdemoapi.azurewebsites.net/api/products?id=42”.

If we wanted the ability to version the API we could construct “https://dctdemoapi.azurewebsites.net/api/v1/products?id=42” for version 1 and “https://dctdemoapi.azurewebsites.net/api/v2/products?id=42” for version 2, etc.

Using proxies we can use the format “https://dctdemoapi.azurewebsites.net/api/[VERSION]/[RESOURCE]?[PARAMS]”

Now we can create 2 proxies (for example in an Azure Function called “dctdemoapi”) that forwards the HTTP requests to other Function Apps (in this example dctdemoapiv1 and dctdemoapiv2).

Screenshots of the proxies are as follows:

Azure Function proxy settings for API version 1

Azure Function proxy settings for API version 2

And the respective proxies.json config file:

{
    "proxies": {
        "v1": {
            "matchCondition": {
                "route": "api/v1/{*restOfPath}"
            },
            "backendUri": "https://dctdemoapiv1.azurewebsites.net/api/{restOfPath}"
        },
        "v2": {
            "matchCondition": {
                "route": "api/v2/{*restOfPath}"
            },
            "backendUri": "https://dctdemoapiv2.azurewebsites.net/api/{restOfPath}"
        }
    }
}

Notice in the proxy config the use of the wildcard term “{*restOfPath}” – this will pass the remainder of the path segments to the backend URL, for example “products”, meaning a request to “https://dctdemoapi.azurewebsites.net/api/v1/products?id=42” will be sent to “https://dctdemoapiv1.azurewebsites.net/api/products?id=42”; and “https://dctdemoapi.azurewebsites.net/api/v2/products?id=42” will be sent to “https://dctdemoapiv2.azurewebsites.net/api/products?id=42”.

Now versions of the API can be updated/monitored/managed/etc independently because they are separate Function App instances, but code duplication is a potential problem; common business logic could however be compiled into an assembly and referenced in both Function Apps.

To jump-start your Azure Functions knowledge check out my Azure Function Triggers Quick Start Pluralsight course.

SHARE:

Using Azure Functions and Microsoft Flow to Send Notifications for NuGet Package Downloads

One of the NuGet packages I maintain is approaching 100,000 downloads. I thought it would be nice to get a notification on my phone when the number of downloads hit 100,000.

To implement this I installed the Flow app on my iPhone, wrote an Azure Function that executes on a timer, and calls into Flow.

Creating a Flow

The first step is to create a new Microsoft Flow that is triggered by a HTTP Post being sent to it.

The flow uses a Request trigger and a URL is auto generated by which the flow can be initiated.

The second step is the Notification action that results in a notification being raised in the Flow app for iOS.

Azure Function calling Microsoft Flow

Creating an Azure Function with Timer Trigger

Now that there is a URL to POST to to create notifications, a timer-triggered Azure Function can be created.

This function screen scrapes the NuGet page (I’m sure there’s a more elegant/less brittle way of doing this) and grabbing the HTML element containing the total downloads. If the total number of downloads >= 100,000 , then the flow URL will be called with a message in the body. The timer schedule runs once per day. I’ll have to manually disable the function once > 100,000 downloads are met.

The function code:

using System.Net;
using HtmlAgilityPack;
using System.Globalization;
using System.Text;

public static async Task Run(TimerInfo myTimer, TraceWriter log)
{       
    try
    {
        string html = new WebClient().DownloadString("https://www.nuget.org/packages/FeatureToggle");

        HtmlDocument doc = new HtmlDocument();
        doc.LoadHtml(html);     
                            
        HtmlNode downloadsNode = doc.DocumentNode
                                    .Descendants("p")
                                    .First(x => x.Attributes.Contains("class") &&  
                                                x.Attributes["class"].Value.Contains("stat-number"));                        

        int totalDownloads = int.Parse(downloadsNode.InnerText, NumberStyles.AllowThousands);
        
        bool thresholdMetOrExceeded = totalDownloads >= 1; // 1 for test purposes, should be 100000

        if (thresholdMetOrExceeded)
        {
            var message = $"FeatureToggle now has {totalDownloads} downloads";

            log.Info(message);

            await SendToFlow(message);            
        }        
    }
    catch (Exception ex)
    {
        log.Info(ex.ToString());
        await SendToFlow($"Error: {ex}");
    }
}

public static async Task SendToFlow(string message)
{
    const string flowUrl = "https://prod-16.australiasoutheast.logic.azure.com:443/workflows/[redacted]/triggers/manual/paths/invoke?api-version=2015-08-01-preview&sp=%2Ftriggers%2Fmanual%2Frun&sv=1.0&sig=[redacted]";

    using (var client = new HttpClient())
    {
        var content = new StringContent(message, Encoding.UTF8, "text/plain");
        
        await client.PostAsync(flowUrl, content);
    }
}

Manually running the function (with test threshold of 1 download) results in the following notification on from the Flow iOS app:

This demonstrates the nice thing about Azure Functions, namely that it’s easy to throw something together to solve a problem.

iOS Flow App Notification

To jump-start your Azure Functions knowledge check out my Azure Function Triggers Quick Start Pluralsight course.

SHARE:

Cross Function App Proxies and Proxy Request Parameters in Azure Functions

In a previous article we saw how to get started with Azure Function Proxies. In addition to creating proxy URLs for HTTP functions in the same Function App, it is also possible to specifiy a backend URL that exists in a different Function App (or even a URL somewhere completely different). This essentially allows a single (HTTP) API for clients to use, that behind the scenes routes traffic to multiple Function Apps to enable  the decomposing of a single large Function App into multiple smaller ones. This also enables isolation between different Function Apps for deployment, testing, management, monitoring, etc..

For example, suppose we have an HTTP function defined in a Function App called myazurecloudfunctions that GETs a customer using an id querystring parameter; a request for customer 42 would look like the following (with function authorization enabled):

https://myazurecloudfunctions.azurewebsites.net/api/LoadCust?id=42&code=SKmM3Hr0IFEdJp9QnQ5ztu/mClYScUxjdjQw4TvSQ9OXm0xrgXQUpg==

In another Function App called dontcodetireddemos a proxy can be created to enable the following URL to be used instead:

https://dontcodetireddemos.azurewebsites.net/customer/42?code=SKmM3Hr0IFEdJp9QnQ5ztu/mClYScUxjdjQw4TvSQ9OXm0xrgXQUpg==

Notice in this proxied URL the id 42 is specified in the URL, not as a querystring parameter. This is another feature of Azure Function Proxies that  allows request parameters to be mapped from the proxy URL to the backend URL. In this example the proxy route template is “customer/{custId}” and the backend is set to “https://myazurecloudfunctions.azurewebsites.net/api/LoadCust?id={custId}” – notice the token {custId}.

The proxies.json configuration is:

{
    "proxies": {
        "CustomerGet": {
            "matchCondition": {
                "route": "customer/{custId}",
                "methods": [
                    "GET"
                ]
            },
            "backendUri": "https://myazurecloudfunctions.azurewebsites.net/api/LoadCust?id={custId}"
        }
    }
}

And a screenshot of the configuration:

Azure Function Proxy settings

To jump-start your Azure Functions knowledge check out my Azure Function Triggers Quick Start Pluralsight course.

SHARE:

Azure Functions Proxies Preview

Azure functions allow the creation of HTTP-triggered code. A new feature to Functions is the ability to define proxies. (Note: at the time of writing this feature is in preview)

For example a function can be created that responds to HTTP GETs to retrieve a customer as the following code demonstrates:

using System.Net;

public class Customer 
{
    public int Id {get; set;}    
    public string Name {get; set;}
}

public static async Task<HttpResponseMessage> Run(HttpRequestMessage req, TraceWriter log)
{
    // error checking omitted

    string id = req.GetQueryNameValuePairs()
        .FirstOrDefault(q => string.Compare(q.Key, "id", true) == 0)
        .Value;

    return req.CreateResponse(HttpStatusCode.OK, GetById(int.Parse(id)));
}

public static Customer GetById(int id)
{
    // simulate fetching a customer, e.g. from Table storage, db, etc.
    return new Customer
        {
            Id = id,
            Name = "Amrit"
        };
}

This function (called “GetCustomer”) could be available at the following URL (with function authorization enabled): https://dontcodetireddemos.azurewebsites.net/api/GetCustomer?id=42&code=rEQKsObGFDRCCiVuLhOnZ1Rdfn/XGgp5tfC1xHrhAqxvWqzHSQszCg==

Notice in the URL the name of the function is prefixed with “api” i.e. “api/GetCustomer”

Calling this URL would result in the following JSON being returned:

{
  "Id": 42,
  "Name": "Amrit"
}

Function proxies allow the “api” part to be replaced, for example to create a URL:  “https://dontcodetireddemos.azurewebsites.net/customer?id=42&code=rEQKsObGFDRCCiVuLhOnZ1Rdfn/XGgp5tfC1xHrhAqxvWqzHSQszCg==”

Azure Function Proxy

This proxy defines a name “CustomerGet”, a route template of “customer”, the actual URL to maps to “https://dontcodetireddemos.azurewebsites.net/api/GetCustomer”, and limited to only GET HTTP verbs.

If we had another function e.g. called PostCustomer we could also setup a POST proxy for that function:

Azure Function Proxy

Now we can issue both POSTs and GETs to the customer “resource” at: https://dontcodetireddemos.azurewebsites.net/customer (code key omitted).

Using Kudu for example, we can see a proxies.js file created in the wwwroot folder with the following contents:

{
    "proxies": {
        "CustomerGet": {
            "matchCondition": {
                "route": "customer",
                "methods": [
                    "GET"
                ]
            },
            "backendUri": "https://dontcodetireddemos.azurewebsites.net/api/GetCustomer"
        },
        "CustomerPost": {
            "matchCondition": {
                "route": "customer",
                "methods": [
                    "POST"
                ]
            },
            "backendUri": "https://dontcodetireddemos.azurewebsites.net/api/PostCustomer"
        }
    }
}

To jump-start your Azure Functions knowledge check out my Azure Function Triggers Quick Start Pluralsight course.


SHARE:

Push Notifications and Buttons with Microsoft Flow: Part 2

In part 1 we created a Flow to toggle the sending of push notifications on and off by storing the configuration in Azure blob storage.

Now that we have a way of enabling/disabling notifications we can start to build the second Flow.

Before jumping into the Flow designer, we need to consider how to generate random positivity phrases and how to integrate this into the second Flow. One option to do this is to create a simple Azure Function with an HTTP trigger. The Flow can then use an HTTP action to issue a GET to the server that will return the string content to be sent via push notifications.

In the Azure Portal function editor a new function can be created with a HTTP trigger configured to GET only as the following screenshot shows:

Creating an Azure Function with a HTTP trigger

Notice in the preceding screenshot the authorization level has bee set to “function”. This means the key needs to be provided when the function is called.

We can now write some code in the function code editor window as follows:

using System.Net;

public static HttpResponseMessage Run(HttpRequestMessage req, TraceWriter log)
{
    log.Info("C# HTTP trigger function processed a request.");

    string phrase = GeneratePhrase();

    return req.CreateResponse(HttpStatusCode.OK, phrase);
}

public static string  GeneratePhrase()
{
    var phrases = new string[]
    {
        "Don't worry, be happy :)",
        "All is well",
        "Will it matter in 100 years?",
        "Change what you can, don't worry about what you can't"
    };

    var rnd = new Random();
    
    return phrases[rnd.Next(phrases.Length)];
}

Azure Function code editor window

Clicking the Run button will test the function and we can see the random phrases being returned with a 200 status as shown in the following screenshot:

Azure function HTTP test output

In the final part of  this series we’ll go and create the second Flow that uses this function and the configuration value created in the previous article to actually send random positivity push notifications on a 15 minute schedule.

To jump-start your Azure Functions knowledge check out my Azure Function Triggers Quick Start Pluralsight course.

SHARE:

Screen Scraping As A Service with Azure Functions in 5 Mins

If you have some data in a web page but there is no API to get the same data, it’s possible to use (the often brittle and error prone) technique of screen scraping to read the values out of the HTML.

By leveraging Azure Functions, it’s trivial (depending on how horrendous the HTML is) to create a HTTP Azure Function that loads a web page, parses the HTML, and returns the data as JSON.

The fist step is to create an HTTP-triggered Azure Function:

Creating a new Azure Function with a HTTP Trigger

To help with the parsing, we can use the HTML Agility Pack NuGet package. To add this to the function, create a project.json file and add the NuGet reference:

Using NuGet Packages in Azure Functions

{
  "frameworks": {
    "net46":{
      "dependencies": {
        "HtmlAgilityPack": "1.4.9.5"
      }
    }
   }
}

Once this file is saved, the NuGet package will be installed and a using directive can be added: using HtmlAgilityPack;

Now we can download the required HTML page as a string, in the example below the archive page from Don’t Code Tired, use some LINQ to get the post titles, and return this as the HTTP response. Correctly selecting/parsing the required data from the HTML page is likely to be the most time-consuming part of the function creation.

The full function source code is as follows. Notice that there’s no error checking code to simplify the demo code. Screen scraping should usually be a last resort because of its very nature it can often break if the UI changes or unexpected data exists in the HTML. It also requires the whole page of HTML be downloaded which may raise performance concerns.

using System.Net;
using HtmlAgilityPack;

public static async Task<HttpResponseMessage> Run(HttpRequestMessage req, TraceWriter log)
{
    HttpClient client = new HttpClient();

    string html = await client.GetStringAsync("http://dontcodetired.com/blog/archive");    

    HtmlDocument doc = new HtmlDocument();
    doc.LoadHtml(html); 
    
    var postTitles = doc.DocumentNode
                        .Descendants("td")
                        .Where(x => x.Attributes.Contains("class") && x.Attributes["class"].Value.Contains("title"))
                        .Select(x => x.InnerText);

    return req.CreateResponse(HttpStatusCode.OK, postTitles);
}

We can now call the function via HTTP and get back a list of all Don’t Code Tired article titles as the following Postman screenshot shows:

Using Postman to call Azure Functions

To jump-start your Azure Functions knowledge check out my Azure Function Triggers Quick Start Pluralsight course.

You can start watching with a Pluralsight free trial.

SHARE:

Azure HTTP Function Authorization with Function Keys

When creating an Azure Function triggered via HTTP, one way to authorize use of the function is to configure the HTTP function trigger to require the caller to provide a function key.

Azure Function HTTP Trigger Authorization Modes

With the authorization set to Anonymous, as expected anyone can call it.

When set to Function Authorization, the caller needs to provide the function key either as a URL query string parameter or in a header.

The function key can be found by navigating to Manage tab as the following screenshot shows:

Finding the Azure Function Key

Once Function Authorization is enabled, if the client does not provide it correctly the function will return a 401 Unauthorized.

To supply the function key in the URL, the “code” query string parameter can be used, e.g. “https://myazurecloudfunctions.azurewebsites.net/api/SayHi?code=udXhf3pviSICFMtViW/pqmV/1Q5vLH5aMcRWXfD/q6NXk2VVxRlfYw==”.

Alternatively an “x-functions-key” header can be added containing the key as the following Postman screenshot shows:

Calling Azure Function with Postman and Function Key

To jump-start your Azure Functions knowledge check out my Azure Function Triggers Quick Start Pluralsight course.

You can start watching with a Pluralsight free trial.

SHARE:

Creating a Tweet Buffer with Azure Queues and Microsoft Flow

There are apps and services that allow the scheduling or buffering of the sending of Tweets. Using the features of Microsoft Flow, it’s possible to create a solution that allows Tweets to be quickly created as simple text files in a OneDrive folder and these will then be buffered to be sent every 15 minutes (or whatever schedule you fancy). The actual buffering mechanism used below is an Azure Queue.

There are two Flows as part of this solution: Flow 1 to pick up text files from OneDrive, extract the content and write a new message to an Azure Queue. Flow 2 runs on a schedule, picks a message off the queue, grabs the message content and sends it a s a Tweet.

Flow 1: Queuing Tweets

The first step is to create an Azure Storage account and create an Azure Queue. The easiest way to create a new queue is to use the Azure Storage Explorer. Once installed and connected, creating a queue is a simple right-click operation:

Using Azure Storage Explorer to create a new Azure Queue

We’ll call the queue “tweet-queue”.

We’ll also create OneDrive folders: OneDrive\FlowDemo\TweetQ\In

Now we can create a new Flow that grabs files from this path and adds them to tweet-queue as the following screenshot shows (notice we're also deleting the file after adding to the queue):

Microsoft Flow reading a file from OneDrive and adding to Azure Queue

Now if we create a .txt file (for example with the content “Testing - this Tweet came from Microsoft Flow via OneDrive and an Azure Queue” in the OneDrive\FlowDemo\TweetQ\In directory, wait for the Flow to run and check out the queue in Storage Explorer we can see a new message as the following screenshot shows:

Azure Storage Explorer showing Azure Queue message content

Now we have a way of queuing Tweets we can create a second flow to send them on a timer.

Flow 2: Sending Tweets

The second Flow will be triggered every 15 minutes, grab a message from the queue, use the message body as the Tweet content, then delete the message from the queue.

The following screenshot shows the first 2 phases:

Getting Azure Queue messages on a timer

Even though we’ve specified 1 message, when we add the next action in the Flow, we’ll automatically get an “Apply to each” added as the following screenshot shows:

Posting Tweet from Azure Queue

Notice in the preceding screenshot that we also need to add an action to delete the message from the queue.

Now once we save this Flow, every 15 minutes a message will be retrieved and posted as a Tweet:

SHARE:

Triggering a Microsoft Flow from an HTTP Post

Microsoft Flow allows the building of workflows in the cloud. One way to trigger a Flow is to set up a HTTP endpoint that can be posted to.

For example, a Flow can be created that takes some JSON data and writes it out to OneDrive or Dropbox.

The first step is to create a new Flow and add a Request trigger. When the Flow is saved, a URL will be generated that can be posted to.

As part of this Request trigger, a JSON schema can be specified that allows individual JSON properties to be surfaced and referenced by name in later actions.

For example the following JSON schema could be specified:

{
  "$schema": "http://json-schema.org/draft-04/schema#",
  "title": "Customer",
  "description": "A generic customer",
  "type": "object",
  "properties": {
    "id": {
      "description": "The unique identifier for a customer",
      "type": "integer"
    },
    "name": {
      "description": "The full name of the customer excluding title",
      "type": "string"
    }
  },
  "required": [
    "id",
    "name"
  ]
}

Now in later steps, the “id” and the “name” properties from the incoming JSON can be used as dynamic content.

Next action(s) can be added that make use of the the data in these properties when an HTTP post occurs. For example we could create a file in OneDrive where the filename is {id}.txt that contains the customer name. This is a simple example but serves to demonstrate the flexibility.

The following screenshot shows the full flow and the JSON schema properties in use:

Microsoft Flow using request trigger and OneDrive

We can now post to the generated URL. For example the following screenshot shows a test post using Postman and the resulting file that was created in OneDrive:

HTTP post to trigger a Microsoft Flow

SHARE:

Serverless Computing and Workflows with Azure Functions and Microsoft Flow

Microsoft Flow is a tool for creating workflows to automate tasks. It’s similar in concept to If This Then That but feels like it exists more towards the end of the spectrum of the business user rather than the end consumer – though both have a number of channels/services in common. Flow has a number of advanced features such as conditions, loops, timers, and delays.

Flow has a number of services including common ones such as Dropbox, OneDrive, Twitter, and Facebook. There are also generic services for calling HTTP services, including those created as Azure Functions. Essentially, services are the building blocks of a Flow.
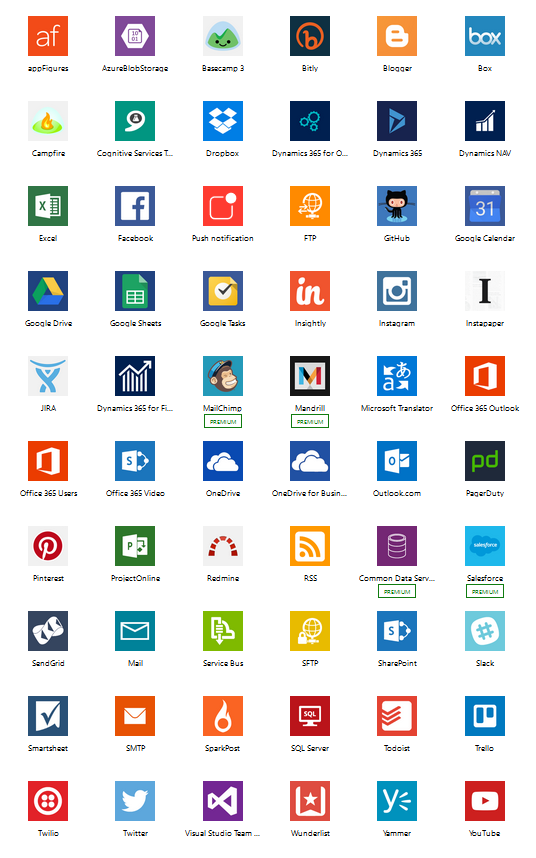
Screenshot of Microsoft Flow Services

Once the free sign up is complete you can create Flows from existing templates or create your own from scratch.
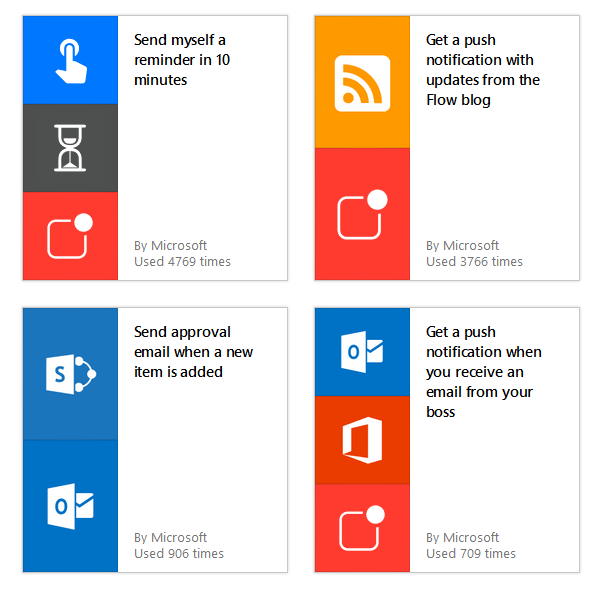
Screenshot of Microsoft Flow pre-built templates

To create a new custom Flow, the web-based workflow designer can be used.

Integrating a Flow with Azure Functions

In the following example, a Flow will be created that picks up files with a specific naming convention from a OneDrive folder, sends the text content to an Azure Function that simply converts to uppercase and returns the result to the Flow. The Flow then writes out the uppercase version to another OneDrive folder.

Reading Files From OneDrive

The first step in the Flow is to monitor a specific OneDrive folder for new files.
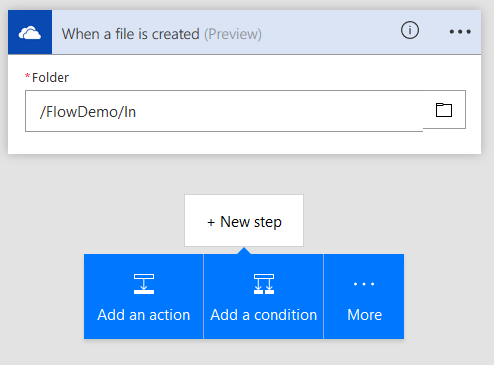
A Flow triggered by new OneDrive files

As an example of conditions, an “if statement” can be added to only process files that contain the word “data”:
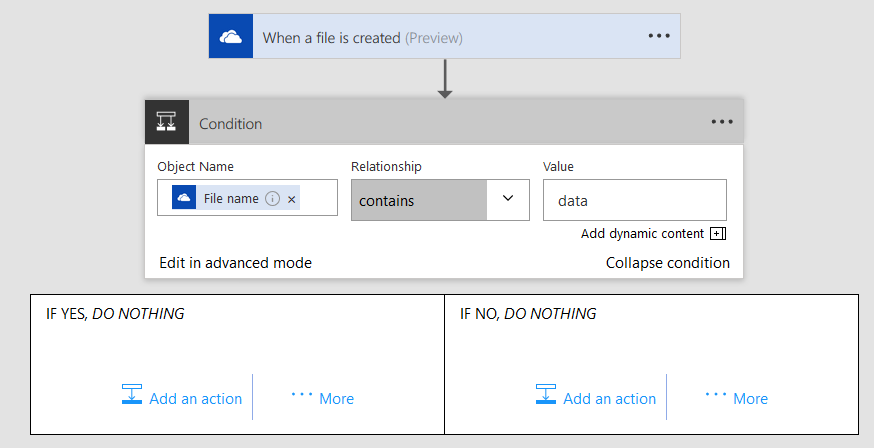
Microsoft Flow condition

Now if the filename is correct we can go ahead and call an Azure Function (or other HTTP endpoint).

Calling an Azure Function from Microsoft Flow

Now that we are reading specific files, we want to call an Azure Function to convert the text content of the file to upper case.

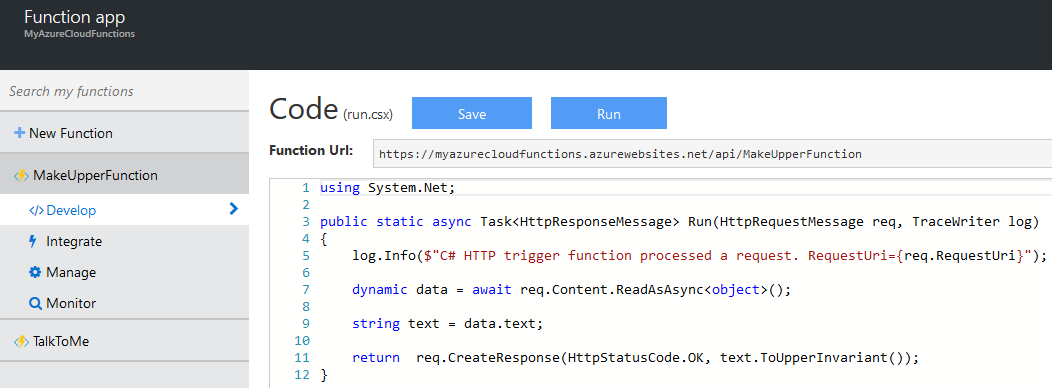
The following code and screenshot shows the function that will be called – this code is stripped down and doesn’t contain any error checking/handling code for simplicity:
Azure Function app screenshot

using System.Net;

public static async Task<HttpResponseMessage> Run(HttpRequestMessage req, TraceWriter log)
{
    log.Info($"C# HTTP trigger function processed a request. RequestUri={req.RequestUri}");

    dynamic data = await req.Content.ReadAsAsync<object>();
    
    string text = data.text;

    return  req.CreateResponse(HttpStatusCode.OK, text.ToUpperInvariant());
}

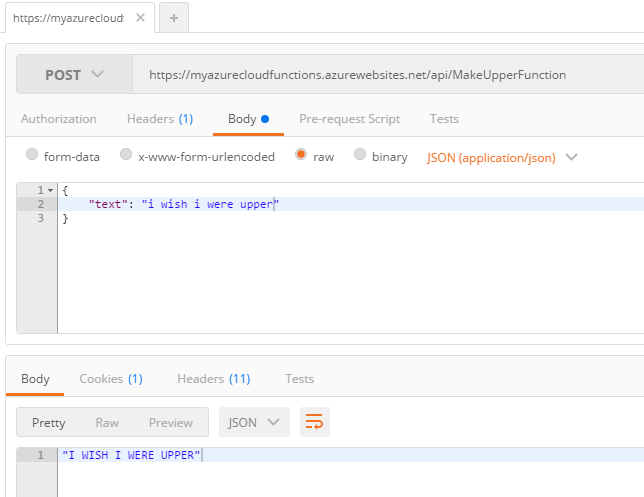
We can test the API in Postman:
Calling Azure Function from Postman

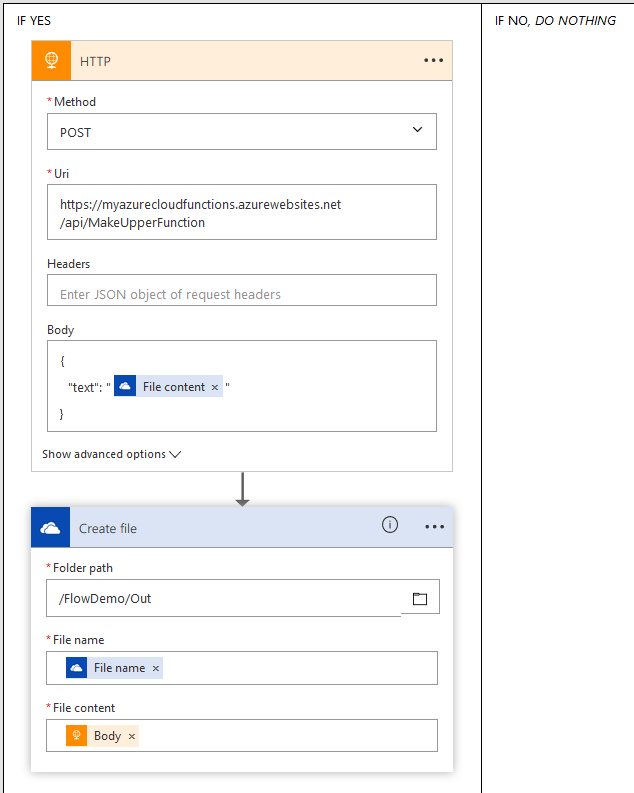
Now that we have a working function we can add a new action of type “HTTP” to the Flow and pass the contents of the OneDrive file as JSON data in the request. The final step is to take the response of calling the Azure Function and writing out to a new file in OneDrive as the following screenshot shows:
Calling Azure Function passing OneDrive file content as JSON data

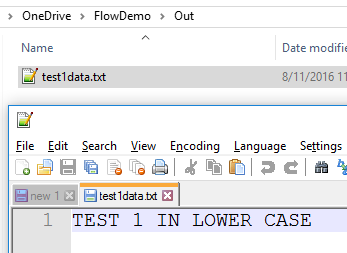
Now we can create a file “OneDrive\FlowDemo\In\test1data.txt”, the Flow will be trigged, and the output file “OneDrive\FlowDemo\Out\test1data.txt” created.
Output file

Microsoft Flow also has a really nice visual representation of runs (individual executions) of Flows:
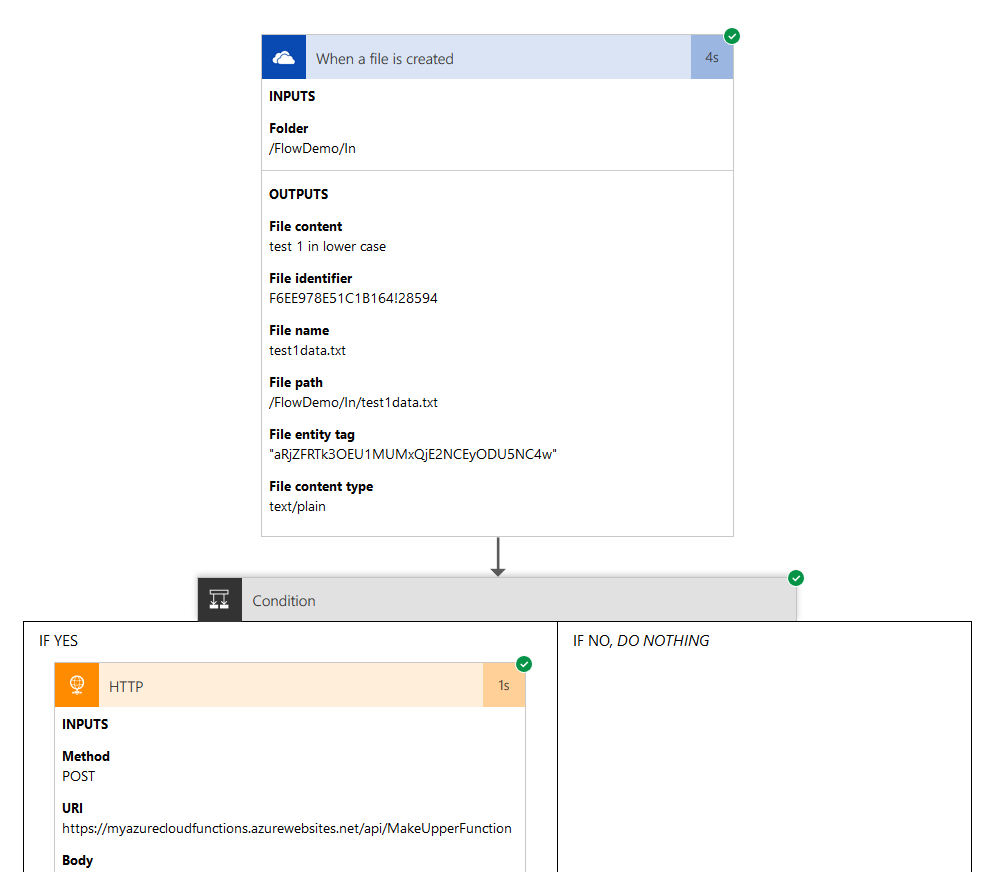
Microsoft Flow run visualization

Microsoft Flow by itself enables a whole host of workflow scenarios, and combined with all the power of Azure Functions (and other Azure features) could enable some really interesting uses.

To jump-start your Azure Functions knowledge check out my Azure Function Triggers Quick Start Pluralsight course.

You can start watching with a Pluralsight free trial.

SHARE: