New Pluralsight Course: Implementing Logging and Dependency Injection in Akka.NET

If you’ve already watched my Akka.NET fundamentals Pluralsight course and want to learn more about using DI and logging, check out my new Implementing Logging and Dependency Injection in Akka.NET course.

You can start watching with a Pluralsight free trial.

Course Description

Akka.NET makes building concurrent and distributed applications easier. As with other architectures, Akka.NET based systems need effective logging for the monitoring and diagnosing of systems when deployed to production. Just because we use Akka.NET to get the benefits of the Actor Model, it doesn’t mean that best practices for object construction and dependencies such as dependency injection should be ignored. By the end of the course, you’ll understand how to implement effective logging in your Akka.NET system and how to use dependency injection to ensure the services your actors depend on are still provided in a loosely coupled and configurable way.

SHARE:

Implementing Platform Specific Code in Universal Windows Apps with MVVMLight and Dependency Injection

In previous articles I’ve covered using MVVMLight in Universal Windows Apps and using C# partial classes and methods to implement different code on Windows Phone and Windows Store apps.

While partial classes/methods are a quick win to alter small amounts of code for each platform, overuse might become painful as the solution gets bigger. There are also limitations of partial methods such as they can only return void, they are implicitly private, cannot be virtual, etc.

If we’re using MVVMLight (or another framework or hand-rolled viewmodels) we can use dependency injection.

The viewmodel class is still shared between the two apps and doesn’t need to have partial methods which means we have more flexibility in the code we write.

As a dependency in the constructor, the viewmodel takes an instance of a class that implements an interface.

This interface-implementing class can then be two different classes, one in the phone project and one in the store project.

architecture diagram

So for example, in the shared project the following interface can be defined:

interface IGreetingService
{
    string GenerateGreeting();
}

Again in the shared project, the viewmodel is defined:

internal class MainViewModel : ViewModelBase
{
    private readonly IGreetingService _greetingService;
    private string _greeting;

    public MainViewModel(IGreetingService greetingService)
    {
        _greetingService = greetingService;

        SayHi = new RelayCommand(() => Greeting = _greetingService.GenerateGreeting());
    }

    public RelayCommand SayHi { get; set; }

    public string Greeting
    {
        get { return _greeting; }
        set { Set(() => Greeting, ref _greeting, value); }
    }
}

The key thing here is the constructor: it takes an IGreetingService.

When the SayHi command is executed, whichever instance of an IGreetingService was passed to the viewmodel, it’s GenerateGreeting() method will be called.

So in the store project the following class can be created:

public class WindowsStoreGreeter : IGreetingService
{
    public string GenerateGreeting()
    {
        return "Hello from Windows Store app!";
    }
}

And in the phone app:

public class WindowsPhoneGreeter : IGreetingService
{
    public string GenerateGreeting()
    {
        return "Hello from Windows Phone app!";
    }
}

It is in these specific implementations of the interface that the platform specific code is written.

So in the code-behind of the main window in the store app (for demonstration simplicity we’re not using a view model locator or DI library here):

public MainPage()
{
    this.InitializeComponent();

    this.DataContext = new MainViewModel(new WindowsStoreGreeter());
}

And in the phone app:

public MainPage()
{
    this.InitializeComponent();

    this.NavigationCacheMode = NavigationCacheMode.Required;

    this.DataContext = new MainViewModel(new WindowsPhoneGreeter());
}

In these code fragments a new MainViewModel is being created and supplied with a platform-specific IGreetingService implementation.

So in this way the shared MainViewModel class can still contain the majority of the code so we only have to write it once. But we still get the ability to write platform-specific code.

SHARE:

Blendable Silverlight (and WPF) MVVM Applications With Dependency Injection

Introduction

One of the challenges with the idea of having separate developer and designers is how to allow the developers to write code while at the same time designers are working on the UI.

The goal is to give designers working in Expression Blend some sample data that they can data-bind to, that will match the runtime data items without requiring additional build scripts\etc.

The Model-View-ViewModel (MVVM) design pattern is a popular way to architect a SL\WPF app to provide separation of concerns, testability, etc. This article assumes a basic understanding of the MVVM pattern.

Getting Started - Defining The ViewModel

We create an interface to define out ViewModel (we can do this for every distinct view in the application). Before we do this though, we need something to represent our model data, for example a person:

     public class Person
    {
        public string Name { get; set; }
        public int Age { get; set; }
    }

Next we can define our ViewModel interface to allow the user to edit a person's details, the idea is that our view (our XAML user control) will be bound to a class that implements this interface. All data and operations are provided by the ViewModel, i.e. the view has no direct contact with the model.

     public interface IEditPersonDetailsViewModel
    {
        Person PersonToEdit { get; set; }
    }

It is this interface that allows both the designer and developer to work with a single common, well-defined set of data items.

Creating Some Design-Time Data

Now we have defined what data our view will have access to, we can proceed to provide the designer with some sample data to work with.

Remember that one of the goals for us to be able to run the application without having to modify configurations or have extra scripts, i.e. we want our app to provide a 'real' ViewModel at runtime, but a 'dummy' one to the designer in Blend. One way of providing this to to implement a version of the Service Locator design pattern:

    public class ViewModelServiceLocator
    {
        public IEditPersonDetailsViewModel GetEditPersonDetailsViewModel
        {
            get
            {
                return new EditPersonDetailsViewModel_DesignTime();
            }
        }
    }

The GetEditPersonDetailsViewModel property (by using a property we can bind to it in Blend) at the moment always returns an instance of  EditPersonDetailsViewModel_DesignTime, we will modify this shortly.EditPersonDetailsViewModel_DesignTime is defined as:

     public class EditPersonDetailsViewModel_DesignTime : IEditPersonDetailsViewModel
    {
        public EditPersonDetailsViewModel_DesignTime()
        {
            PersonToEdit = new Person()
            {
                Name="Mr Design Time Data",
                Age=44
            };
        }

        #region IEditPersonDetailsViewModel Members

        public Person PersonToEdit { get; set; }

        #endregion
    }

It is an instance of this class will provide the design time data in Blend.

Binding to Design-Time Data in Blend

(You can download a trial copy of blend from Microsoft.)

Open your project in blend and  on the Data tab choose "Define New Object Data Source...".


Select our ViewModelServiceLocator class and click OK.
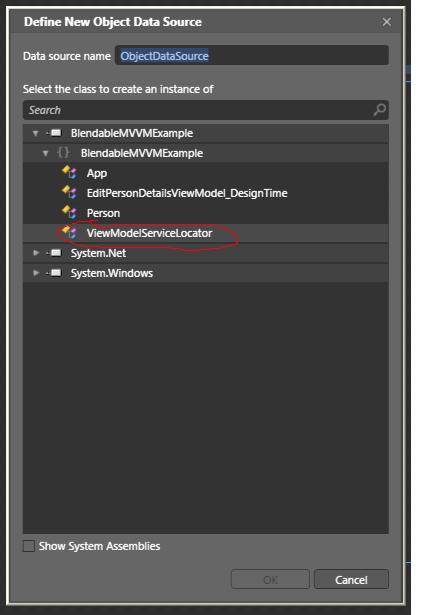


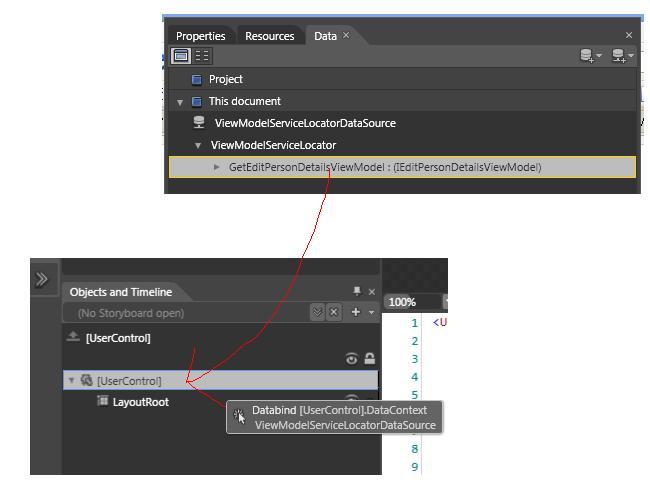
Now we bind our usercontrol to an instance of ViewModelServiceLocator, you can do this by dragging from the data tab to [UserControl] in the Objects and Timeline pane:
 

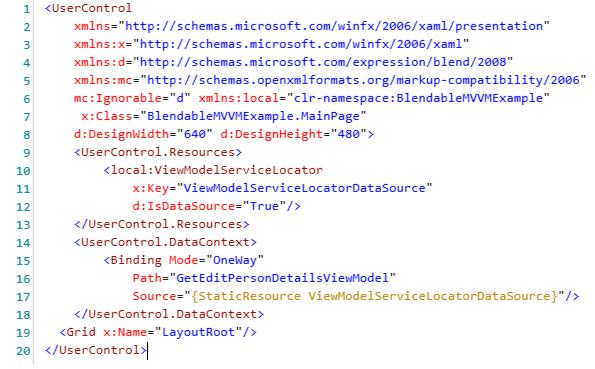
If you look at the xaml this creates, it's basically setting the DataContext of the entire user control to the return value of the GetEditPersonDetailsViewModel property.

Now the designer can (for example) bind a textbox to the person name:


So now we have a design time ViewModel bound in Blend. If we run the app now, we would get the design time ViewModel at runtime, so the next step is to provide a 'real' ViewModel at runtime.

Providing a Runtime ViewModel

First we define our ViewModel to be used at runtime (with a hard-coded person for illustration purposes):

    public class EditPersonDetailsViewModel : IEditPersonDetailsViewModel
    {
        public EditPersonDetailsViewModel()
        {
            PersonToEdit = new Person()
            {
                Name="Mr Runtime Data",
                Age=22
            };
        }

        #region IEditPersonDetailsViewModel Members

        public Person PersonToEdit{ get; set;}

        #endregion
    }

We can then modify our ViewModel service locator to provide our runtime version:

    public class ViewModelServiceLocator
    {
        public IEditPersonDetailsViewModel GetEditPersonDetailsViewModel
        {
            get
            {
                if (System.ComponentModel.DesignerProperties.IsInDesignTool)
                    return new EditPersonDetailsViewModel_DesignTime();
                else
                    return new EditPersonDetailsViewModel();
            }
        }
    }

When we run the app we get our runtime version: 


In a real situation you could pass in the Person to be editied to the runtime viewmodel constructor and possibly use Dependency Injection to provide the dependency.

Adding Dependency Injection to the Service Locator

We can add another layer of abstraction by having the service locator delegate to a DI framework. The examples below are from another project which uses Ninject to provide DI.

    public class ViewModelServiceLocator
    {
        public IMainViewModel GetMainViewModel
        {
            get
            {
                return KernelHost.Kernel.Get<IMainViewModel>();
            }
        }


        public IAddNewWeightViewModel GetAddNewWeightViewModel
        {
            get
            {
                return KernelHost.Kernel.Get<IAddNewWeightViewModel>();
            }
        }


        public IPersonDetailsViewModel GetPersonDetailsViewModel
        {
            get
            {
                return KernelHost.Kernel.Get<IPersonDetailsViewModel>();
            }
        }
    }


    public static class KernelHost
    {
        static IKernel _kernel;
       

        static KernelHost ()
        {
            _kernel = new StandardKernel(new DI.StandardNInjectModule());
        }


        public static IKernel Kernel
        {
            get
            {             
                return _kernel;
            }
            set
            {
                _kernel = value;
            }
        }
    }


    public class StandardNInjectModule : StandardModule
    {
        public override void Load()
        {           
            // For normally injected IModel resolve using the instance provided by factory
            Bind<IModel>().ToFactoryMethod<IModel>(ModelFactory.Get);

            // For when a new IModel is required (and explicitly not required from thefactory)
            Bind<IModel>().To<Model>().Only(When.Context.Variable("createNewNotFromFactory").EqualTo(true));

            Bind<IModelStore>().To<IsolatedStorageModelStore>();
            Bind<IModelLoader>().To<ModelLoader>();


            Bind<IPerson>().To<Person>().WithArgument<string>("name", "No Name Specified").WithArgument<double>("heightCm",150);
            Bind<IBMICalculator>().To<BMICalculator>().Using<SingletonBehavior>();
            Bind<IWeightRecord>().To<WeightRecord>();
            Bind<IAggregateData>().To<AggregateData>();


            // Bind view models
            Bind<IMainViewModel>().To<MainViewModel>();
            Bind<IAddNewWeightViewModel>().To<AddNewWeightViewModel>();
            Bind<IPersonDetailsViewModel>().To<PersonDetailsViewModel>();
         

#region "Blend design time view models"
#if DEBUG
            Bind<IMainViewModel>().To<MainViewModelDesignTime>().OnlyIf(x => (System.ComponentModel.DesignerProperties.IsInDesignTool));
            Bind<IAddNewWeightViewModel>().To<AddNewWeightViewModelDesignTime>().OnlyIf(x => (System.ComponentModel.DesignerProperties.IsInDesignTool));
            Bind<IPersonDetailsViewModel>().To<PersonDetailsViewModelDesignTime>().OnlyIf(x => (System.ComponentModel.DesignerProperties.IsInDesignTool));
           
#endif
#endregion
        }
    }


SHARE:

Notes on Software Development

It can be hard for those new to development or those wanting to move upwards from a junior role to mentally collate some of the ideas that constitute a senior/experienced outlook. The list below attempts to piece together some of the ways to improve both the management and development of software. It is by no means comprehensive but hopefully will provide a helpful starting point...

Do Realize That We Are The Business

  • There can sometimes be an 'Us' and 'Them' mentality when it comes to our relationship to 'The business'. We should accept (and respectfully challenge where appropriate) the view of 'The Business' when it comes to using IT to meet those business goals.
  • We should seek to explain the basics of software development, just as we should seek to understand the 'The Business' more.
  • We should work with 'The Business' to come up with new innovate uses of IT, rather that wait for 'The Business' to come to us with initiatives.
  • NOTE: I don't think there is anything intrinsically wrong with using the term 'the business' as long as it's not divisive.


Do Use Metrics (but don't rely on a single one)

Managing and tracking a project through the use of a single (often poor) metric such as Lines of Code (LOC) does not give an accurate view, e.g. do you count generated code in LOC reports?, or if you refactor then LOC may go up or down when the functionality remains the same.
Some useful metrics that can be used together:
  • Number of tests
  • LOC for solution (for pure volume)
  • LOC for test code
  • Number of bug / number of bugs per iteration/sprint
  • Average time to close bugs
  • Number of formal code reviews performed
  • Number of use cases completed
  • Number of/frequency of demos given to users/client
  • Average LOC in methods
  • Number of classes/methods
  • etc.


Do Dependency Injection

DI is a great way to decouple the parts of the solution. If you start out with DI in mind it may also have a beneficial effect on the overall design of the system (it can force you to think in abstract terms such as interfaces). Learn a tool that offers DI (such as Windsor) or for simple scenarios create you own DI framework.


Do Test Driven Development

  • Remember that TDD should be though of more as a design tool that happens to produce the hugely valuable side-effect of 'unit' tests.
  • Once you get into the rhythm of TDD it is a great way to be (and feel) productive: great satisfaction from all your green lights!
  • Don't neglect the overall big-picture architecture.


Do Regular Automated Builds

For projects with more than a couple of developers, it can be beneficial to set up an automated build (using  CruiseControl, Team Foundation Server, a simple scheduled batch file, etc.).  At a minimum schedule a nightly build.


Consider a Continuous Integration (CI) build with larger teams, remote workers, heavy volumes of check-ins, or anytime when ASAP failure feedback is required. A CI build can still be useful even with smaller teams - it's better to know sooner when we break the build.


Do Iterative/Incremental/Evolutionary Development

Whether you're formally 'Agile' (XP, Scrum, UP, etc.) or not, taking an evolutionry approach to software development can still yield benefits. This is especially true if you demo the product to users/clients after each evolution/iteration/sprint/use case/feature.

Much as we would like to think the 'Waterfall State of Mind' is dead there can still be a lot of resistance in business to idea of Agile development, regular demos could be one way to start to introduce the 'feeling' of agile.


Do A Daily Stand-Up Meeting

But do it properly: I have seen stand-ups which have gone on for over half an hour - the whole purpose of a stand-up is to encourage people to keep it short!. The team lead (or devs take it in turns if there is no 'lead' role) should 'chair' the meeting; each person simply needs to state: (1) what they have achieved\worked on since the last stand-up; (2) what they intend to achieve\work on until the next stand-up' and (3) anything that is 'blocking' their progress. If there are any problems then the relevant people should meet after the stand-up to discuss further.

Devs shouldn't see it as micro-management or a way of management applying extra pressure (nor should management), rather as a way of reporting problems earlier-on. This also puts an onus on the 'chair' and other devs to support each other to resolve problems.


Do Code Reviews

Formal code reviews can be time-consiming and as the reviewer is another Dev there can be a view that it is wasted time. There is a balance to be had; if every line of code has to be reviewed then of course a large amount of dev time will be otherwise-used. The main benefit is that code reviews can find bugs that automated unit tests cannot - again if these bugs are found earlier, they cost less to fix. One method is to target code reviews at pieces of code that are deemed to be a higher-risk (e.g. integration with 3rd parties components) or code that, if wrong, would have serious consequences (e.g. life-support system or financial transfers).

Deliver Value

This seems like an obvious statement but sometimes it is easy to get bogged down on a particular element. in the desire to implement the most elegant and optimized code (which is a good and natural state of mind for a developer) we can loose sight of the bigger goal which is: to deliver value to the business/client.


Do Risk-Oreinted Prioritization

Code/test higher risk areas as early on in the project as possible and leave the 'easy' parts until later. This helps to prevent nasty surprises when you are nearing your deadline and you have less room for maneuver.


Higher risk can come from:

  • 3rd party suppliers & components;
  • previously unused hardware/tech/libraries/APIs/versions;
  • more intrinsically complex algorithms; etc.


High Cohesion & Low Coupling

- Understand.
- Implement.


Do Buy Over Build

When low risk/high benefit/safe, consider using 3rd party components rather than reinventing the wheel, but bear in mind: vendor support/warrenty; license cost present & future; downloading trial version to evaluate. This ties in with the point on delivering value.


Do Test Driven Bug-Fixing (TDB??) (or "Find A Bug, Write A Test")

If you have been assigned or found a bug, the first thing you should do once you have isolated/identified the cause is to write a (unit/integration) test to reproduce it. Once you can reproduce it you then fix it. The test then becomes a valuable part of the regression testing performed on every test run.

Whether you keep bug fixed test in a separate assembly/project is a matter of choice, but if you using formal bug-tracking software it's a good idea to comment the test with the bug reference number.


SHARE: