Akka.NET Dispatchers and User Interface Thread Access

Akka.NET actors typically run in their own (non-UI) threads. This means by default accessing UI objects (for example setting some text in a text box) will cause a thread access exception.

For example the following code shows an actor trying to set the text of the button. The actor is not running in the UI context but the Button is so we’re trying to cross threads which causes the exception shown below.

Screenshot of Visual Stuid showing thread access exception in debugger

<Window x:Class="WpfApplication1.MainWindow"
        xmlns="http://schemas.microsoft.com/winfx/2006/xaml/presentation"
        xmlns:x="http://schemas.microsoft.com/winfx/2006/xaml"
        Title="MainWindow" Height="350" Width="525">
    <StackPanel>
        <Button Click="Button_OnClick">Say Hi</Button>
        <TextBox Name="GreetingTextBox"></TextBox>
    </StackPanel>
</Window>

public class HelloWorldActor : ReceiveActor
{
    public HelloWorldActor(TextBox textBox)
    {
        Receive<string>(s => textBox.Text = s);
    }
}
public partial class MainWindow : Window
{
    private ActorSystem _actorSystem;
    private IActorRef _actor;

    public MainWindow()
    {
        InitializeComponent();

        _actorSystem = ActorSystem.Create("MySystem");

        _actor = _actorSystem.ActorOf(Props.Create(() => new HelloWorldActor(GreetingTextBox)));
    }

    private void Button_OnClick(object sender, RoutedEventArgs e)
    {
        _actor.Tell("G'day");
    }
}

The thread on which an actor runs can be configured, either in code or in the app/web HOCON config.

We can modify the actor props in code as follows:

_actor = _actorSystem.ActorOf(Props.Create(() => new HelloWorldActor(GreetingTextBox))
                                   .WithDispatcher("akka.actor.synchronized-dispatcher"));

Now the HelloWorldActor will run on the UI thread and be able to access the text box as the following screenshot shows:

screenshot of WPF application running and updating the TextBox from another thread


MVVM and INotifyPropertyChanged

When using MVVM and a view-model, rather that passing the UI element to the actor, the view-model can instead be passed. The actor now updates the view-model which the textbox is databound to. In this situation the data-binding mechanism/INotifyPropertyChanged will take care of marshalling changes to the UI thread. This means that the actor no longer needs to be configured to run on the UI thread. The following code shows these changes:

<Window x:Class="WpfApplication1.MainWindow"
        xmlns="http://schemas.microsoft.com/winfx/2006/xaml/presentation"
        xmlns:x="http://schemas.microsoft.com/winfx/2006/xaml"
        Title="MainWindow" Height="350" Width="525">
    <StackPanel>
        <Button Click="Button_OnClick">Say Hi</Button>
        <TextBox Text="{Binding Greeting}"></TextBox>
    </StackPanel>
</Window>

using System.ComponentModel;
using System.Runtime.CompilerServices;
using System.Windows;
using Akka.Actor;

namespace WpfApplication1
{    
    public partial class MainWindow : Window
    {
        private ActorSystem _actorSystem;
        private IActorRef _actor;
        private ViewModel _viewModel ;

        public MainWindow()
        {
            InitializeComponent();

            _viewModel = new ViewModel();

            _actorSystem = ActorSystem.Create("MySystem");

            _actor = _actorSystem.ActorOf(Props.Create(() => new HelloWorldActor(_viewModel)));
            
            DataContext = _viewModel;
        }

        private void Button_OnClick(object sender, RoutedEventArgs e)
        {
            _actor.Tell("G'day");
        }
    }

    public class HelloWorldActor : ReceiveActor
    {
        private readonly ViewModel _viewModel;

        public HelloWorldActor(ViewModel viewModel)
        {
            _viewModel = viewModel;

            Receive<string>(s => _viewModel.Greeting = s);
        }
    }

    public class ViewModel : INotifyPropertyChanged
    {
        private string _greeting;

        public string Greeting
        {
            get { return _greeting; }
            set
            {
                _greeting = value;
                OnPropertyChanged();
            }
        }

        public event PropertyChangedEventHandler PropertyChanged;

        protected virtual void OnPropertyChanged([CallerMemberName] string propertyName = null)
        {
            var handler = PropertyChanged;
            if (handler != null) handler(this, new PropertyChangedEventArgs(propertyName));
        }
    }
}

You can read more about dispatchers in the Akka.NET docs and learn more about using Akka.NET with WPF in my Pluralsight course: Building Reactive Concurrent WPF Applications with Akka.NET.

You can start watching with a Pluralsight free trial.

SHARE:

Custom FeatureToggle Implementations for Non-Continuous-Delivery Usages

My open source fetaure toggling library contains a number of prebuilt toggles for common things such as enabling a feature based on the date, or a configuration value.

It’s also easy to create custom toggles by implementing IFeatureToggle.

Up to now, FeatureToggle has mainly been an aid for continuous delivery; a “half done” feature can simply be configured off so it doesn’t appear in the UI.

I’m wondering if the following approach has merit, namely treating conditionally available features as a first class citizens. So this is not just using them for continuous delivery but to encapsulate actual features of the application.

The example below requires 3 NuGet packages:

  • FeatureToggle.Core
  • FeatureToggle.WPFExtensions
  • MVVMLight

So the feature in the application will restrict the availability of mature rated games to customers who are 18+.

First off the feature toggle:

using FeatureToggle.Core;

namespace CustomFeatureToggle
{
    class MatureTitleSelectionFeature : IFeatureToggle
    {       
        public MatureTitleSelectionFeature(Customer customer)
        {
            FeatureEnabled = customer.Age >= 18;
        }

        public bool FeatureEnabled { get; set; }
    }
}

Here the business logic is encapsulated in the feature toggle and can be tested.

Next the viewmodel:

class MainViewModel : ViewModelBase
{
    private Customer _selectedCustomer;
    private IFeatureToggle _matureTitlesFeature;
    private ObservableCollection<Customer> _customers;

    public MainViewModel()
    {
        Customers = new ObservableCollection<Customer>
                    {
                        new Customer {Name = "Sarah", Age = 32},
                        new Customer {Name = "Robert", Age = 17}
                    };

        SelectedCustomer = Customers[0];

        MatureTitlesFeature = new MatureTitleSelectionFeature(SelectedCustomer);
    }

    public ObservableCollection<Customer> Customers
    {
        get
        {
            return _customers;                 
        }
        set
        {
            _customers = value; 
            Set(() => Customers, ref _customers, value);                 
        }
    }

    public Customer SelectedCustomer
    {
        get
        {
            return _selectedCustomer;
        }
        set
        {
            _selectedCustomer = value;
            
            Set(() => SelectedCustomer, ref _selectedCustomer, value);

            MatureTitlesFeature = new MatureTitleSelectionFeature(SelectedCustomer);
        }
    }

    public IFeatureToggle MatureTitlesFeature
    {
        get
        {
            return _matureTitlesFeature;
        }
        set
        {
            _matureTitlesFeature = value;

            Set(() => MatureTitlesFeature, ref _matureTitlesFeature, value);
        }
    }
}

Here, every time the selected customer changes, a new (immutable) toggle is created based on the customer’s details, i.e. Age.

The visibility in the UI of mature titles is simple data binding, using a visibility convertor from FeatureToggle.WPFExtensions.

<Window x:Class="CustomFeatureToggle.MainWindow"
        xmlns="http://schemas.microsoft.com/winfx/2006/xaml/presentation"
        xmlns:x="http://schemas.microsoft.com/winfx/2006/xaml"
        xmlns:toggles="clr-namespace:FeatureToggle.Toggles;assembly=FeatureToggle.WpfExtensions"
        Title="MainWindow" Height="350" Width="525">
    <Window.Resources>
        <toggles:FeatureToggleToVisibilityConverter x:Key="ToggleVisConverter"></toggles:FeatureToggleToVisibilityConverter>
    </Window.Resources>
    <Grid>
        <StackPanel>
            <ComboBox DisplayMemberPath="Name" 
                      ItemsSource="{Binding Customers, Mode=TwoWay}"
                      SelectedItem="{Binding SelectedCustomer}"></ComboBox>
            <TextBlock>All audience titles here</TextBlock>
            <TextBlock Visibility="{Binding MatureTitlesFeature, Converter={StaticResource ToggleVisConverter}, Mode=TwoWay}">Mature titles here</TextBlock>
        </StackPanel>
    </Grid>
</Window>

I’m wondering how this approach would scale out for larger apps.

screenshot showing mature visible


screenshot showing mature invisible

SHARE:

Implementing Platform Specific Code in Universal Windows Apps with MVVMLight and Dependency Injection

In previous articles I’ve covered using MVVMLight in Universal Windows Apps and using C# partial classes and methods to implement different code on Windows Phone and Windows Store apps.

While partial classes/methods are a quick win to alter small amounts of code for each platform, overuse might become painful as the solution gets bigger. There are also limitations of partial methods such as they can only return void, they are implicitly private, cannot be virtual, etc.

If we’re using MVVMLight (or another framework or hand-rolled viewmodels) we can use dependency injection.

The viewmodel class is still shared between the two apps and doesn’t need to have partial methods which means we have more flexibility in the code we write.

As a dependency in the constructor, the viewmodel takes an instance of a class that implements an interface.

This interface-implementing class can then be two different classes, one in the phone project and one in the store project.

architecture diagram

So for example, in the shared project the following interface can be defined:

interface IGreetingService
{
    string GenerateGreeting();
}

Again in the shared project, the viewmodel is defined:

internal class MainViewModel : ViewModelBase
{
    private readonly IGreetingService _greetingService;
    private string _greeting;

    public MainViewModel(IGreetingService greetingService)
    {
        _greetingService = greetingService;

        SayHi = new RelayCommand(() => Greeting = _greetingService.GenerateGreeting());
    }

    public RelayCommand SayHi { get; set; }

    public string Greeting
    {
        get { return _greeting; }
        set { Set(() => Greeting, ref _greeting, value); }
    }
}

The key thing here is the constructor: it takes an IGreetingService.

When the SayHi command is executed, whichever instance of an IGreetingService was passed to the viewmodel, it’s GenerateGreeting() method will be called.

So in the store project the following class can be created:

public class WindowsStoreGreeter : IGreetingService
{
    public string GenerateGreeting()
    {
        return "Hello from Windows Store app!";
    }
}

And in the phone app:

public class WindowsPhoneGreeter : IGreetingService
{
    public string GenerateGreeting()
    {
        return "Hello from Windows Phone app!";
    }
}

It is in these specific implementations of the interface that the platform specific code is written.

So in the code-behind of the main window in the store app (for demonstration simplicity we’re not using a view model locator or DI library here):

public MainPage()
{
    this.InitializeComponent();

    this.DataContext = new MainViewModel(new WindowsStoreGreeter());
}

And in the phone app:

public MainPage()
{
    this.InitializeComponent();

    this.NavigationCacheMode = NavigationCacheMode.Required;

    this.DataContext = new MainViewModel(new WindowsPhoneGreeter());
}

In these code fragments a new MainViewModel is being created and supplied with a platform-specific IGreetingService implementation.

So in this way the shared MainViewModel class can still contain the majority of the code so we only have to write it once. But we still get the ability to write platform-specific code.

SHARE:

Using MVVM Light in Universal Windows Apps

I though it would be interesting to see how easy it is to define an MVVM Light view model once and then use it in both a Universal Windows Phone and Windows Store project.

So I created a new blank universal apps project and added the “MVVM Light libraries only (PCL) NuGet” package to both the Windows 8.1 project and the Windows Phone 8.1 project.

Next create a new view model class in the shared project:

using System.Linq;
using GalaSoft.MvvmLight;
using GalaSoft.MvvmLight.Command;

namespace UniMvvmLight
{
    class MainViewModel : ViewModelBase
    {
        public MainViewModel()
        {
            Words = "Hello";

            Reverse = new RelayCommand(() =>
                                       {
                                           Words = new string(Words.ToCharArray().Reverse().ToArray());
                                       });
        }

        private string _words;
        public RelayCommand Reverse { get; set; }

        public string Words
        {
            get
            {
                return _words;
            }
            set
            {
                Set(() => Words, ref _words, value);                
            }
        }
    }
}

I’m not going to create a view model locator etc, just simply set the datacontext in the code behind of both the phone and store MainWindow:

public MainPage()
{
    this.InitializeComponent();

    this.DataContext = new MainViewModel();
}

Next define the xaml in both the MainWindow.xaml in both phone and store projects:

<Grid>
    <StackPanel>
        <TextBox Text="{Binding Words}"></TextBox>
        <Button Command="{Binding Reverse}">Reverse</Button>
    </StackPanel>
</Grid>

Now running either the phone or store app works as expected, the view model binding works as expected and clicking the button reverses the string as expected. Whilst this is not surprising, the view model in the shared project is just like having a copy of it in both app projects, even so it’s still cool.

Windows phone simulator

If we wanted to we could then leverage C# partial classes and methods to define platform-specific viewmodel code.

SHARE:

Write Less MVVM ViewModel Boilerplate Code with T4

Although code snippets can make creating our initial viewmodels easier (properties, commands,etc.) it’s still tantamount to boilerplate code. Obviously the actions that happen when a command is executed is not boilerplate, but the actual definition is.

T4 templates are built into Visual Studio and allow us to define templates that are a mix of literal output (such as HTML tags) and C# code.

We can for example create a C# for loop around some literal output, e.g. “Hello World” to output it 10 times. For more info on T4, check out MSDN.

T4 for View Model Code Generation

Rather than hand-coding viewmodels, we can define a T4 template. In this template we are able to define the view models we want generating – included both commands and properties that we want to have on those view models.

The implementation in this article creates a new abstract base class for each view model that contains our commands and properties, in addition to a command init method to create and wire-up new MVVM Light RelayCommands along with can execute hooks.

Once T4 has generated these base class view models, we inherit from them and a constructor that calls the base class’s InitCommands method.

The sample application bind some text and a button:

before clicking button

When you click the button the bound Person in the viewmodel is updated and the command is disabled:

after clicking button


The actual viewmodel code looks like this:

using SampleWpfApplication.Model;

namespace SampleWpfApplication.ViewModel
{
    class MainViewModel : MainViewModelBase
    {
        public MainViewModel()
        {
            InitCommands();
        }

        protected override void ExecuteLoad()
        {
            Who = new Person {Name="Jason"};
            LoadCommand.RaiseCanExecuteChanged();
        }

        protected override bool CanExecuteLoad()
        {
            return Who == null;
        }
    }
}

Note it derives from MainViewModelBase which is the generated code.

Also note there’s no Person property (called “Who”) and no RelayCommand defined.

We’ve overridden a couple of methods from the base class to get the behaviour we want and also called InitCommands in the constructor.

The fragment of the T4 template that defines the viewmodels looks like this:

/// <summary>
/// Make changes to this class to define what view models you want generating
/// </summary>
public  static class ViewModelGeneratorSettings
{   
    // ********** Which name space the view model classes will live in
    public const string OutputNameSpace = "SampleWpfApplication.ViewModel";


    public static List<ViewModelDefinition> ViewModelDefinitions
    {
        get
        {
            return new List<ViewModelDefinition>()
                   {
                       // Define your view models here
                       new ViewModelDefinition
                       {
                           Name = "MainViewModel",
                           Properties =
                           {
                               Tuple.Create("Who", "Person"), // here Who is the name of the command prop, Person is the type
                               //Tuple.Create("NextTopic", "Topic"),
                               //Tuple.Create("CurrentTopicTimeRemaining", "TimeSpan"),
                               //Tuple.Create("TotalTimeRemaining", "TimeSpan"),
                               //Tuple.Create("IsPlaying", "bool") // here IsPlaying is the name of the command prop, bool is the type
                           },
                           Commands =
                           {
                               "Load", // Name of the commands
                               //"Pause"
                           }
                       },
                       new ViewModelDefinition
                       {
                           Name = "AnotherViewModel",
                           Properties =
                           {
                               Tuple.Create("SomeProperty", "int"),
                           },
                           Commands =
                           {
                               "A",
                               "B"
                           }
                       }, // etc.
                   };
        }
    }
}

To create new viewmodels we just add new ViewModelDefinitions and specify what properties and commands we want – currently property types are specified as strings rather than actual types.

To get started and see it in action, download the sample application from GitHub and see how it fits together. The full template is here as well.

While the examples here relate to MVVM Light, the concept could be used with other frameworks.

SHARE:

Telling a View to display a Message Dialog from the ViewModel With MVVMLight in Windows 8.1 Store Apps

The technique below is one technique, others exist, but the design goals of this approach are:

  1. The ViewModel cannot know or reference the View
  2. The ViewModel should should not care how the View displays or interacts with the user (it could be a dialog box, a flyout, etc.)
  3. The ViewModel must be Portable Class Library compatible and View agnostic, e.g. not need to know about dialog buttons, etc.
  4. Choices the user makes in the View dialog should result in Commands being executed on the ViewModel
  5. The ViewModel must not specify the content of the message text, button labels, etc. – the View should be responsible for the text/content of the message

One way to think about these design goals is that the ViewModel is asking for some semantic message/dialog to be displayed in the View.

Defining a Message to be used with the MVVM Light Messenger

The way the ViewModel “tells” the View to create a dialog is by sending a message using the MVVM Light Messenger.

First we define a custom message:

using System.Windows.Input;
using GalaSoft.MvvmLight.Messaging;

namespace Project.Portable.ViewModel.Messages
{
    public class ShowDialogMessage : MessageBase
    {
        public ICommand Yes { get; set; }
        public ICommand No { get; set; }
        public ICommand Cancel { get; set; }
    }
}

This message allows us to define the commands that the view will call, based on the choice that the user makes in the dialog.

More...

SHARE:

MVVM Light Telling the View to play Storyboards

Sometimes you want to tell the view to play an animation (Storyboard). One simple way to do this is to define a StartStoryboardMessage class, populate this with the name of a Storyboard to play, then send it to the Messenger.

public class StartStoryboardMessage
{
    public string StoryboardName { getset; }
    public bool LoopForever { getset; }
}

In the viewmodel when you want to tell the view to play an animation:

Messenger.Default.Send(new StartStoryboardMessage { StoryboardName = "TimerFinAnimation",LoopForever=true });

The view (i.e. in the code-behind) registers for these messages:

Messenger.Default.Register<StartStoryboardMessage>(this, x => StartStoryboard(x.StoryboardName, x.LoopForever));

...

private void StartStoryboard(string storyboardName, bool loopForever)
{
    var storyboard = FindName(storyboardName) as Storyboard;
    if (storyboard != null)
    {
        if (loopForever) 
            storyboard.RepeatBehavior = RepeatBehavior.Forever;
        else
            storyboard.RepeatBehavior = new RepeatBehavior(1);
        storyboard.Begin();
    }
}

SHARE:

MVVM Light Messenger Action Executing Multiple Times

With MVVM Light you can get into a situation where you code-behind's message handler gets called multiple times.

If the ctor for the view is registering for a message then the every time the view loads another subscription will be added; then when the message is sent the are effectively 2 'listeners' which end up executing the registered Action method multiple times.

One solution to this is to make sure you un-register when the view unloads.

The example below shows the code-behind for a simple settings page that registers for a DialogMessage in the ctor, and un-registers when the page is done with.

    public partial class Settings : PhoneApplicationPage
    {
        public Settings()
        {
            InitializeComponent();
            Messenger.Default.Register<DialogMessage>(this, DialogMessageHandler);
        }
        private void DialogMessageHandler(DialogMessage message)
        {
            var result = MessageBox.Show(message.Content, message.Caption, message.Button);
            
            message.ProcessCallback(result);
        }
        private void PhoneApplicationPage_Unloaded(object sender, RoutedEventArgs e)
        {
            Messenger.Default.Unregister(this);
        }
    }

SHARE:

MVVM Light Messenger Events Firing Multiple Times

If you register for a message in the ctor of your views code-behind, eg:

Messenger.Default.Register<DialogMessage>(this, DialogMessageHandler);

Every time you reload the view, i.e by navigating to it, the callback method (in this example DialogMessageHandler) can get called multiple times from the previous times ctor ran.

To fix this all you need to do create an event handler for the PhoneApplicationPage Unloaded and unregister the message (you can unregister more specifically using one of the other overloads):

Messenger.Default.Unregister(this);

SHARE:

Blendable Silverlight (and WPF) MVVM Applications With Dependency Injection

Introduction

One of the challenges with the idea of having separate developer and designers is how to allow the developers to write code while at the same time designers are working on the UI.

The goal is to give designers working in Expression Blend some sample data that they can data-bind to, that will match the runtime data items without requiring additional build scripts\etc.

The Model-View-ViewModel (MVVM) design pattern is a popular way to architect a SL\WPF app to provide separation of concerns, testability, etc. This article assumes a basic understanding of the MVVM pattern.

Getting Started - Defining The ViewModel

We create an interface to define out ViewModel (we can do this for every distinct view in the application). Before we do this though, we need something to represent our model data, for example a person:

     public class Person
    {
        public string Name { get; set; }
        public int Age { get; set; }
    }

Next we can define our ViewModel interface to allow the user to edit a person's details, the idea is that our view (our XAML user control) will be bound to a class that implements this interface. All data and operations are provided by the ViewModel, i.e. the view has no direct contact with the model.

     public interface IEditPersonDetailsViewModel
    {
        Person PersonToEdit { get; set; }
    }

It is this interface that allows both the designer and developer to work with a single common, well-defined set of data items.

Creating Some Design-Time Data

Now we have defined what data our view will have access to, we can proceed to provide the designer with some sample data to work with.

Remember that one of the goals for us to be able to run the application without having to modify configurations or have extra scripts, i.e. we want our app to provide a 'real' ViewModel at runtime, but a 'dummy' one to the designer in Blend. One way of providing this to to implement a version of the Service Locator design pattern:

    public class ViewModelServiceLocator
    {
        public IEditPersonDetailsViewModel GetEditPersonDetailsViewModel
        {
            get
            {
                return new EditPersonDetailsViewModel_DesignTime();
            }
        }
    }

The GetEditPersonDetailsViewModel property (by using a property we can bind to it in Blend) at the moment always returns an instance of  EditPersonDetailsViewModel_DesignTime, we will modify this shortly.EditPersonDetailsViewModel_DesignTime is defined as:

     public class EditPersonDetailsViewModel_DesignTime : IEditPersonDetailsViewModel
    {
        public EditPersonDetailsViewModel_DesignTime()
        {
            PersonToEdit = new Person()
            {
                Name="Mr Design Time Data",
                Age=44
            };
        }

        #region IEditPersonDetailsViewModel Members

        public Person PersonToEdit { get; set; }

        #endregion
    }

It is an instance of this class will provide the design time data in Blend.

Binding to Design-Time Data in Blend

(You can download a trial copy of blend from Microsoft.)

Open your project in blend and  on the Data tab choose "Define New Object Data Source...".


Select our ViewModelServiceLocator class and click OK.
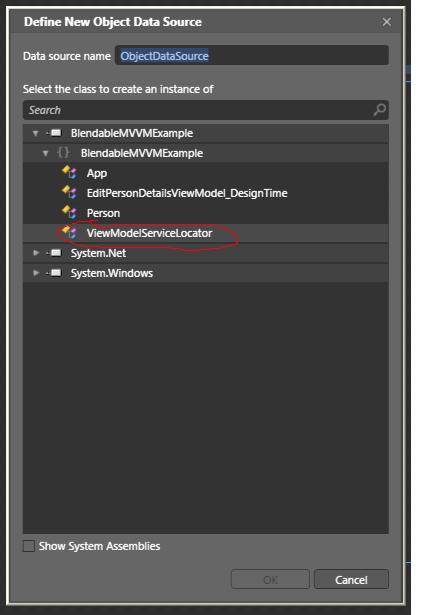


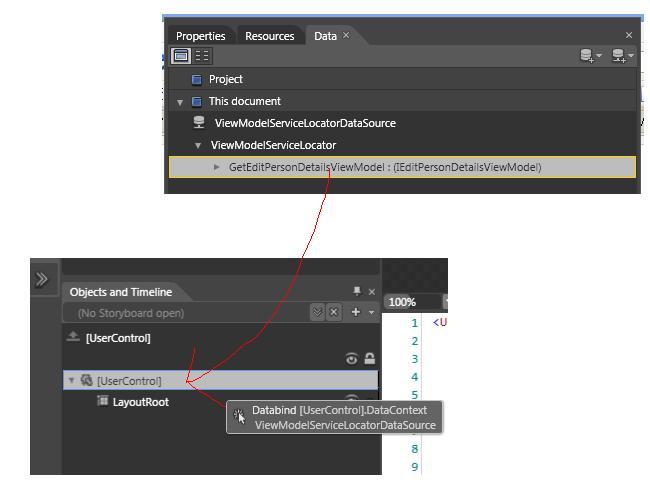
Now we bind our usercontrol to an instance of ViewModelServiceLocator, you can do this by dragging from the data tab to [UserControl] in the Objects and Timeline pane:
 

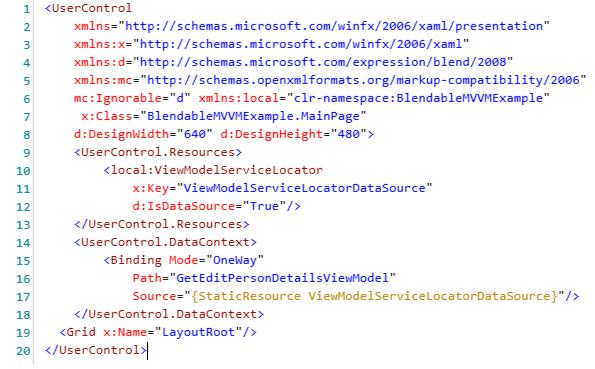
If you look at the xaml this creates, it's basically setting the DataContext of the entire user control to the return value of the GetEditPersonDetailsViewModel property.

Now the designer can (for example) bind a textbox to the person name:


So now we have a design time ViewModel bound in Blend. If we run the app now, we would get the design time ViewModel at runtime, so the next step is to provide a 'real' ViewModel at runtime.

Providing a Runtime ViewModel

First we define our ViewModel to be used at runtime (with a hard-coded person for illustration purposes):

    public class EditPersonDetailsViewModel : IEditPersonDetailsViewModel
    {
        public EditPersonDetailsViewModel()
        {
            PersonToEdit = new Person()
            {
                Name="Mr Runtime Data",
                Age=22
            };
        }

        #region IEditPersonDetailsViewModel Members

        public Person PersonToEdit{ get; set;}

        #endregion
    }

We can then modify our ViewModel service locator to provide our runtime version:

    public class ViewModelServiceLocator
    {
        public IEditPersonDetailsViewModel GetEditPersonDetailsViewModel
        {
            get
            {
                if (System.ComponentModel.DesignerProperties.IsInDesignTool)
                    return new EditPersonDetailsViewModel_DesignTime();
                else
                    return new EditPersonDetailsViewModel();
            }
        }
    }

When we run the app we get our runtime version: 


In a real situation you could pass in the Person to be editied to the runtime viewmodel constructor and possibly use Dependency Injection to provide the dependency.

Adding Dependency Injection to the Service Locator

We can add another layer of abstraction by having the service locator delegate to a DI framework. The examples below are from another project which uses Ninject to provide DI.

    public class ViewModelServiceLocator
    {
        public IMainViewModel GetMainViewModel
        {
            get
            {
                return KernelHost.Kernel.Get<IMainViewModel>();
            }
        }


        public IAddNewWeightViewModel GetAddNewWeightViewModel
        {
            get
            {
                return KernelHost.Kernel.Get<IAddNewWeightViewModel>();
            }
        }


        public IPersonDetailsViewModel GetPersonDetailsViewModel
        {
            get
            {
                return KernelHost.Kernel.Get<IPersonDetailsViewModel>();
            }
        }
    }


    public static class KernelHost
    {
        static IKernel _kernel;
       

        static KernelHost ()
        {
            _kernel = new StandardKernel(new DI.StandardNInjectModule());
        }


        public static IKernel Kernel
        {
            get
            {             
                return _kernel;
            }
            set
            {
                _kernel = value;
            }
        }
    }


    public class StandardNInjectModule : StandardModule
    {
        public override void Load()
        {           
            // For normally injected IModel resolve using the instance provided by factory
            Bind<IModel>().ToFactoryMethod<IModel>(ModelFactory.Get);

            // For when a new IModel is required (and explicitly not required from thefactory)
            Bind<IModel>().To<Model>().Only(When.Context.Variable("createNewNotFromFactory").EqualTo(true));

            Bind<IModelStore>().To<IsolatedStorageModelStore>();
            Bind<IModelLoader>().To<ModelLoader>();


            Bind<IPerson>().To<Person>().WithArgument<string>("name", "No Name Specified").WithArgument<double>("heightCm",150);
            Bind<IBMICalculator>().To<BMICalculator>().Using<SingletonBehavior>();
            Bind<IWeightRecord>().To<WeightRecord>();
            Bind<IAggregateData>().To<AggregateData>();


            // Bind view models
            Bind<IMainViewModel>().To<MainViewModel>();
            Bind<IAddNewWeightViewModel>().To<AddNewWeightViewModel>();
            Bind<IPersonDetailsViewModel>().To<PersonDetailsViewModel>();
         

#region "Blend design time view models"
#if DEBUG
            Bind<IMainViewModel>().To<MainViewModelDesignTime>().OnlyIf(x => (System.ComponentModel.DesignerProperties.IsInDesignTool));
            Bind<IAddNewWeightViewModel>().To<AddNewWeightViewModelDesignTime>().OnlyIf(x => (System.ComponentModel.DesignerProperties.IsInDesignTool));
            Bind<IPersonDetailsViewModel>().To<PersonDetailsViewModelDesignTime>().OnlyIf(x => (System.ComponentModel.DesignerProperties.IsInDesignTool));
           
#endif
#endregion
        }
    }


SHARE: