Getting Started with Azure Cosmos DB and Azure Functions

This is the first part in a series of articles.

Azure Cosmos DB is a “globally distributed, multi-model database service. With a click of a button, Cosmos DB enables you to elastically and independently scale throughput and storage across any number of Azure regions worldwide. You can elastically scale throughput and storage, and take advantage of fast, single-digit-millisecond data access using your favorite API including SQL, MongoDB, Cassandra, Tables, or Gremlin” [Microsoft]

One way to respond to changes in Cosmos is to use Azure Functions. When changes occur (currently limited to inserts and updates, e.g. not deletions ) the Function can be notified and executes.

Azure Function Cosmos DB triggers under the hood make use of the Azure Cosmos DB change feed to know when to execute functions.

Installing the Azure Cosmos Emulator

You can use the Azure Cosmos Emulator to get started locally without even needing an Azure subscription.

Once the emulator is downloaded and installed on your development PC (a Docker version is also available) you can start the  emulator from the start menu.

When running you can see the icon in the Windows taskbar notification area and it will pop up a browser window pointing to https://localhost:8081/_explorer/index.html as the following screenshot shows:

Azure Cosmos Emulator portal

Notice in the preceding screenshot the Primary Connection String, you will need to copy this for use in the local app settings later.

Creating an Azure Function Triggered from Cosmos DB

Once you have created an Azure Function project in Visual Studio, you need to add the Microsoft.Azure.WebJobs.Extensions.CosmosDB NuGet package to get access to the .NET C# bindings.

Now the package is installed (and with an up to date installation of Visual Studio) you can right click the Azure Functions project and choose Add –> New Azure Function…

Give the function a name and for the trigger type choose Cosmos - this will create a boiler plate function like the following:

public static class PizzaDriverLocationUpdated
{
    [FunctionName("PizzaDriverLocationUpdated")]
    public static void Run([CosmosDBTrigger(
        databaseName: "databaseName",
        collectionName: "collectionName",
        ConnectionStringSetting = "",
        LeaseCollectionName = "leases")]IReadOnlyList<Document> input, ILogger log)
    {
        if (input != null && input.Count > 0)
        {
            log.LogInformation("Documents modified " + input.Count);
            log.LogInformation("First document Id " + input[0].Id);
        }
    }
}

The preceding code uses the [CosmosDBTrigger] attribute to tell this function to execute when there are changes as specified by the following attribute parameters/properties:

  • databaseName - Azure Cosmos DB database with the monitored collection
  • collectionName – Collection being monitored for changes
  • ConnectionStringSetting – App setting name containing the connection string to the Azure Cosmos DB being monitored
  • LeaseCollectionName - name of the collection used to store leases, defaults to “leases” if not specified

The LeaseCollectionName is required by the trigger to store leases over Cosmos DB partitions, one thing to note: “If multiple functions are configured to use a Cosmos DB trigger for the same collection, each of the functions should use a dedicated lease collection or specify a different LeaseCollectionPrefix for each function. Otherwise, only one of the functions will be triggered” [Microsoft]

How to Create a Database and Collection in the Azure Cosmos Emulator

In the emulator portal in the browser, click Explorer.This will allow you to create collections in the emulator.

Click the New Collection button and enter the following:

  • Database id: pizza
  • Collection Id: driverLocation
  • Partition key: /storeId

Creating a new collection in the Azure Cosmos DB Emulator

Save this new collection.

Configuring an Azure Function Cosmos DB Trigger

Modify the function that was created earlier to be as follows:

public static class PizzaDriverLocationUpdated
{
    [FunctionName("PizzaDriverLocationUpdated")]
    public static void Run([CosmosDBTrigger(
        databaseName: "pizza",
        collectionName: "driverLocation",
        ConnectionStringSetting = "pizzaConnection")] IReadOnlyList<Document> input,
        ILogger log)
    {
        if (input != null && input.Count > 0)
        {
            log.LogInformation("Documents modified " + input.Count);
            log.LogInformation("First document Id " + input[0].Id);
        }
    }
}

Notice in the preceding code that the databaseName and collectionName settings match what we just created in the emulator.

The ConnectionStringSetting is set to “pizzaConnection” – this needs to be in the function settings, in the case of local development in the local.settings.json file:

{
  "IsEncrypted": false,
  "Values": {
    "AzureWebJobsStorage": "UseDevelopmentStorage=true",
    "FUNCTIONS_WORKER_RUNTIME": "dotnet",
    "pizzaConnection": "AccountEndpoint=https://localhost:8081/;AccountKey=C2y6yDjf5/R+ob0N8A7Cgv30VRDJIWEHLM+4QDU5DE2nQ9nDuVTqobD4b8mGGyPMbIZnqyMsEcaGQy67XIw/Jw=="
  },
  "Host": {
    "LocalHttpPort": 7071,
    "CORS": "http://localhost:3872",
    "CORSCredentials": true
  }
}

Notice in the preceding settings, the value for the pizzaConnection item is the Primary Connection String copied from the Azure Cosmos Emulator.

Testing the Function Locally

Now that the function code is configured and the database and collection exist in the emulator, hit F5 in Visual Studio (or click Run) and the local functions runtime will start.

Once the runtime has started, head back to the Cosmos Emulator in the browser, click on Pizza –> driverLocation –> Documents and click the New Document button.

Creating a new document in the Cosmos DB emulator

Add the following:

{
    "id": "1",
    "storeId": 42,
    "name": "Sarah",
    "lat" : 52,
    "long": 2
}

And click Save.

Head back to the locally running functions runtime window and you will see the function has noticed this new document and executed:

Executing 'PizzaDriverLocationUpdated' (Reason='New changes on collection driverLocation at 2019-05-10T04:10:29.9913171Z', Id=203ae791-c7d4-4270-ac6b-501f313c3805)
Documents modified 1
First document Id 1
Executed 'PizzaDriverLocationUpdated' (Succeeded, Id=203ae791-c7d4-4270-ac6b-501f313c3805)

If you head back to the emulator, modify the document (e.g. change the name to “Amrit”) and click Update, the function will trigger a second time:

Executing 'PizzaDriverLocationUpdated' (Reason='New changes on collection driverLocation at 2019-05-10T04:13:00.8233214Z', Id=778caddd-9f19-42fa-9d9d-6c5dd5892a25)
Documents modified 1
First document Id 1
Executed 'PizzaDriverLocationUpdated' (Succeeded, Id=778caddd-9f19-42fa-9d9d-6c5dd5892a25)

If you want to fill in the gaps in your C# knowledge be sure to check out my C# Tips and Traps training course from Pluralsight – get started with a free trial.

SHARE:

Diagnosing Failing Tests More Easily and Improving Test Code Readability

Sometimes the assertions that come bundled with a testing framework are suboptimal in that they do not provide test failure messages that allow easier understanding of why/where the test failed.

If the test failure message does not provide enough information, it may be necessary to run the test in debug mode just to find out what went wrong before fixing it. This test debugging step is wasted time.

Using the built-in assertions can also be suboptimal from a code readability point of view, though this can be a matter of personal preference.

The Fluent Assertions library aims to solve these two problems by:

  • Providing better, more descriptive test failure messages; and
  • Providing a more fluent, readable  syntax for assertions

Let’s take a look at some examples. Note that Fluent Assertions is an “add on” to whatever testing framework you are using (NUnit, xUnit.net, etc.).

The following test (using NUnit) shows a simple case:

public class CreditCardApplication
{
    public string Name { get; set; }
    public int Age { get; set; }
    public decimal AnnualGrossIncome { get; set; }

    public int CalculateCreditScore()
    {
        int score = 0;

        if (Age > 30)
        {
            score += 10;
        }

        if (AnnualGrossIncome < 50_000)
        {
            score += 30;
        }
        else
        {
            score += 30;
        }

        return score;
    }
}


[Test]
public void NUnitExample()
{
    var application = new CreditCardApplication
    {
        Name = "Sarah",
        Age = 31,
        AnnualGrossIncome = 50_001
    };

    Assert.That(application.CalculateCreditScore(), Is.EqualTo(50));
}

When this test fails using the built-in NUnit asserts, the failure message is:

Test Outcome:    Failed

Result Message:    
Expected: 50
  But was:  40

Notice in the preceding test failure message we don’t have any context about what is failing or what the number 50 and 40 represent. While well-named tests can help with this, it can be helpful to have additional information, especially when there are multiple asserts in a single test method.

The same test in xUnit.net:

[Fact]
public void XUnitExample()
{
    var application = new CreditCardApplication
    {
        Name = "Sarah",
        Age = 31,
        AnnualGrossIncome = 50_001
    };

    Assert.Equal(50, application.CalculateCreditScore());
}

Produces the message:

Test Outcome:    Failed

Result Message:    
Assert.Equal() Failure
Expected: 50
Actual:   40

Once again there is no additional context about the failure.

The same test written using Fluent Assertions would look like the following:

[Fact]
public void XUnitExample_WithFluentAssertions()
{
    var application = new CreditCardApplication
    {
        Name = "Sarah",
        Age = 31,
        AnnualGrossIncome = 50_001
    };


    application.CalculateCreditScore().Should().Be(50);
}

Now when the test fails, the message looks like the following:

Test Outcome:    Failed
Result Message:
Expected application.CalculateCreditScore() to be 50, but found 40.

Notice the failure is telling us the method (or variable) name that is being asserted on – in this example the CalculateCreditScore method.

Optionally you can also add a “because” to further clarify failures:

[Fact]
public void XUnitExample_WithFluentAssertions_Because()
{
    var application = new CreditCardApplication
    {
        Name = "Sarah",
        Age = 31,
        AnnualGrossIncome = 50_001
    };


    application.CalculateCreditScore().Should().Be(50, because: "an age of {0} should be worth 20 points and an income of {1} should be worth 30 points.", application.Age, application.AnnualGrossIncome);
}

This would now produce the following failure message:

Test Outcome:    Failed
Result Message:    
Expected application.CalculateCreditScore() to be 50 because an age of 31 should be worth 20 points and an income of 50001 should be worth 30 points., but found 40.

Notice the “because” not only gives a richer failure message but also helps describe the test. While you probably wouldn’t use the because feature on every assert, you could use it to clarify tests that may not be obvious at first sight or that represent complex domain logic or algorithms. You should also be aware that the because text may need modifying if the business logic changes and this may introduce an additional maintenance cost.

If you want to learn more about Fluent Assertions, check out my express Pluralsight course Improving Unit Tests with Fluent Assertions which you can get access to with a Pluralsight free trial by clicking the banner below.

SHARE:

Learning .NET Unit Testing the Easy Way

Knowing what you need to know is hard. Sometimes harder than the learning itself.

Many years ago I was getting started with .NET v1 and .NET unit testing, Agile had recently been “invented” and I had a printout of the agile manifesto on the office wall. I was also learning Test Driven Development (TDD), mocking, unit testing frameworks, assertions, data driven testing.

I remember it being a little overwhelming at times, so much to learn with fragments of information scattered around but no clearly defined path to follow to get where I knew I wanted to be: proficient and efficient in writing high quality, tested and testable code.

Today things are a little easier but there can still be the: “I don’t know what I need to know”.

This is where skills paths from Pluralsight can be super helpful. I wish I had had them all those years ago.

A path is a curated collection of courses in a specific order to get you to where you need to be for a specific learning goal.

I’m super proud to have contributed to the C# Unit Testing with NUnit Pluralsight path which at the time of writing you can start to watch for free with a Pluralsight free trial.

While it’s certainly possible that you could find the information and learn the topics yourself, you would also waste so much time in getting the information from disparate sources and trying to “meta learn” what it is you don’t know. Ultimately it depends on how much free time you have and how efficient you want to be at learning. You should always keep the end goal in mind and weigh up the costs/benefits/risks of the different ways of getting to that goal. If you want to learn to “how to write clean, testable code, all the way from writing your first test to mocking out dependencies to developing a pragmatic suite of unit tests for your application” then the C# Unit Testing with NUnit path may be your most efficient approach to get to your goal.

SHARE:

Returning HTTP Status Codes from Azure Functions

(This post refers to Azure Functions v2)

When creating HTTP-triggered Azure Functions there are a number of ways to indicate results back to the calling client.

Returning HTTP Status Codes Manually

To return a specific status code to the client you can create an instance of one of the …Result classes and return that from the function body.

The following example returns an instance of an OkResult or a BadRequestResult:

[FunctionName("AddActor1")]
public static async Task<IActionResult> AddActor1(
    [HttpTrigger(AuthorizationLevel.Function, "post")] HttpRequest req,
    ILogger log)
{
    log.LogInformation("C# HTTP trigger function processed a request.");

    string requestBody = await new StreamReader(req.Body).ReadToEndAsync();
    dynamic data = JsonConvert.DeserializeObject(requestBody);

    string name = data.actorName; // get name from dynamic/JSON object

    if (name == null)
    {
        // Return a 400 bad request  result to the client
        return new BadRequestResult();
    }

    // Do some processing
    char firstLetter = name[0];

    // Return a 200 OK to the client
    return new OkResult();                
}

If you wanted to provide additional success/failure information you could use the OkObjectResult and BadRequestObjectResult classes instead, these allow you to provide additional contextual information to the client:

[FunctionName("AddActor2")]
public static async Task<IActionResult> AddActor2(
    [HttpTrigger(AuthorizationLevel.Function, "post")] HttpRequest req,
    ILogger log)
{
    log.LogInformation("C# HTTP trigger function processed a request.");

    string requestBody = await new StreamReader(req.Body).ReadToEndAsync();
    dynamic data = JsonConvert.DeserializeObject(requestBody);

    string name = data.actorName; // get name from dynamic/JSON object

    if (name == null)
    {
        // Return a 400 bad request result to the client with additional information
        return new BadRequestObjectResult("Please pass an actorName in the request body");
    }

    // Do some processing
    char firstLetter = name[0];

    // Return a 200 OK to the client with additional information
    return new OkObjectResult($"Actor {name} was added");
}

Automatically Returning Status Codes

In addition to manually returning status code instances, you can let the functions runtime take care of this for you.

For example, the following code will automatically return a “204 no content” if the function executes without throwing an exception, or a “500 internal server error” if an exception was thrown:

[FunctionName("AddActor3")]
public static async Task AddActor3(
    [HttpTrigger(AuthorizationLevel.Function, "post")] HttpRequest req,
    ILogger log)
{
    log.LogInformation("C# HTTP trigger function processed a request.");

    string requestBody = await new StreamReader(req.Body).ReadToEndAsync();
    dynamic data = JsonConvert.DeserializeObject(requestBody);

    string name = data.actorName; // get name from dynamic/JSON object

    // Do some processing
    char firstLetter = name[0]; // 500 internal server error if name is null

    // Auto return a 204 no content if no exception was thrown
}

In the preceding code, if the client fails to provide a actorName in the JSON, rather then getting a more helpful “400 bad request” (with optional additional message), they instead get a less useful “500 internal server error” status code and they have no idea what may have gone wrong or how to resolve it.

In this way, automatic status codes can be helpful if you want to write less code or perhaps use the return value of the function in a binding as in the following example:

[FunctionName("AddActor4")]
[return: Queue("new-actor-first-letter")]
public static async Task<string> AddActor4(
    [HttpTrigger(AuthorizationLevel.Function, "post")] HttpRequest req,
    ILogger log)
{
    log.LogInformation("C# HTTP trigger function processed a request.");

    string requestBody = await new StreamReader(req.Body).ReadToEndAsync();
    dynamic data = JsonConvert.DeserializeObject(requestBody);

    string name = data.actorName;

    return name.Substring(0,1); // add a new message to the queue containing the first letter of the name
}

Once again, the preceding function will return a 500 if there is an exception (e.g. actorName not provided in JSON) but will return a “200 OK” if no exception occurs (rather than the “204 no content” in the earlier example).

If you want to fill in the gaps in your C# knowledge be sure to check out my C# Tips and Traps training course from Pluralsight – get started with a free trial.

SHARE:

Different Ways to Parse Http Request Data in Http-triggered Azure Functions

(This post refers to Azure Functions v2)

There are different ways to access both the request data and also request metadata when a HTTP-triggered Azure Function is executed.

Getting Query String Data in Azure Functions

Suppose we have the following class (e.g. in table storage):

public class PhotoMetadata
{
    public string PartitionKey { get; set; }
    public string RowKey { get; set; }
    public string FileName { get; set; }
    public string Keywords { get; set; }
}

We could write an Azure Function triggered by a HTTP GET that returns an item from a database by a querystring parameter called “id”:

[FunctionName("GetPhotoMetadata")]
public static IActionResult GetPhotoMetadata(
    [HttpTrigger(AuthorizationLevel.Function, "get")] HttpRequest req,
    ILogger log)
{
    log.LogInformation("C# HTTP trigger function processed a request.");

    string id = req.Query["id"];

    if (string.IsNullOrWhiteSpace(id))
    {
        return new NotFoundResult();
    }

    PhotoMetadata metadata = LoadFromDatabase(id);

    return new OkObjectResult(metadata);
}

In the preceding code, to access querystring parameters use req.Query and specify the key you are looking for, in this example “id”.

If there is no value in the incoming request, id will be null and we return a NotFoundResult (404).

Getting HTTP POST JSON Request Data in Azure Functions

When it comes to accessing POSTed data, there are a number of options.

Manually Convert JSON Request Strings

The first option is to take control of the process at a lower level and read the posted data from the request body and parse the JSON into a dynamic C# object. [If you’re not familiar with dynamic C# check out my Dynamic C# Fundamentals Pluralsight course]

First we define a model that will represent the posted data (we don’t want to use the PhotoMetadata class as we don’t want clients specifying partition and row keys):

public class PhotoMetadataAdditionRequest
{
    public string FileName { get; set; }
    public string Keywords { get; set; }
}

Next we can write a function that will parse this incoming data:

[FunctionName("AddPhotoMetadata")]
public static async Task<IActionResult> AddPhotoMetadata(
    [HttpTrigger(AuthorizationLevel.Function, "post")] HttpRequest req,
    ILogger log)
{
    log.LogInformation("C# HTTP trigger function processed a request.");


    log.LogInformation("You can get additional information about the request such as:");
    log.LogInformation($" length : {req.ContentLength}");
    log.LogInformation($" type   : {req.ContentType}");
    log.LogInformation($" https  : {req.IsHttps}");
    log.LogInformation($" host   : {req.Host}");


    // read the contents of the posted data into a string
    string requestBody = await new StreamReader(req.Body).ReadToEndAsync();

    // use Json.NET to deserialize the posted JSON into a C# dynamic object
    dynamic data = JsonConvert.DeserializeObject(requestBody);

    // data validation omitted for demo purposes

    // extract data from the dynamic object into strongly typed object
    PhotoMetadata metadata = new PhotoMetadata
    {
        FileName = data.fileName, // notice the camel case (lowercase f)
        PartitionKey = "landscapes",
        RowKey = Guid.NewGuid().ToString(),
        Keywords = data.keywords // notice the camel case (lowercase k)
    };

    SaveToDatabase(metadata);

    return new OkObjectResult(metadata.RowKey);
}

Notice in the preceding code that you can also access information about the request such as req.ContentLength. Also note the lowercase f and k in data.fileName and data.keywords.

We can post the following JSON to the function:

{
    "fileName": "IMG0382435.jpg",
    "keywords": "landscape, sky, sunset"
}

Automatically Bind to Strongly Types POCOs in Azure HTTP Functions

You can also let the runtime auto-convert the POSTed JSON into a specified C# type:

[FunctionName("AddPhotoMetadata")]
public static IActionResult AddPhotoMetadata(
    [HttpTrigger(AuthorizationLevel.Function, "post")] PhotoMetadataAdditionRequest metadataAdditionRequest,
    ILogger log)
{
    log.LogInformation("C# HTTP trigger function processed a request.");

    log.LogInformation($" FileName : {metadataAdditionRequest.FileName}");
    log.LogInformation($" Keywords : { metadataAdditionRequest.Keywords}");

    PhotoMetadata metadata = new PhotoMetadata
    {
        FileName = metadataAdditionRequest.FileName,
        PartitionKey = "landscapes",
        RowKey = Guid.NewGuid().ToString(),
        Keywords = metadataAdditionRequest.Keywords
    };

    SaveToDatabase(metadata);

    return new OkObjectResult(metadata.RowKey);
}

In the preceding code, instead of binding to a HttpRequest object,  we bind to the PhotoMetadataAdditionRequest. Behind the scenes the JSON will be automatically deserialized into a PhotoMetadataAdditionRequest object.

Note that if you have malformed JSON you may get errors. For example if the “fileName” item in the JSON was misspelt as “file” then the FileName property of the PhotoMetadata would end up being set to null but the function body would still execute. If you had an int in the POCO but the POSTed JSON had a string (e.g. “hello”) instead of a number, then the runtime cannot bind a “hello” to an int – in this case your function body code will not even execute and you get an error from the runtime such as: “System.Private.CoreLib: Exception while executing function: AddPhotoMetadata. Microsoft.Azure.WebJobs.Host: Exception binding parameter 'metadataAdditionRequest'. System.Private.CoreLib: Input string was not in a correct format.” (and a 500 will status be returned to the client).

If you were handling things at a lower level (e.g. with the dynamic approach) you could perhaps provide a default value, do some extra logging, etc.

Accessing HTTP Request Metadata When Auto-binding to POCOs

If you want to do automatic binding and also want to get request metadata, you can simply add an extra parameter of type HttpRequest:

[FunctionName("AddPhotoMetadata")]
public static IActionResult AddPhotoMetadata(
    [HttpTrigger(AuthorizationLevel.Function, "post")] PhotoMetadataAdditionRequest metadataAdditionRequest,
    HttpRequest req,
    ILogger log)
{
    log.LogInformation("C# HTTP trigger function processed a request.");

    log.LogInformation("You can get additional information about the request such as:");
    log.LogInformation($" length : {req.ContentLength}");
    log.LogInformation($" type   : {req.ContentType}");
    log.LogInformation($" https  : {req.IsHttps}");
    log.LogInformation($" host   : {req.Host}");

    log.LogInformation($" FileName : {metadataAdditionRequest.FileName}");
    log.LogInformation($" Keywords : { metadataAdditionRequest.Keywords}");

    PhotoMetadata metadata = new PhotoMetadata
    {
        FileName = metadataAdditionRequest.FileName,
        PartitionKey = "landscapes",
        RowKey = Guid.NewGuid().ToString(),
        Keywords = metadataAdditionRequest.Keywords
    };

    SaveToDatabase(metadata);

    return new OkObjectResult(metadata.RowKey);
}

Posting Form Data to Azure Functions

In addition to POSTing JSON content to an Azure Function, you can also POST form data and access the HttpRequest.Form property:

[FunctionName("AddPhotoMetadata")]
public static IActionResult AddPhotoMetadata(
    [HttpTrigger(AuthorizationLevel.Function, "post")] HttpRequest req,
    ILogger log)
{
    log.LogInformation("C# HTTP trigger function processed a request.");

    log.LogInformation("You can get additional information about the request such as:");
    log.LogInformation($" length : {req.ContentLength}");
    log.LogInformation($" type   : {req.ContentType}");
    log.LogInformation($" https  : {req.IsHttps}");
    log.LogInformation($" host   : {req.Host}");

    PhotoMetadata metadata = new PhotoMetadata
    {
        FileName = req.Form["fileName"], // access form data
        PartitionKey = "landscapes",
        RowKey = Guid.NewGuid().ToString(),
        Keywords = req.Form["keywords"]  // access form data
    };

    SaveToDatabase(metadata);

    return new OkObjectResult(metadata.RowKey);
}

If you want to fill in the gaps in your C# knowledge be sure to check out my C# Tips and Traps training course from Pluralsight – get started with a free trial.

SHARE:

Using the Azure SignalR Service Bindings in Azure Functions to Create Real-time Serverless Applications

The Azure SignalR Service is a serverless offering from Microsoft to facilitate real-time communications without having to manage the infrastructure yourself.

SignalR itself has been around for a while, now the hosted/serverless version makes it even easier to consume.

There are also Azure Functions bindings available that make it easy to integrate SignalR with Azure Functions and end clients.

This means that any Azure Function with any trigger type (e.g. Azure Cosmos DB changes, queue messages, HTTP requests,  blob triggers, etc.) can push out a notification to clients via Azure SignalR Service.

In this article we’ll build a simple example that simulates the “someone in Austin just bought a Surface Laptop” kind of messages that you see on some shopping websites.
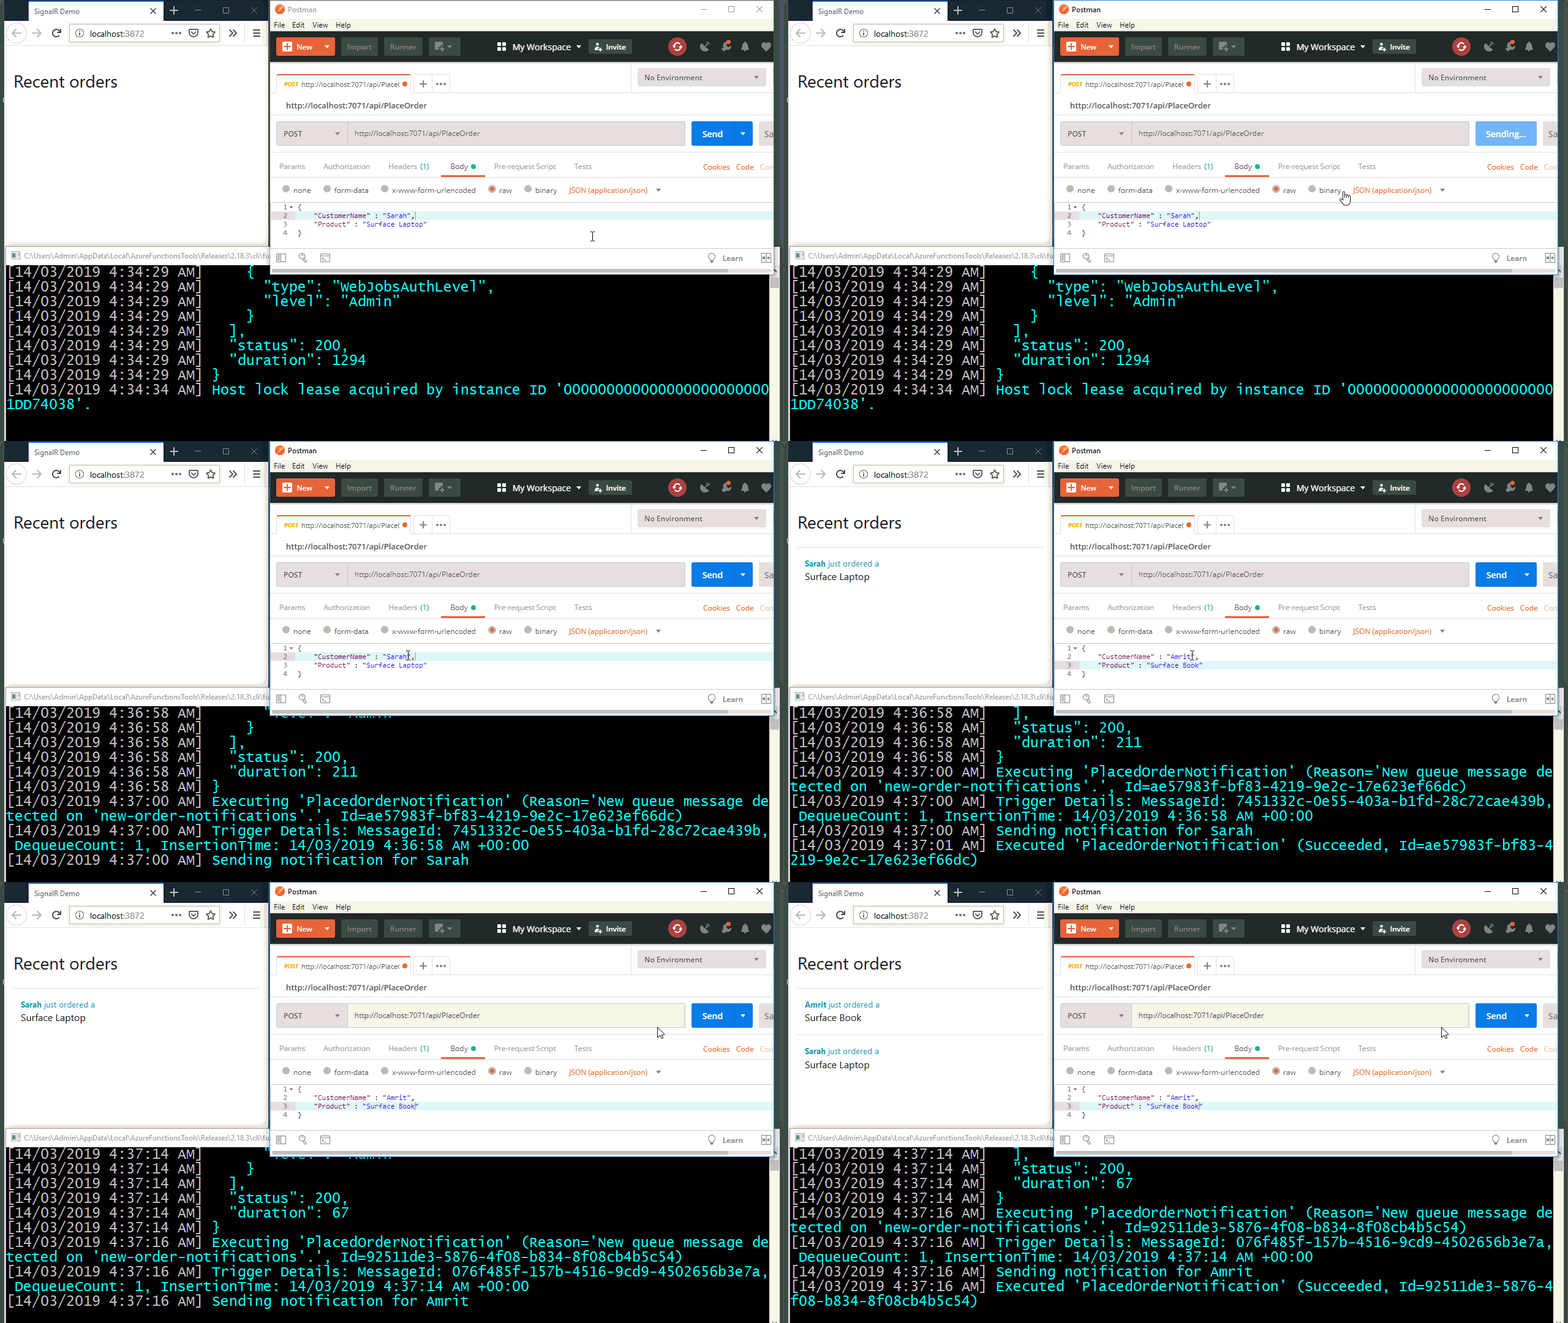
Azure SignalR Service Demo

Creating an Azure SignalR Service Instance

After logging into the Azure Portal, create a new SignalR Service instance (search for “SignalR Service”) – you can currently choose a free pricing tier.

Give the new instance a name, in this example the  instance was called “dctdemosorderplaced”. Once you’ve filled out the info for the new instance (such as resource group and  location) hit the create button and wait for Azure to create the new instance.

Once the instance has been created, open it and head into the settings and change the service mode to Serverless and save the changes, as the following screenshot shows:
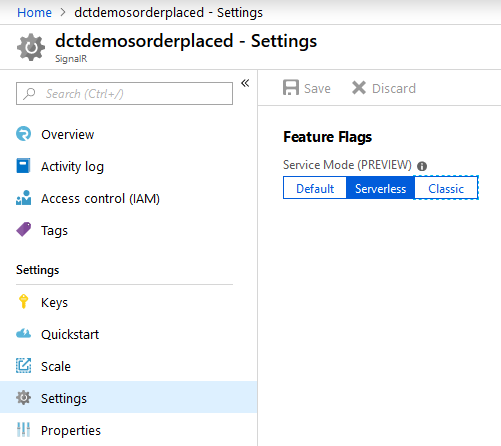
Setting SignalR Service to serverless mode

You will need to copy the connection string to be used in the function app later, you can get this from the Keys tab – copy the Primary connection string as shown in the following screenshot:
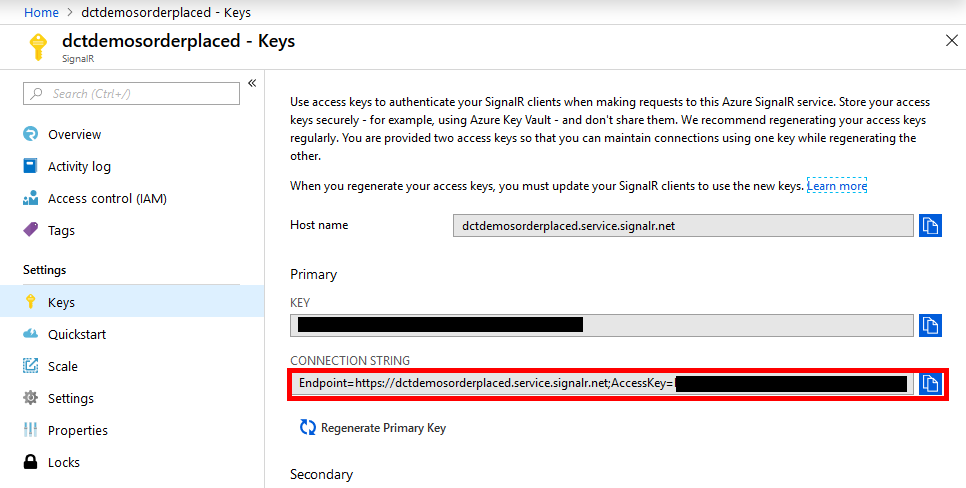
image

Creating the Azure Functions App

In Visual Studio (or Code) create a new Azure Functions project.

Open the local.settings.json file and make the following changes:

{
  "IsEncrypted": false,
  "Values": {
    "AzureWebJobsStorage": "UseDevelopmentStorage=true",
    "FUNCTIONS_WORKER_RUNTIME": "dotnet",
    "AzureSignalRConnectionString": "PASTE YOUR SIGNALR SERVICE CONNECTION STRING HERE"
  },
  "Host": {
    "LocalHttpPort": 7071,
    "CORS": "http://localhost:3872",
    "CORSCredentials": true
  }
}

In the preceding code notice 2 things:

  1. The AzureSignalRConnectionString setting: paste your connection string here
  2. The CORS entries to configure the local environment (http://localhost:3872 is whatever local IIS Express port you will run the test website from)

Add a couple of classes to represent an incoming order and an order stored in table storage (we could have also use Cosmos DB or another storage mechanism – it isn’t really relevant to the SignalR demo):

public class OrderPlacement
{
    public string CustomerName { get; set; }
    public string Product { get; set; }
}


// Simplified for demo purposes
public class Order
{
    public string PartitionKey { get; set; }
    public string RowKey { get; set; }
    public string CustomerName { get; set; }
    public string Product { get; set; }
}

We can now add a function that will allow a new order to be placed:

public static class PlaceOrder
{
    [FunctionName("PlaceOrder")]
    public static async Task<IActionResult> Run(
        [HttpTrigger(AuthorizationLevel.Function, "post")] OrderPlacement orderPlacement,
        [Table("Orders")] IAsyncCollector<Order> orders, // could use cosmos db etc.
        [Queue("new-order-notifications")] IAsyncCollector<OrderPlacement> notifications,
        ILogger log)
    {
        await orders.AddAsync(new Order
        {
            PartitionKey = "US",
            RowKey = Guid.NewGuid().ToString(),
            CustomerName = orderPlacement.CustomerName,
            Product = orderPlacement.Product
        });

        await notifications.AddAsync(orderPlacement);

        return new OkResult();
    }
}

The preceding function allows a new OrderPlacement to be HTTP POSTed to the function. The function saves it in table storage and also adds it to a storage queue.

Creating The Azure Functions with the SignalR Bindings

The first SignalR-related function is the function that a client calls to get itself wired-up to the the SignalR service in the cloud:

[FunctionName("negotiate")]
public static SignalRConnectionInfo GetOrderNotificationsSignalRInfo(
    [HttpTrigger(AuthorizationLevel.Anonymous, "post")] HttpRequest req,
    [SignalRConnectionInfo(HubName = "notifications")] SignalRConnectionInfo connectionInfo)
{
    return connectionInfo;
}

This function will be automatically called from the SignalR client code as we’ll see later in this article. Notice the function returns a SignalRConnectionInfo object to the client. This data contains the SignalR URL and an access token which the client can use. Also notice that the SignalRConnectionInfo binding allows the SignalR hub name to be specified, in this case “notifications”.

Now the client can negotiate a connection to the Azure SignalR Service via our Function App.

Now the client can get itself wired-up, we need to push some data to the client:

[FunctionName("PlacedOrderNotification")]
public static async Task Run(
    [QueueTrigger("new-order-notifications")] OrderPlacement orderPlacement,
    [SignalR(HubName = "notifications")] IAsyncCollector<SignalRMessage> signalRMessages,
    ILogger log)
{
    log.LogInformation($"Sending notification for {orderPlacement.CustomerName}");

    await signalRMessages.AddAsync(
        new SignalRMessage
        {
            Target = "productOrdered",
            Arguments = new[] { orderPlacement }
        });
}

The preceding function is triggered from the queue (“new-order-notifications”) that the initial HTTP function wrote to, but you can send SignalR messages from any triggered function.

Notice the [SignalR(HubName = "notifications")] binding specifies the same hub name as in the negotiate function.

To send notifications, you can simply add one or more SignalRMessage messages to the IAsyncCollector<SignalRMessage> In this function, the arguments contain the OrderPlacement object. The client will then be ale to access the customer name and product and display it on the website as a notification.

Creating an Azure SignalR Service JavaScript Client

Create a new empty ASP.NET Core project and add a default.html file under wwwroot. This example does not require any server-side code (controllers, etc.) in the demo web site, so a simple static HTML file is sufficient.

In the startup.cs configure default and static files:

public void Configure(IApplicationBuilder app, IHostingEnvironment env)
{
    if (env.IsDevelopment())
    {
        app.UseDeveloperExceptionPage();
    }

    app.UseDefaultFiles();
    app.UseStaticFiles();
}

Add the following content to the default.html file:

<html>

<head>
     <!--Adapted (aka hacked) from: https://azure-samples.github.io/signalr-service-quickstart-serverless-chat/demo/chat-v2/ -->

    <title>SignalR Demo</title>
    <link rel="stylesheet" href="https://cdn.jsdelivr.net/npm/bootstrap@4.1.3/dist/css/bootstrap.min.css">

    <style>
        .slide-fade-enter-active, .slide-fade-leave-active {
            transition: all 1s ease;
        }

        .slide-fade-enter, .slide-fade-leave-to {
            height: 0px;
            overflow-y: hidden;
            opacity: 0;
        }
    </style>
</head>

<body>
    <p>&nbsp;</p>
    <div id="app" class="container">
        <h3>Recent orders</h3>

        <div class="row" v-if="!ready">
            <div class="col-sm">
                <div>Loading...</div>
            </div>
        </div>
        <div v-if="ready">
            <transition-group name="slide-fade" tag="div">
                <div class="row" v-for="order in orders" v-bind:key="order.id">
                    <div class="col-sm">
                        <hr />
                        <div>
                            <div style="display: inline-block; padding-left: 12px;">
                                <div>
                                    <span class="text-info small"><strong>{{ order.CustomerName }}</strong> just ordered a</span>
                                </div>
                                <div>
                                    {{ order.Product }}
                                </div>
                            </div>
                        </div>
                    </div>
                </div>
            </transition-group>
        </div>
    </div>

    <script src="https://cdn.jsdelivr.net/npm/vue@2.5.17/dist/vue.js"></script>
    <script src="https://cdn.jsdelivr.net/npm/@aspnet/signalr@1.1.2/dist/browser/signalr.js"></script>
    <script src="https://cdn.jsdelivr.net/npm/axios@0.18.0/dist/axios.min.js"></script>

    <script>
        const data = {
          orders: [],
          ready: false
        };

        const app = new Vue({
          el: '#app',
          data: data,
          methods: {
          }
        });

        const connection = new signalR.HubConnectionBuilder()
          .withUrl('http://localhost:7071/api')
          .configureLogging(signalR.LogLevel.Information)
          .build();

        connection.on('productOrdered', productOrdered);
        connection.onclose(() => console.log('disconnected'));

        console.log('connecting...');
        connection.start()
            .then(() => data.ready = true)
            .catch(console.error);

        let counter = 0;

        function productOrdered(orderPlacement) {
        orderPlacement.id = counter++; // vue transitions need an id
        data.orders.unshift(orderPlacement);
    }
    </script>
</body>

</html>

The .withUrl('http://localhost:7071/api') line is the root of your locally running Azure Function development runtime environment.

When this page loads, the negotiate function will be called in the Function App and will return the Azure SignalR Service connection details so the client can connect to the hub in the cloud and send/receive messages (in this example we are just receiving messages in the JavaScript client).

Running the Demo Application

Right-click the solution in Visual Studio and select “Set Startup Projects…” and choose Multiple startup projects and set the Function App project to Start and the ASP.NET core project to Start without debugging. This just means you can hit F5 and both projects will run.

Once both projects are running you should be able to post some JSON to the PlaceOrder function HTTP endpoint (for example using Postman) containing the CustomerName and Product:

{
    "CustomerName" : "Amrit",
    "Product" : "Surface Book"
}

This will save the order to table storage and add a message to the queue.

The queue-triggered function will pick up this message an send a notification to the client and you should then see “Amrit just ordered a Surface Book” appear on the web site.

Note that this demo application allows anonymous/unauthenticated clients to access the functions and the SignalR Service, in a real-work production app you should ensure you secure the entire system appropriately – see docs for more info.

You can find this entire sample app on GitHub.

If you want to fill in the gaps in your C# knowledge be sure to check out my C# Tips and Traps training course from Pluralsight – get started with a free trial.

SHARE:

Testing EventGridTrigger Azure Functions Locally (Without Using ngrok)

(This post refers to Azure Functions v2)

One way to test Azure Functions that use Event Grid triggers is to run the Function App locally and then get Azure in the cloud to invoke the function running on the local machine. As an example, suppose you want to use Event Grid to improve the reliability and responsiveness of Blob Storage processing. To do this the documentation suggests the use of ngrok. Now when a blob is added to a container in the cloud, the locally running function on the dev machine will be invoked via ngrok.

There is a somewhat simpler solution that allows you to invoke the Event Grid triggered function locally.

This approach bypasses Event Grid completely, so it is not a substitute for proper end-to-end testing, it’s more a development-time testing & debugging tool.

Manually Running Non HTTP-Triggered Azure Functions

You can manually trigger a non HTTP-triggered function (such as a timer triggered or Event Grid triggered function) via a special HTTP endpoint.

The endpoint is of the format: {host}/admin/functions/{function name}

For example, take the following function (which was also used in the post Improving Azure Functions Blob Trigger Performance and Reliability - Part 3: Using Event Grid to Respond to New Blobs):

public static class ProcessFoodBlobsEventGrid
{
    private static readonly string[] _meats = { "steak", "chicken", "venison" };

    [FunctionName("ProcessFoodBlobsEventGrid")]
    public static void Run(
     [EventGridTrigger]EventGridEvent blobCreatedEvent,
     [Blob("{data.url}")] string foods, // assumes small blob size so using string not stream
     [Blob("{data.url}.vegetarian")] out string vegetarian,
     [Blob("{data.url}.nonvegetarian")] out string nonVegetarian,
     ILogger log)
    {
        log.LogInformation("Processing a blob created event");

        StorageBlobCreatedEventData createdEvent = ((JObject)blobCreatedEvent.Data).ToObject<StorageBlobCreatedEventData>();

        log.LogInformation($"Blob: {createdEvent.Url}");
        log.LogInformation($"Api operation: {createdEvent.Api}");

        vegetarian = null;
        nonVegetarian = null;

        string[] foodLines = foods.Split(new[] { "\r\n", "\n" }, StringSplitOptions.RemoveEmptyEntries);


        foreach (var food in foodLines)
        {
            var isMeat = _meats.Contains(food);

            if (isMeat)
            {
                nonVegetarian += food + Environment.NewLine;
            }
            else
            {
                vegetarian += food + Environment.NewLine;
            }
        }
    }
}

The preceding function when running locally in development would have the special URL: http://localhost:7071/admin/functions/ProcessFoodBlobsEventGrid

If you had a timer-triggered function called HerdCats that you wanted to manually invoke (so you didn’t have to wait for the next timed invocation) the special URL would be:http://localhost:7071/admin/functions/HerdCats

Note: when running locally in development you do not have to authenticate. If you wanted to manually invoke a deployed function in Azure, you need to provide an x-functions-key header that contains the function master key.

Manually Invoking an Event Grid Triggered Azure Function

When using the special URL to invoke a function, you can also provide data to be passed to the function. The type of data passed will depend on the trigger type of the function that you are invoking.

To provide data to the function, a JSON payload can be posted to the special URL. The data that is passed to the function is contained in a JSON property called “input”:

{
    "input": "trigger data goes here"
}

If the Event Grid triggered function will be invoked by a new blob event, the contents of this input property must match the event schema for an Azure Blob Storage event.

An example of event JSON (taken from the Microsoft documentation):

[{
  "topic": "/subscriptions/{subscription-id}/resourceGroups/Storage/providers/Microsoft.Storage/storageAccounts/xstoretestaccount",
  "subject": "/blobServices/default/containers/testcontainer/blobs/testfile.txt",
  "eventType": "Microsoft.Storage.BlobCreated",
  "eventTime": "2017-06-26T18:41:00.9584103Z",
  "id": "831e1650-001e-001b-66ab-eeb76e069631",
  "data": {
    "api": "PutBlockList",
    "clientRequestId": "6d79dbfb-0e37-4fc4-981f-442c9ca65760",
    "requestId": "831e1650-001e-001b-66ab-eeb76e000000",
    "eTag": "0x8D4BCC2E4835CD0",
    "contentType": "text/plain",
    "contentLength": 524288,
    "blobType": "BlockBlob",
    "url": "https://example.blob.core.windows.net/testcontainer/testfile.txt",
    "sequencer": "00000000000004420000000000028963",
    "storageDiagnostics": {
      "batchId": "b68529f3-68cd-4744-baa4-3c0498ec19f0"
    }
  },
  "dataVersion": "",
  "metadataVersion": "1"
}]

When testing the function outlined earlier, the first thing to do is ensure that there is a blob in the local blob container that will be read by the function by way of the blob input binding: [Blob("{data.url}")] string foods.

For example, in the Storage Emulator a blob called in.txt can be uploaded to the food-in container.

Now the new blob event data JSON needs to be modified, specifically the data.url property needs to contain the URL to the local blob: http://127.0.0.1:10000/devstoreaccount1/food-in/in.txt

A modified version with updated data.url would be as follows:

[{
  "topic": "/subscriptions/{subscription-id}/resourceGroups/Storage/providers/Microsoft.Storage/storageAccounts/xstoretestaccount",
  "subject": "/blobServices/default/containers/testcontainer/blobs/testfile.txt",
  "eventType": "Microsoft.Storage.BlobCreated",
  "eventTime": "2017-06-26T18:41:00.9584103Z",
  "id": "831e1650-001e-001b-66ab-eeb76e069631",
  "data": {
    "api": "PutBlockList",
    "clientRequestId": "6d79dbfb-0e37-4fc4-981f-442c9ca65760",
    "requestId": "831e1650-001e-001b-66ab-eeb76e000000",
    "eTag": "0x8D4BCC2E4835CD0",
    "contentType": "text/plain",
    "contentLength": 524288,
    "blobType": "BlockBlob",
    "url": "http://127.0.0.1:10000/devstoreaccount1/food-in/in.txt",
    "sequencer": "00000000000004420000000000028963",
    "storageDiagnostics": {
      "batchId": "b68529f3-68cd-4744-baa4-3c0498ec19f0"
    }
  },
  "dataVersion": "",
  "metadataVersion": "1"
}]

The next step is to remove the surrounding [], and replace the with . Then paste the resulting JSON into the input property:

{
    "input": "
  {
    'topic': '/subscriptions/{subscription-id}/resourceGroups/Storage/providers/Microsoft.Storage/storageAccounts/xstoretestaccount',
    'subject': '/blobServices/default/containers/oc2d2817345i200097container/blobs/oc2d2817345i20002296blob',
    'eventType': 'Microsoft.Storage.BlobCreated',
    'eventTime': '2017-06-26T18:41:00.9584103Z',
    'id': '831e1650-001e-001b-66ab-eeb76e069631',
    'data': {
      'api': 'PutBlockList',
      'clientRequestId': '6d79dbfb-0e37-4fc4-981f-442c9ca65760',
      'requestId': '831e1650-001e-001b-66ab-eeb76e000000',
      'eTag': '0x8D4BCC2E4835CD0',
      'contentType': 'application/octet-stream',
      'contentLength': 524288,
      'blobType': 'BlockBlob',
      'url': 'http://127.0.0.1:10000/devstoreaccount1/food-in/in.txt',
      'sequencer': '00000000000004420000000000028963',
      'storageDiagnostics': {
        'batchId': 'b68529f3-68cd-4744-baa4-3c0498ec19f0'
      }
    },
    'dataVersion': '',
    'metadataVersion': '1'
  }
"
}

Now this JSON can be POSTed to the special URL: in the case of the example in this post the URL would be: http://localhost:7071/admin/functions/ProcessFoodBlobsEventGrid

The following screenshot shows posting using Postman:


Using Postman to post to Event Grid triggered Azure Function

Posting will cause the Event Grid triggered function to be invoked and the JSON contained inside the input property will be passed to the trigger input EventGridEvent blobCreatedEvent object. The function will execute and read in the blob called “in.txt”.

If you want to fill in the gaps in your C# knowledge be sure to check out my C# Tips and Traps training course from Pluralsight – get started with a free trial.

SHARE:

Improving Azure Functions Blob Trigger Performance and Reliability - Part 4: Periodically Checking for Unprocessed Blobs

In the this final part of this series we wrap up by briefly discussing some ways to check for blobs that have not been processed correctly.

When using Azure Functions, a timer trigger can be used to automatically periodically execute a function based on a CRON expression. The following code is and example of a timer-triggered function:

public static class CheckBlobs
{
    [FunctionName("CheckBlobs")]
    public static void Run(
        [TimerTrigger("0 */5 * * * *")]TimerInfo myTimer, 
        ILogger log)
    {
        log.LogInformation($"C# Timer trigger function executed at: {DateTime.Now}");

        // Blob checking logic here
    }
}

There are a number of ways to check for unprocessed blobs depending on the solution you are building, some examples:

  • Check that an output blob exists for every input blob
  • Use a database to keep track of blobs that were uploaded and compare this to actual output blobs
  • If blobs are deleted after they have been processed, check there are no blobs in the container
  • Etc.

Some things to bear in mind if implementing this kind of checking include:

  • How often/when to run the function?
  • How long after a blob is written should you give it to be processed normally?
  • Will running this function interfere with any other processing in the system?
  • What if a blob is due to be processed (e.g. message sitting in a queue but not yet processed)? Could this create false positives or cause duplication of processing?
  • How long does the checking function take to execute? Will it take too long as the number of blobs increases and will the function be terminated by the runtime?
  • How/who do you notify of missed blobs (email, SMS, create ticket in CRM/bug system, etc.)?
  • Do you try to perform auto-retry of processing? Again, could this cause duplication, errors, etc.?

You could also use logging/Application Insights to provide you with information, or write every incoming blob name to a database and update that record when a blob has been processed, this way unprocessed blobs can be found with a simple “IF NOT PROCESSED” query.

If you want to fill in the gaps in your C# knowledge be sure to check out my C# Tips and Traps training course from Pluralsight – get started with a free trial.

SHARE:

Improving Azure Functions Blob Trigger Performance and Reliability - Part 3: Using Event Grid to Respond to New Blobs

In the previous part of the series we saw how to improve the reliability of responding to new blobs by introducing a queue.This required the introduction of a Storage Queue to the solution and also that the writer of new blobs also write a queue message.

In this article, instead of manually writing messages to a queue on blob creation, we use Event Grid events.

Azure Event Grid has support for Blob Storage, meaning that when a new blob is written, Event Grid will notice this. We can then trigger an Azure Function from this Event Grid event.

This approach can improve the reliability and responsiveness compared to using a simple blob trigger: “Blob storage events are reliably sent to the Event grid service which provides reliable delivery services to your applications through rich retry policies and dead-letter delivery.” [Microsoft]

Creating an Event Grid Triggered Function

The following Azure Function code is a modified version of the code used in the previous article:

public static class ProcessFoodBlobsEventGrid
{
    private static readonly string[] _meats = { "steak", "chicken", "venison" };

    [FunctionName("ProcessFoodBlobsEventGrid")]
    public static void Run(
     [EventGridTrigger]EventGridEvent blobCreatedEvent,
     [Blob("{data.url}")] string foods, // assumes small blob size so using string not stream
     [Blob("{data.url}.vegetarian")] out string vegetarian,
     [Blob("{data.url}.nonvegetarian")] out string nonVegetarian,
     ILogger log)
    {
        log.LogInformation("Processing a blob created event");

        StorageBlobCreatedEventData createdEvent = ((JObject)blobCreatedEvent.Data).ToObject<StorageBlobCreatedEventData>();

        log.LogInformation($"Blob: {createdEvent.Url}");
        log.LogInformation($"Api operation: {createdEvent.Api}");

        vegetarian = null;
        nonVegetarian = null;

        string[] foodLines = foods.Split(new[] { "\r\n", "\n" }, StringSplitOptions.RemoveEmptyEntries);


        foreach (var food in foodLines)
        {
            var isMeat = _meats.Contains(food);

            if (isMeat)
            {
                nonVegetarian += food + Environment.NewLine;
            }
            else
            {
                vegetarian += food + Environment.NewLine;
            }
        }
    }
}

In the preceding code, the [EventGridTrigger]EventGridEvent blobCreatedEvent will cause the function to be trigged based on an Event Grid event being directed to the function.

The input blob binding [Blob("{data.url}")] string foods uses a binding expression and accesses the data.url property from the JSON data that’s contained in the event (this comes from the event schema for Blob Storage). The 2 output bindings also use the original blob path/name and append .vegetarian or .nonvegetarian. This implementation writes output blobs to the same container as the input blob. You could also use dynamic binding in Azure Functions with imperative runtime bindings to just extract the filename from the blob and write the output blobs to a different container.

Creating an Event Subscription for New Blobs

The function needs an event subscription to be created in Azure to recognize when new blobs are written and invoke the function. This can be done by navigating to the storage account (requires storage account v2) in the Azure Portal and clicking the Events link. You can then add a new event subscription as the following screenshot shows (note the Defined Event Types is set to Blob Created):

Creating a new Azure Event Grid Subscription to trigger an Azure Function

You can also specify subject filters to limit the event to a specific container and/or file type as the following screenshot shows:

Configuring Azure Event Grid subscription to filter on blob storage containers

You could also specify dead-lettering and retry policies in case the Function App is unable to respond.

Now when a blob is added, the event subscription will notice it and invoke the function.

Ultimately “Use the Event Grid trigger instead of the Blob storage trigger for blob-only storage accounts, for high scale, or to reduce latency.” [Microsoft]

If you want to fill in the gaps in your C# knowledge be sure to check out my C# Tips and Traps training course from Pluralsight – get started with a free trial.

SHARE:

Improving Azure Functions Blob Trigger Performance and Reliability - Part 2: Processing Delays and Missed Blobs

This is the second part of a series or articles.

When you add a new blob, your blob-triggered function may not be triggered immediately: “If the blob container being monitored contains more than 10,000 blobs, the Functions runtime scans log files to watch for new or changed blobs. This process can result in delays. A function might not get triggered until several minutes or longer after the blob is created.” [Microsoft]

Also when scanning log files to find new blobs that need processing, there’s “no guarantee that all events are captured. Under some conditions, logs may be missed.” [Microsoft]

This means that it is possible for some new blobs to be missed and not processed.

Using a Storage Queue to Trigger Processing of New Blobs

One alternative to reduce the likelihood of missed blobs and also improve the responsiveness of blob processing is to use a slightly more  complex (but still relatively straight forward) approach.

Essentially this alternative approach has the following workflow:

  1. New blob written to blob storage
  2. Write message to storage queue containing new blob path
  3. Queue-triggered function gets message from step 2
  4. Blob processing occurs

(Note that this alternative approach may not suit all situations depending on how new blobs are making their way into blob storage – who or whatever is writing the blob in step 1 also needs to be able to write a queue message.)

Blob Writing

This approach requires that when a blob is written, a queue message is also written.

As a simple example, this could be from client code as follows:

using Microsoft.WindowsAzure.Storage;
using Microsoft.WindowsAzure.Storage.Blob;
using System.IO;
using System.Threading.Tasks;

namespace AddNewBlob
{
    class Program
    {
        static async Task Main(string[] args)
        {
            CloudStorageAccount storageAccount = CloudStorageAccount.DevelopmentStorageAccount;
            CloudBlobClient cloudBlobClient = storageAccount.CreateCloudBlobClient();
            CloudBlobContainer cloudBlobContainer = cloudBlobClient.GetContainerReference("food-in");
            CloudBlockBlob cloudBlockBlob = cloudBlobContainer.GetBlockBlobReference("recipe1.txt");

            await WriteBlob();
            await WriteMessage();

            async Task WriteBlob()
            {
                using (var stream = await cloudBlockBlob.OpenWriteAsync())
                using (var sw = new StreamWriter(stream))
                {
                    await sw.WriteLineAsync("carrot");
                    await sw.WriteLineAsync("steak");
                    await sw.WriteLineAsync("apple");
                }
            }

            async Task WriteMessage()
            {
                var queueClient = storageAccount.CreateCloudQueueClient();
                var queue = queueClient.GetQueueReference("food-in");
                await queue.AddMessageAsync(new Microsoft.WindowsAzure.Storage.Queue.CloudQueueMessage("recipe1.txt"));
            }
        }

        
    }
}

Or perhaps the blob data comes in via an HTTP-triggered function as follows:

public static class AddRecipe
{
    [FunctionName("AddRecipe")]
    [return: Queue("food-in")]
    public static async Task<string> Run(
        [HttpTrigger(AuthorizationLevel.Function, "post", Route = null)] HttpRequest req,            
        ILogger log)
    {
        log.LogInformation("C# HTTP trigger function processed a request.");
        
        string ingredients = await new StreamReader(req.Body).ReadToEndAsync();

        // validation/error code omitted for demo purposes

        var blobName = Guid.NewGuid().ToString();

        await WriteBlob(); // ensure blob is written *before* function returns and add message to the queue

        return blobName; // write to queue


        async Task WriteBlob()
        {
            var account = CloudStorageAccount.DevelopmentStorageAccount; // In real app load this from secure config location
            var blobClient = account.CreateCloudBlobClient();
            var blobContainer = blobClient.GetContainerReference("food-in");
            var cloudBlockBlob = blobContainer.GetBlockBlobReference(blobName);
            await cloudBlockBlob.UploadTextAsync(ingredients);
        }
    }
}

Notice in the preceding code , the writing of the blob is being done explicitly in code to ensure that the queue message isn’t added until the blob is definitely available to be processed by the next function in the chain. (See this related GitHub issue).

More Reliable Blob Processing

The next function is where the actual processing of the new blob is carried out, it is however triggered from a queue rather than relying on a blob trigger:

public static class ProcessFoodBlobs
{
    private static readonly string[] _meats = { "steak", "chicken", "venison" };      

    [FunctionName("ProcessFoodBlobs")]
    public static void Run(
        [QueueTrigger("food-in")]string newBlobPath, 
        [Blob("food-in/{queueTrigger}")] string foods,
        [Blob("food-out/{queueTrigger}.vegetarian")] out string vegetarian,
        [Blob("food-out/{queueTrigger}.nonvegetarian")] out string nonVegetarian,
        ILogger log)
    {
        vegetarian = null;
        nonVegetarian = null;

        string[] foodLines = foods.Split(new[] {"\r\n", "\n"  }, StringSplitOptions.RemoveEmptyEntries);


        foreach (var food in foodLines)
        {
            var isMeat = _meats.Contains(food);

            if (isMeat)
            {
                nonVegetarian += food + Environment.NewLine;
            }
            else
            {
                vegetarian += food + Environment.NewLine;
            }
        }    
    }
}

In the preceding code we’re making use of automatic input blob binding.

Summary

This approach may offer some benefits at the cost of some additional complexity if you have a lot of blobs being written/stored/processed. It also has some other considerations to bear in mind such as what happens if the blob is deleted or changed before the message is picked up off the queue? As with all things you should consider your own requirements and ensure you do thorough testing which includes performance/load/stress testing.

If you want to fill in the gaps in your C# knowledge be sure to check out my C# Tips and Traps training course from Pluralsight – get started with a free trial.

SHARE: