The Azure SignalR Service is a serverless offering from Microsoft to facilitate real-time communications without having to manage the infrastructure yourself.
SignalR itself has been around for a while, now the hosted/serverless version makes it even easier to consume.
There are also Azure Functions bindings available that make it easy to integrate SignalR with Azure Functions and end clients.
This means that any Azure Function with any trigger type (e.g. Azure Cosmos DB changes, queue messages, HTTP requests, blob triggers, etc.) can push out a notification to clients via Azure SignalR Service.
In this article we’ll build a simple example that simulates the “someone in Austin just bought a Surface Laptop” kind of messages that you see on some shopping websites.

Creating an Azure SignalR Service Instance
After logging into the Azure Portal, create a new SignalR Service instance (search for “SignalR Service”) – you can currently choose a free pricing tier.
Give the new instance a name, in this example the instance was called “dctdemosorderplaced”. Once you’ve filled out the info for the new instance (such as resource group and location) hit the create button and wait for Azure to create the new instance.
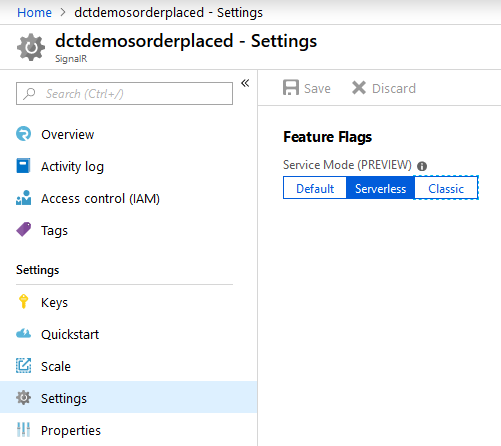
Once the instance has been created, open it and head into the settings and change the service mode to Serverless and save the changes, as the following screenshot shows:

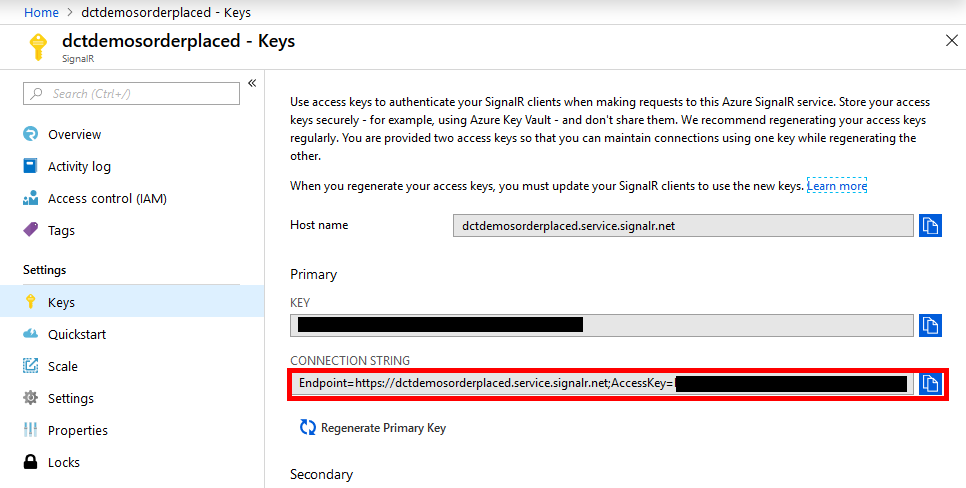
You will need to copy the connection string to be used in the function app later, you can get this from the Keys tab – copy the Primary connection string as shown in the following screenshot:

Creating the Azure Functions App
In Visual Studio (or Code) create a new Azure Functions project.
Open the local.settings.json file and make the following changes:
{
  "IsEncrypted": false,
  "Values": {
    "AzureWebJobsStorage": "UseDevelopmentStorage=true",
    "FUNCTIONS_WORKER_RUNTIME": "dotnet",
    "AzureSignalRConnectionString": "PASTE YOUR SIGNALR SERVICE CONNECTION STRING HERE"
  },
  "Host": {
    "LocalHttpPort": 7071,
    "CORS": "http://localhost:3872",
    "CORSCredentials": true
  }
}
In the preceding code notice 2 things:
- The AzureSignalRConnectionString setting: paste your connection string here
- The CORS entries to configure the local environment (http://localhost:3872 is whatever local IIS Express port you will run the test website from)
Add a couple of classes to represent an incoming order and an order stored in table storage (we could have also use Cosmos DB or another storage mechanism – it isn’t really relevant to the SignalR demo):
public class OrderPlacement
{
    public string CustomerName { get; set; }
    public string Product { get; set; }
}


// Simplified for demo purposes
public class Order
{
    public string PartitionKey { get; set; }
    public string RowKey { get; set; }
    public string CustomerName { get; set; }
    public string Product { get; set; }
}
We can now add a function that will allow a new order to be placed:
public static class PlaceOrder
{
    [FunctionName("PlaceOrder")]
    public static async Task<IActionResult> Run(
        [HttpTrigger(AuthorizationLevel.Function, "post")] OrderPlacement orderPlacement,
        [Table("Orders")] IAsyncCollector<Order> orders, // could use cosmos db etc.
        [Queue("new-order-notifications")] IAsyncCollector<OrderPlacement> notifications,
        ILogger log)
    {
        await orders.AddAsync(new Order
        {
            PartitionKey = "US",
            RowKey = Guid.NewGuid().ToString(),
            CustomerName = orderPlacement.CustomerName,
            Product = orderPlacement.Product
        });

        await notifications.AddAsync(orderPlacement);

        return new OkResult();
    }
}
The preceding function allows a new OrderPlacement to be HTTP POSTed to the function. The function saves it in table storage and also adds it to a storage queue.
Creating The Azure Functions with the SignalR Bindings
The first SignalR-related function is the function that a client calls to get itself wired-up to the the SignalR service in the cloud:
[FunctionName("negotiate")]
public static SignalRConnectionInfo GetOrderNotificationsSignalRInfo(
    [HttpTrigger(AuthorizationLevel.Anonymous, "post")] HttpRequest req,
    [SignalRConnectionInfo(HubName = "notifications")] SignalRConnectionInfo connectionInfo)
{
    return connectionInfo;
}
This function will be automatically called from the SignalR client code as we’ll see later in this article. Notice the function returns a SignalRConnectionInfo object to the client. This data contains the SignalR URL and an access token which the client can use. Also notice that the SignalRConnectionInfo binding allows the SignalR hub name to be specified, in this case “notifications”.
Now the client can negotiate a connection to the Azure SignalR Service via our Function App.
Now the client can get itself wired-up, we need to push some data to the client:
[FunctionName("PlacedOrderNotification")]
public static async Task Run(
    [QueueTrigger("new-order-notifications")] OrderPlacement orderPlacement,
    [SignalR(HubName = "notifications")] IAsyncCollector<SignalRMessage> signalRMessages,
    ILogger log)
{
    log.LogInformation($"Sending notification for {orderPlacement.CustomerName}");

    await signalRMessages.AddAsync(
        new SignalRMessage
        {
            Target = "productOrdered",
            Arguments = new[] { orderPlacement }
        });
}
The preceding function is triggered from the queue (“new-order-notifications”) that the initial HTTP function wrote to, but you can send SignalR messages from any triggered function.
Notice the [SignalR(HubName = "notifications")] binding specifies the same hub name as in the negotiate function.
To send notifications, you can simply add one or more SignalRMessage messages to the IAsyncCollector<SignalRMessage> In this function, the arguments contain the OrderPlacement object. The client will then be ale to access the customer name and product and display it on the website as a notification.
Creating an Azure SignalR Service JavaScript Client
Create a new empty ASP.NET Core project and add a default.html file under wwwroot. This example does not require any server-side code (controllers, etc.) in the demo web site, so a simple static HTML file is sufficient.
In the startup.cs configure default and static files:
public void Configure(IApplicationBuilder app, IHostingEnvironment env)
{
    if (env.IsDevelopment())
    {
        app.UseDeveloperExceptionPage();
    }

    app.UseDefaultFiles();
    app.UseStaticFiles();
}
Add the following content to the default.html file:
<html>
<head>
<!--Adapted (aka hacked) from: https://azure-samples.github.io/signalr-service-quickstart-serverless-chat/demo/chat-v2/ -->
<title>SignalR Demo</title>
<link rel="stylesheet" href="https://cdn.jsdelivr.net/npm/bootstrap@4.1.3/dist/css/bootstrap.min.css">
<style>
.slide-fade-enter-active, .slide-fade-leave-active {
transition: all 1s ease;
}
.slide-fade-enter, .slide-fade-leave-to {
height: 0px;
overflow-y: hidden;
opacity: 0;
}
</style>
</head>
<body>
<p> </p>
<div id="app" class="container">
<h3>Recent orders</h3>
<div class="row" v-if="!ready">
<div class="col-sm">
<div>Loading...</div>
</div>
</div>
<div v-if="ready">
<transition-group name="slide-fade" tag="div">
<div class="row" v-for="order in orders" v-bind:key="order.id">
<div class="col-sm">
<hr />
<div>
<div style="display: inline-block; padding-left: 12px;">
<div>
<span class="text-info small"><strong>{{ order.CustomerName }}</strong> just ordered a</span>
</div>
<div>
{{ order.Product }}
</div>
</div>
</div>
</div>
</div>
</transition-group>
</div>
</div>
<script src="https://cdn.jsdelivr.net/npm/vue@2.5.17/dist/vue.js"></script>
<script src="https://cdn.jsdelivr.net/npm/@aspnet/signalr@1.1.2/dist/browser/signalr.js"></script>
<script src="https://cdn.jsdelivr.net/npm/axios@0.18.0/dist/axios.min.js"></script>
<script>
const data = {
orders: [],
ready: false
};
const app = new Vue({
el: '#app',
data: data,
methods: {
}
});
const connection = new signalR.HubConnectionBuilder()
.withUrl('http://localhost:7071/api')
.configureLogging(signalR.LogLevel.Information)
.build();
connection.on('productOrdered', productOrdered);
connection.onclose(() => console.log('disconnected'));
console.log('connecting...');
connection.start()
.then(() => data.ready = true)
.catch(console.error);
let counter = 0;
function productOrdered(orderPlacement) {
orderPlacement.id = counter++; // vue transitions need an id
data.orders.unshift(orderPlacement);
}
</script>
</body>
</html>
The .withUrl('http://localhost:7071/api') line is the root of your locally running Azure Function development runtime environment.
When this page loads, the negotiate function will be called in the Function App and will return the Azure SignalR Service connection details so the client can connect to the hub in the cloud and send/receive messages (in this example we are just receiving messages in the JavaScript client).
Running the Demo Application
Right-click the solution in Visual Studio and select “Set Startup Projects…” and choose Multiple startup projects and set the Function App project to Start and the ASP.NET core project to Start without debugging. This just means you can hit F5 and both projects will run.
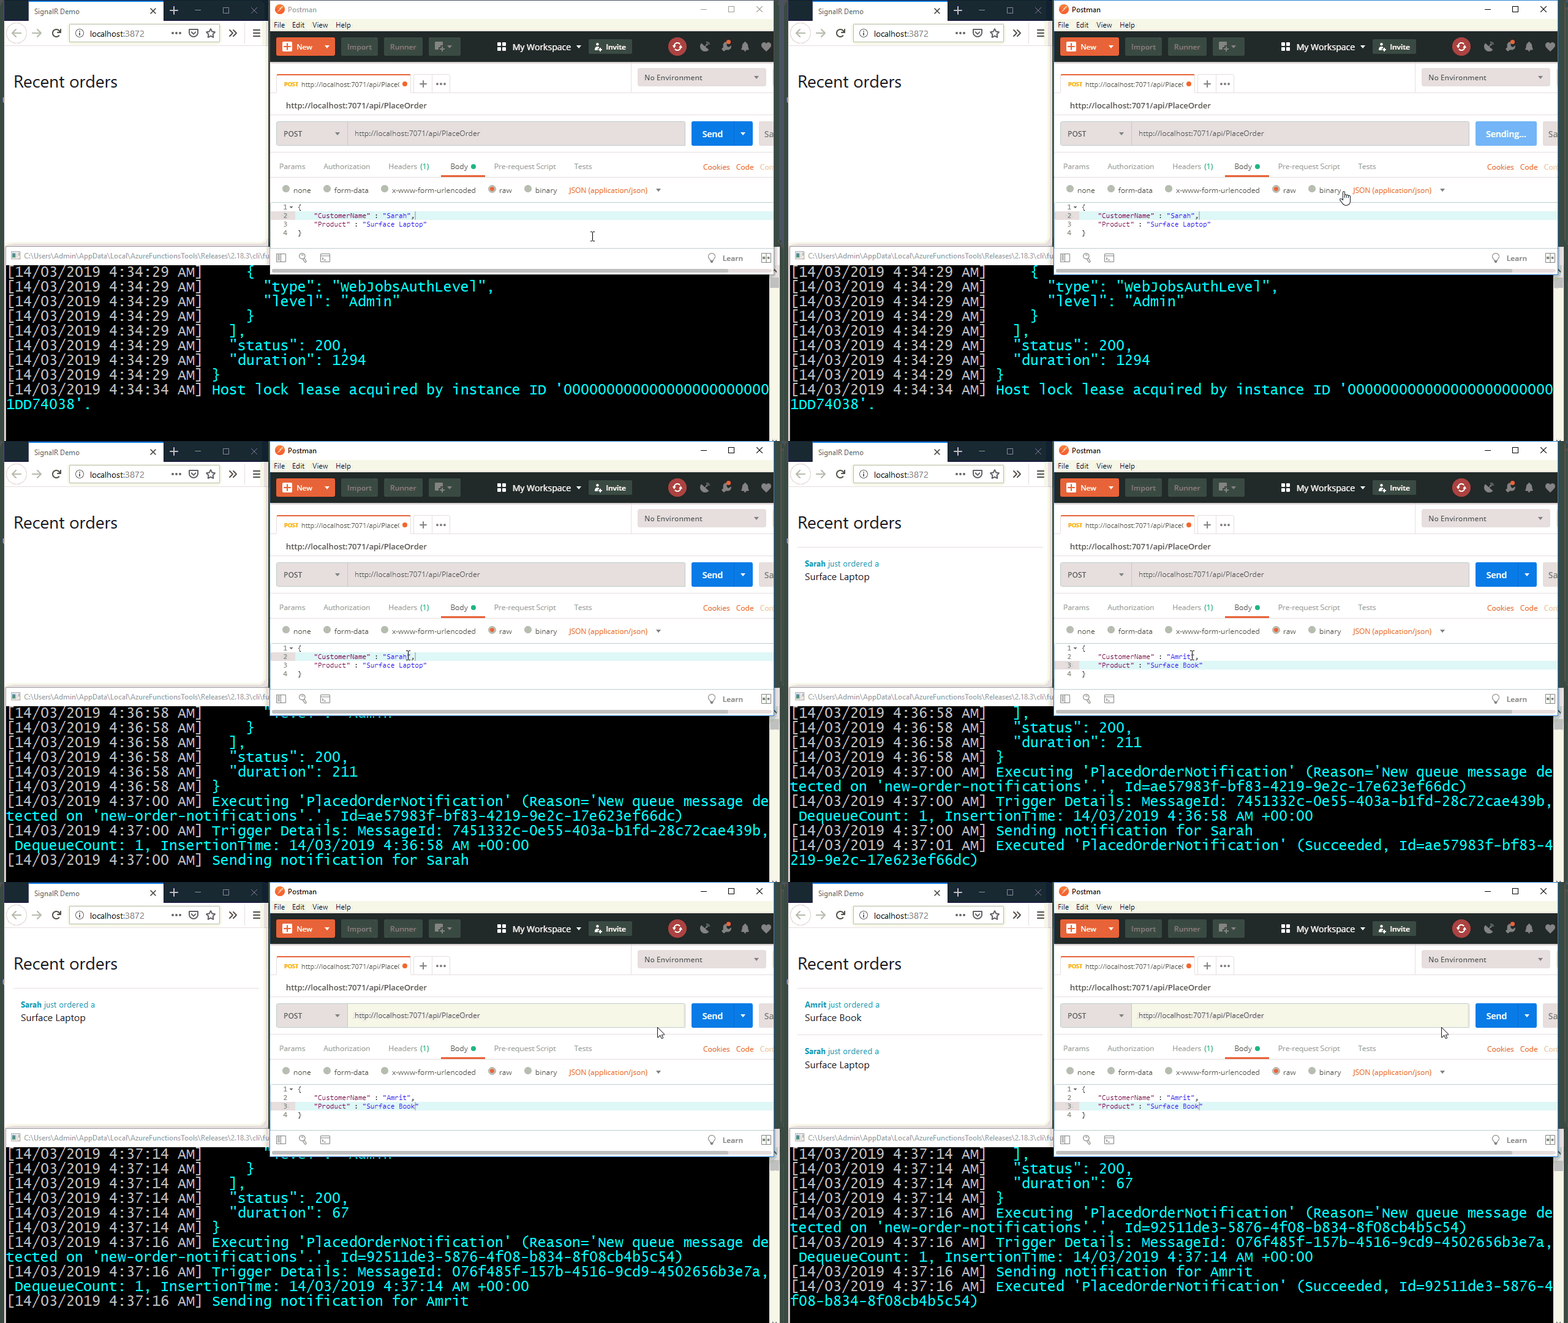
Once both projects are running you should be able to post some JSON to the PlaceOrder function HTTP endpoint (for example using Postman) containing the CustomerName and Product:
{
    "CustomerName" : "Amrit",
    "Product" : "Surface Book"
}
This will save the order to table storage and add a message to the queue.
The queue-triggered function will pick up this message an send a notification to the client and you should then see “Amrit just ordered a Surface Book” appear on the web site.
Note that this demo application allows anonymous/unauthenticated clients to access the functions and the SignalR Service, in a real-work production app you should ensure you secure the entire system appropriately – see docs for more info.
You can find this entire sample app on GitHub.
If you want to fill in the gaps in your C# knowledge be sure to check out my C# Tips and Traps training course from Pluralsight – get started with a free trial.


SHARE: