Rather than taking an array of Color objects, the WritableBitmap.Pixels property holds an array on ints which represent premultiplied ARGB colour values. To set a given pixel to a given colour you have to take the alpha, red, green and blue values and convert them to a premultiplied ARGB int value.
The following code contains some helpers/extension methods to make the process bit easier, for example to set every pixel to red:
for (int index = 0; index < bmp.Pixels.Length; index++)

{

   Color myColour = new Color() { A = 255, R = 255, G = 0, B = 0 };

   bmp.Pixels[index] = myColour.ToWritableBitmapPixelValue();

}
or using the Fill extension method:
bmp.Fill( new Color() { A = 255, R = 255, G = 0, B = 0 } );
WritableBitmapHelper class listing
using System;

using System.Net;

using System.Windows;

using System.Windows.Controls;

using System.Windows.Documents;

using System.Windows.Ink;

using System.Windows.Input;

using System.Windows.Media;

using System.Windows.Media.Animation;

using System.Windows.Shapes;

using System.Windows.Media.Imaging;


namespace BitmapAPI

{

    /// <summary>

    /// Helper methods\extension methods for dealing with WritableBitmap,

    /// in real world implementation you'd probably choose to separate the

    /// extension methods iinto separate static classes;

    /// eg WritableBitmapExtensions & ColorExtensions

    /// </summary>

    public static class WritableBitmapHelper

    {

        /// <summary>

        /// Converts ARGB byte values to an integer

        /// Based on info found at:

        /// http://blogs.silverarcade.com/silverlight-games-101/15/silverlight-writeablebitmap-pixel-format-in-silverlight-3/

        /// </summary>

        /// <param name="alpha">Alpha transparency: 0=transparent  255=solid</param>

        /// <param name="red">Amount of red: 0 to 255</param>

        /// <param name="green">Amount of green: 0 to 255</param>

        /// <param name="blue">Amount of blue: 0 to 255</param>

        /// <returns>An integer representing an ARGB color</returns>

        public static int CalcWritableBitmapPixelValue(byte alpha, byte red, byte green, byte blue)

        {

            // Calc premultiplier once only. We need to use premultiplied ARGB32

            // rather than convential ARGB.

            double alphaPreMultiplier = alpha / 255d;


            // Premultiply rgb values with alpha

            byte r = (byte)(red   * alphaPreMultiplier);

            byte g = (byte)(green * alphaPreMultiplier);

            byte b = (byte)(blue  * alphaPreMultiplier);


            return (alpha << 24) | (r << 16) | (g << 8) | b;

        }


        /// <summary>

        /// Extension method to convert a System.Windows.Media.Color to an integer value.

        /// </summary>

        /// <param name="color">The System.Windows.Media.Color to convert</param>

        /// <returns>An integer representing the ARGB values of <paramref name="color"/></returns>

        public static int ToWritableBitmapPixelValue(this Color color)

        {

            return CalcWritableBitmapPixelValue(color.A, color.R, color.G, color.B);

        }


        /// <summary>

        /// Extension method to 'fill' a WriteableBitmap with a given solid color

        /// </summary>

        /// <param name="bmp">The WriteableBitmap to fill</param>

        /// <param name="color">The Color to fill with</param>

        public static void Fill(this WriteableBitmap bmp, Color color)

        {

            for (int i = 0; i < bmp.Pixels.Length; i++)

            {

                bmp.Pixels[i] = color.ToWritableBitmapPixelValue();

            }

        }


    }

}
SHARE:
While SL3 doesn't add full 3D support, you can now transform elements in a 3D fashion.
The following videos are recommended (and form the basis of this example) but I've used simple opacity rather than transforming an element off the screen:
http://silverlight.net/learn/learnvideo.aspx?video=187308
http://silverlight.net/learn/learnvideo.aspx?video=189248
The new PlaneProject allow you to 'skew' an element in X, Y and Z dimensions. UI elements now have a Projection property which can contain a PlaneProjection:
<Grid.Projection>

  <PlaneProjection x:Name="HeadsGridProjection" RotationX="0" RotationY="0" RotationZ="0"></PlaneProjection>

</Grid.Projection>
The example below uses 2 grids containing a circle (the coin face) and text "Heads" or "Tails". There are 2 storyboards, the 1st rotates the heads to tails, the 2nd animation tails to heads. The storyboards call each other wheneach one finishes using the Completed event of the storyboard.
The code behind looks like this:
using System;

using System.Collections.Generic;

using System.Linq;

using System.Net;

using System.Windows;

using System.Windows.Controls;

using System.Windows.Documents;

using System.Windows.Input;

using System.Windows.Media;

using System.Windows.Media.Animation;

using System.Windows.Shapes;


namespace _3DCoinFlip

{

    public partial class MainPage : UserControl

    {

        public MainPage()

        {

            InitializeComponent();

        }


        private void UserControl_Loaded(object sender, RoutedEventArgs e)

        {

            // Automatically start the 1st storyboard when the page loads

            FlipToTails.Begin();

        }


        private void FlipToTails_Completed(object sender, EventArgs e)

        {

            // When the head-->tails animation completes, start the tails-->heads animation

            FlipToHeads.Begin();

        }


        private void FlipToHeads_Completed(object sender, EventArgs e)

        {

            // When the tails-->heads animation completes, start the head-->tails animation

            FlipToTails.Begin();

        }

    }

}
And the XAML:
<UserControl x:Class="_3DCoinFlip.MainPage"

    xmlns="http://schemas.microsoft.com/winfx/2006/xaml/presentation"

    xmlns:x="http://schemas.microsoft.com/winfx/2006/xaml"

    xmlns:d="http://schemas.microsoft.com/expression/blend/2008" xmlns:mc="http://schemas.openxmlformats.org/markup-compatibility/2006"

    mc:Ignorable="d" d:DesignWidth="640" d:DesignHeight="480"

    Loaded="UserControl_Loaded" >

    <UserControl.Resources>


        <Style TargetType="Grid" x:Key="CoinFace">

            <Setter Property="Width" Value="200"/>

            <Setter Property="Height" Value="200"/>

        </Style>


        <Style TargetType="TextBlock" x:Key="CoinText">

            <Setter Property="VerticalAlignment" Value="Center"/>

            <Setter Property="HorizontalAlignment" Value="Center"/>

            <Setter Property="FontSize" Value="48"/>

        </Style>


        <Storyboard x:Name="FlipToTails" Completed="FlipToTails_Completed" >

            <!-- heads side -->

            <DoubleAnimationUsingKeyFrames BeginTime="00:00:00"

                                           Storyboard.TargetName="HeadsGridProjection"

                                           Storyboard.TargetProperty="RotationY">

                <SplineDoubleKeyFrame KeyTime="00:00:00" Value="0"/>

                <SplineDoubleKeyFrame KeyTime="00:00:01" Value="90"/>

            </DoubleAnimationUsingKeyFrames>


            <!-- Tails Side -->

            <DoubleAnimationUsingKeyFrames BeginTime="00:00:00"

                                           Storyboard.TargetName="TailsGridProjection"

                                           Storyboard.TargetProperty="RotationY">

                <SplineDoubleKeyFrame KeyTime="00:00:01" Value="270"/>

                <SplineDoubleKeyFrame KeyTime="00:00:02" Value="360"/>

            </DoubleAnimationUsingKeyFrames>


            <DoubleAnimationUsingKeyFrames BeginTime="00:00:00"

                                           Storyboard.TargetName="Tails"

                                           Storyboard.TargetProperty="Opacity">

                <SplineDoubleKeyFrame KeyTime="00:00:00" Value="0"/>

                <SplineDoubleKeyFrame KeyTime="00:00:01" Value="0"/>

                <SplineDoubleKeyFrame KeyTime="00:00:01.01" Value="1"/>

            </DoubleAnimationUsingKeyFrames>

        </Storyboard>


        <Storyboard x:Name="FlipToHeads" Completed="FlipToHeads_Completed">

            <!-- tails side -->

            <DoubleAnimationUsingKeyFrames BeginTime="00:00:00"

                                           Storyboard.TargetName="TailsGridProjection"

                                           Storyboard.TargetProperty="RotationY">

                <SplineDoubleKeyFrame KeyTime="00:00:00" Value="0"/>

                <SplineDoubleKeyFrame KeyTime="00:00:01" Value="90"/>

            </DoubleAnimationUsingKeyFrames>


            <!-- heads Side -->

            <DoubleAnimationUsingKeyFrames BeginTime="00:00:00"

                                           Storyboard.TargetName="HeadsGridProjection"

                                           Storyboard.TargetProperty="RotationY">

                <SplineDoubleKeyFrame KeyTime="00:00:01" Value="270"/>

                <SplineDoubleKeyFrame KeyTime="00:00:02" Value="360"/>

            </DoubleAnimationUsingKeyFrames>


            <DoubleAnimationUsingKeyFrames BeginTime="00:00:00"

                                           Storyboard.TargetName="Heads"

                                           Storyboard.TargetProperty="Opacity">

                <SplineDoubleKeyFrame KeyTime="00:00:00" Value="0"/>

                <SplineDoubleKeyFrame KeyTime="00:00:01" Value="0"/>

                <SplineDoubleKeyFrame KeyTime="00:00:01.01" Value="1"/>

            </DoubleAnimationUsingKeyFrames>

        </Storyboard>

    </UserControl.Resources>


    <Grid x:Name="LayoutRoot">

        <StackPanel>

            <Grid>

                <Grid Name="Heads" Style="{StaticResource CoinFace}">

                    <Grid.Projection>

                        <PlaneProjection x:Name="HeadsGridProjection" RotationX="0" RotationY="0" RotationZ="0"></PlaneProjection>

                    </Grid.Projection>

                    <Ellipse Stretch="Fill" Fill="Silver"/>

                    <TextBlock Style="{StaticResource CoinText}">Heads</TextBlock>

                </Grid>

                <Grid Name="Tails" Style="{StaticResource CoinFace}" Opacity="0">

                    <Grid.Projection>

                        <PlaneProjection x:Name="TailsGridProjection" RotationX="0" RotationY="0" RotationZ="0"></PlaneProjection>

                    </Grid.Projection>

                    <Ellipse Stretch="Fill" Fill="Gold"/>

                    <TextBlock Style="{StaticResource CoinText}">Tails</TextBlock>

                </Grid>

            </Grid>

        </StackPanel>

    </Grid>

</UserControl>
SHARE:
One of the new SL3 features is the ability to test if there is a network connection currently active. This complements the out of browser experience by letting an app use local (isolated) storage when off-line, and when a network connection becomes available, upload data to a central server.
To be informed when the network changes:
System.Net.NetworkInformation.NetworkChange.NetworkAddressChanged += (sender, e) => txtNetStatus.Text = "Network available: " + System.Net.NetworkInformation.NetworkInterface.GetIsNetworkAvailable().ToString();
This example uses a lambda expression as a shortcut (rather than having a separate method); when the network status changes, we set the text of txtNetStatus to 'Network available: True' or 'Network available: False' depedning on the (boolean) result of GetIsNetworkAvailable().
SHARE:
If a user attempts to install a SLOOB app when it is already installed an InvalidOperationException is thrown with the message "Application is already installed.". We can wrap in a try..catch to handle this:
try

{

    Application.Current.Install();

}

catch (InvalidOperationException ex)

{

    MessageBox.Show(ex.Message);

}
Or better yet, remove the install button from the UI if the application is already installed:
if (Application.Current.InstallState == InstallState.Installed)

    btnInstall.Visibility = Visibility.Collapsed;

else

    btnInstall.Visibility = Visibility.Visible;
SHARE:
When running a Silverlight 3 application out of browser (OOB) {or SLOOB=Silverlight Out Of Browser} you can enable the automatic download\install of updated versions.
This is not an automatic feature and requires some (simple) coding on the developers part.
In the App.xaml.cs add a callback for the CheckAndDownloadUpdateCompleted event (the example below uses a lambda but you could use a separate method with the signature void App_CheckAndDownloadUpdateCompleted(object sender, CheckAndDownloadUpdateCompletedEventArgs e).
public App()

{

    this.Startup += this.Application_Startup;

    this.Exit += this.Application_Exit;

    this.UnhandledException += this.Application_UnhandledException;


    // Add callback to be executed when the check (and possible download) has been performed

    this.CheckAndDownloadUpdateCompleted += (sender,  e) =>

    {

        if (e.UpdateAvailable)

            MessageBox.Show("Update downloaded, plese restart to take effect.");

    };


    InitializeComponent();

}
Next add a call to check for updates, this can be placed in the Application Startup event handler or you could have a "Check for updates" button in th U.
private void Application_Startup(object sender, StartupEventArgs e)

{

    this.RootVisual = new MainPage();

    this.CheckAndDownloadUpdateAsync();

}
Now, every time the app start an update check will be performed, and if there is an updated version available it will be downloaded asynchronously. Once download the user will get the message box advising them to restart the app to start using the new version. The download\update just happens if available and there is currently no mechanism to allow the user to opt-out of an update.
SHARE:
This is pleasantly simple to do :)
In response to a user action (clicking a button, etc.) add the following code: Application.Current.Install(); e.g.
private void Button_Click_1(object sender, RoutedEventArgs e)

{

    Application.Current.Install();

}
Configure the application to run out of browser (OOB):
In the project properties page, tick the"Enable running application out of the browser"


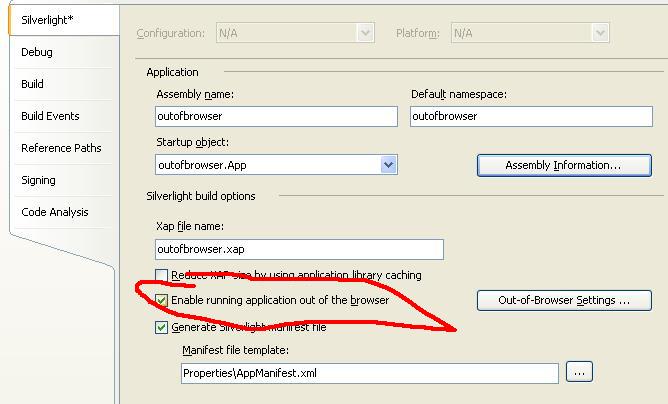
The Out-Of-Browser Settings button now becomes enabled: this lets you specify OOB window and shortcut names, description, and an application icon in 4 different sizes.
You can un-install an OOB app by running it (from the desktop or programs menu) and right-clicking and choosing "Remove this application".
SHARE:
It can be hard for those new to development or those wanting to move upwards from a junior role to mentally collate some of the ideas that constitute a senior/experienced outlook. The list below attempts to piece together some of the ways to improve both the management and development of software. It is by no means comprehensive but hopefully will provide a helpful starting point...
Do Realize That We Are The Business
- There can sometimes be an 'Us' and 'Them' mentality when it comes to our relationship to 'The business'. We should accept (and respectfully challenge where appropriate) the view of 'The Business' when it comes to using IT to meet those business goals.
- We should seek to explain the basics of software development, just as we should seek to understand the 'The Business' more.
- We should work with 'The Business' to come up with new innovate uses of IT, rather that wait for 'The Business' to come to us with initiatives.
- NOTE: I don't think there is anything intrinsically wrong with using the term 'the business' as long as it's not divisive.
Do Use Metrics (but don't rely on a single one)
Managing and tracking a project through the use of a single (often poor) metric such as Lines of Code (LOC) does not give an accurate view, e.g. do you count generated code in LOC reports?, or if you refactor then LOC may go up or down when the functionality remains the same.
Some useful metrics that can be used together:
- Number of tests
- LOC for solution (for pure volume)
- LOC for test code
- Number of bug / number of bugs per iteration/sprint
- Average time to close bugs
- Number of formal code reviews performed
- Number of use cases completed
- Number of/frequency of demos given to users/client
- Average LOC in methods
- Number of classes/methods
- etc.
Do Dependency Injection
DI is a great way to decouple the parts of the solution. If you start out with DI in mind it may also have a beneficial effect on the overall design of the system (it can force you to think in abstract terms such as interfaces). Learn a tool that offers DI (such as Windsor) or for simple scenarios create you own DI framework.
Do Test Driven Development
- Remember that TDD should be though of more as a design tool that happens to produce the hugely valuable side-effect of 'unit' tests.
- Once you get into the rhythm of TDD it is a great way to be (and feel) productive: great satisfaction from all your green lights!
- Don't neglect the overall big-picture architecture.
Do Regular Automated Builds
For projects with more than a couple of developers, it can be beneficial to set up an automated build (using CruiseControl, Team Foundation Server, a simple scheduled batch file, etc.). At a minimum schedule a nightly build.
Consider a Continuous Integration (CI) build with larger teams, remote workers, heavy volumes of check-ins, or anytime when ASAP failure feedback is required. A CI build can still be useful even with smaller teams - it's better to know sooner when we break the build.
Do Iterative/Incremental/Evolutionary Development
Whether you're formally 'Agile' (XP, Scrum, UP, etc.) or not, taking an evolutionry approach to software development can still yield benefits. This is especially true if you demo the product to users/clients after each evolution/iteration/sprint/use case/feature.
Much as we would like to think the 'Waterfall State of Mind' is dead there can still be a lot of resistance in business to idea of Agile development, regular demos could be one way to start to introduce the 'feeling' of agile.
Do A Daily Stand-Up Meeting
But do it properly: I have seen stand-ups which have gone on for over half an hour - the whole purpose of a stand-up is to encourage people to keep it short!. The team lead (or devs take it in turns if there is no 'lead' role) should 'chair' the meeting; each person simply needs to state: (1) what they have achieved\worked on since the last stand-up; (2) what they intend to achieve\work on until the next stand-up' and (3) anything that is 'blocking' their progress. If there are any problems then the relevant people should meet after the stand-up to discuss further.
Devs shouldn't see it as micro-management or a way of management applying extra pressure (nor should management), rather as a way of reporting problems earlier-on. This also puts an onus on the 'chair' and other devs to support each other to resolve problems.
Do Code Reviews
Formal code reviews can be time-consiming and as the reviewer is another Dev there can be a view that it is wasted time. There is a balance to be had; if every line of code has to be reviewed then of course a large amount of dev time will be otherwise-used. The main benefit is that code reviews can find bugs that automated unit tests cannot - again if these bugs are found earlier, they cost less to fix. One method is to target code reviews at pieces of code that are deemed to be a higher-risk (e.g. integration with 3rd parties components) or code that, if wrong, would have serious consequences (e.g. life-support system or financial transfers).
Deliver Value
This seems like an obvious statement but sometimes it is easy to get bogged down on a particular element. in the desire to implement the most elegant and optimized code (which is a good and natural state of mind for a developer) we can loose sight of the bigger goal which is: to deliver value to the business/client.
Do Risk-Oreinted Prioritization
Code/test higher risk areas as early on in the project as possible and leave the 'easy' parts until later. This helps to prevent nasty surprises when you are nearing your deadline and you have less room for maneuver.
Higher risk can come from:
- 3rd party suppliers & components;
- previously unused hardware/tech/libraries/APIs/versions;
- more intrinsically complex algorithms; etc.
High Cohesion & Low Coupling
- Understand.
- Implement.
Do Buy Over Build
When low risk/high benefit/safe, consider using 3rd party components rather than reinventing the wheel, but bear in mind: vendor support/warrenty; license cost present & future; downloading trial version to evaluate. This ties in with the point on delivering value.
Do Test Driven Bug-Fixing (TDB??) (or "Find A Bug, Write A Test")
If you have been assigned or found a bug, the first thing you should do once you have isolated/identified the cause is to write a (unit/integration) test to reproduce it. Once you can reproduce it you then fix it. The test then becomes a valuable part of the regression testing performed on every test run.
Whether you keep bug fixed test in a separate assembly/project is a matter of choice, but if you using formal bug-tracking software it's a good idea to comment the test with the bug reference number.
SHARE:
Out of the box and without plug-ins, you can animate elements with basic jQuery. You can view a live example of the following code which animates the position of a "ball" up and down.
There are a number of overloads for the jQuery animate function, the one used in this example takes 4 parameters:
- params: numeric property value(s) you want changed over time as the animation runs;
- duration: how long the animation takes ("slow", "normal", "fast", or number of milliseconds);
- easing: "linear" or "swing";
- callback: a function to be called when the animation finishes.
For example:
$("#ball").animate({ top: "1px" }, "slow", "swing", animDown);
This code changes the top property "slow"ly to a value of 1px whilst creating a non-linear "swing" motion. When the value of top reaches 1px, the animation has completed and the callback function animDown is called.
In the code below, the continuous bouncing is achieved by having 2 separate animation functions defined: animUp and animDown. Once the animUp animation completes it calls the animDown function and vice versa.
<!DOCTYPE html PUBLIC "-//W3C//DTD XHTML 1.0 Transitional//EN" "http://www.w3.org/TR/xhtml1/DTD/xhtml1-transitional.dtd">

<html xmlns="http://www.w3.org/1999/xhtml">

<head>

    <title>Bouncing Ball Animation in jQuery</title>


    <script type="text/javascript" src="jquery-1.3.2.js"></script>


    <script type="text/javascript">


        /* Entry point into the animation 'loop'. Once the the animation is complete

           i.e. the ball is at the top, the animate call the callback function animDown */

        function animUp() {

            $("#ball").animate({ top: "1px" }, "slow", "swing", animDown);

        }


        /* Called when the up animation completes. Once this downanimation is complete

           i.e. the ball is at the bottom, the animate function calls the callback function

           animUp */

        function animDown() {

            $("#ball").animate({ top: "446px" }, "slow", "swing", animUp);

        }


        $(document).ready(function() {

            animUp();

        });


    </script>


</head>

<body>

    <div><h1>Bouncing Ball Animation in jQuery</h1></div>


    <div id="ballContainer" style="width: 500px; height: 500px; display:block;

        background-color: White; border-bottom: solid 10px Black;">


        <div id="ball" style="position: relative; overflow: hidden;

            background-color: Transparent; color: Black; font-size: 50pt;

            top: 450px; left: 225px;">

            O

        </div>


    </div>

    <h4>from: <a href="http://www.dontcodetired.com" title="Don't Code Tired">Don't Code Tired</a></h4>

</body>

</html>
SHARE:
jQuery's Toggle function allows you to specify 2 or more functions to be called alternately on each click. Specifying 2 functions you can create a simple 2 state toggle.
The example below (see live example) specifies 3 functions to count 1,2,3,1,2,3,1...etc. Each mouse click executes the next successive function, when the last function is reached, the cycle returns to the first function.
The jQuery selector ":button[name='btnCount']" means "select all buttons or input elements of type button that also have the name of btnCount".
<!DOCTYPE html PUBLIC "-//W3C//DTD XHTML 1.0 Transitional//EN" "http://www.w3.org/TR/xhtml1/DTD/xhtml1-transitional.dtd">

<html xmlns="http://www.w3.org/1999/xhtml">

<head>

    <title>The Toggle Function in jQuery</title>


    <script type="text/javascript" src="jquery-1.3.2.js"></script>


    <script type="text/javascript">

        $(document).ready(function() {


            $(":button[name='btnCount']").toggle(function() {

                $("#number").text("1");

            }, function() {

                $("#number").text("2");

            }, function() {

                $("#number").text("3");

            });


        });

    </script>


</head>

<body>

    <h1>The Toggle Function in jQuery</h1>

    <div id="number" style="font-size: 36pt; font-weight: bold;">

    </div>

    <input type="button" name="btnCount" value="Count" />

    <h4>from: <a href="http://www.dontcodetired.com" title="Don't Code Tired">Don't Code Tired</a></h4>

</body>

</html>
SHARE:
When working on the client, you may have a number of HTML elements that have some form of logical state, e.g. coins (heads/tails), cards (face up/down), importance (high, medium, low), etc.
You could declare a variable for each element (or an array); when the use changes the state you update the variable representing the elements state and perform any UI changes.
An alternative to this which removes the need for additional variables is to represent the state of the element by which CSS classes are currently added to it.
The example below (view live example) shows one way to achieve this using jQuery. It represents a number of simulated coins and if each coin's state is heads or tails.
<!DOCTYPE html PUBLIC "-//W3C//DTD XHTML 1.0 Transitional//EN" "http://www.w3.org/TR/xhtml1/DTD/xhtml1-transitional.dtd">

<html xmlns="http://www.w3.org/1999/xhtml">

<head>

    <title>Maintaining basic state with jQuery and CSS</title>


    <script type="text/javascript" src="jquery-1.3.2.js"></script>


    <script type="text/javascript">

        $(document).ready(function() {

            $("#btnClick").click(function() {

                /* Select every element that has the CSS class coin applied

                   and iterate using the each function */

                $(".coin").each(function() {

                    /* Check the each element to see if it has a tails or heads

                       css class, and 'flip' the class and the text from T->H */

                    if ($(this).hasClass("heads"))

                        $(this).removeClass("heads").addClass("tails").text("T");

                    else if ($(this).hasClass("tails"))

                        $(this).removeClass("tails").addClass("heads").text("H");

                });

            });

        });

    </script>


    <style type="text/css">

        .coin

        {

            background-color: Silver;

            font-size: 24pt;

            font-weight: bold;

            padding: 5px;

        }

        /* We don't have to define .heads and .tails to make use of

        the state maintenance, but they are defined here for visual cues */

        .heads

        {

            color: Black;

        }

        .tails

        {

            color: White;

        }

    </style>

</head>

<body>

    <h1>Maintaining basic state with jQuery and CSS</h1>

    <span class="coin heads">H</span>

    <span class="coin heads">H</span>

    <span class="coin tails">T</span>

    <span class="coin heads">H</span>

    <span class="coin tails">T</span>

    <h4>H = heads, T = Tails</h4>


    <form action="#">

    <input type="button" id="btnClick" value="Flip Coins" />

    </form>

    <h4>from: <a href="http://www.dontcodetired.com" title="Don't Code Tired" >Don't Code Tired</a></h4>

</body>

</html>
SHARE: