Testing for Thrown Exceptions in NUnit

In a previous post, testing for thrown exceptions using xUnit.net was demonstrated. In this post we’ll see how to do the same with NUnit.

Once again the class being tested is as follows:

public class TemperatureSensor
{
    bool _isInitialized;

    public void Initialize()
    {
        // Initialize hardware interface
        _isInitialized = true;
    }

    public int ReadCurrentTemperature()
    {
        if (!_isInitialized)
        {
            throw new InvalidOperationException("Cannot read temperature before initializing.");
        }

        // Read hardware temp
        return 42; // Simulate for demo code purposes
    }
}

The first test can be to test the happy path:

[Test]
public void ReadTemperature()
{
    var sut = new TemperatureSensor();

    sut.Initialize();

    var temperature = sut.ReadCurrentTemperature();

    Assert.AreEqual(42, temperature);
}

Next, a test can be written to check that the expected exception is thrown:

[Test]
public void ErrorIfReadingBeforeInitialized()
{
    var sut = new TemperatureSensor();

    Assert.Throws<InvalidOperationException>(() => sut.ReadCurrentTemperature());
}

Notice in the preceding code that any InvalidOperationException thrown will pass the test. To ensure that the thrown exception is correct, it can be captured and further asserts performed against it:

[Test]
public void ErrorIfReadingBeforeInitialized_CaptureExDemo()
{
    var sut = new TemperatureSensor();

    var ex = Assert.Throws<InvalidOperationException>(() => sut.ReadCurrentTemperature());

    Assert.AreEqual("Cannot read temperature before initializing.", ex.Message);
    // or:
    Assert.That(ex.Message, Is.EqualTo("Cannot read temperature before initializing."));
}

There’s also other ways to assert against expected exceptions such as the following:

Assert.Throws(Is.TypeOf<InvalidOperationException>()
                .And.Message.EqualTo("Cannot read temperature before initializing."), 
              () => sut.ReadCurrentTemperature());

There’s some personal preference involved when choosing a style, for example the preceding code could be considered more verbose by some and may muddle the distinction between the Act and Assert phases of a test.

To learn more about using exceptions to handle errors in C#, check out my Error Handling in C# with Exceptions Pluralsight course.

You can start watching with a Pluralsight free trial.

SHARE:

Testing for Thrown Exceptions in xUnit.net

When writing tests it is sometimes useful to check that the correct exceptions are thrown at the expected time.

When using xUnit.net there are a number of ways to accomplish this.

As an example consider the following simple class:

public class TemperatureSensor
{
    bool _isInitialized;

    public void Initialize()
    {
        // Initialize hardware interface
        _isInitialized = true;
    }

    public int ReadCurrentTemperature()
    {
        if (!_isInitialized)
        {
            throw new InvalidOperationException("Cannot read temperature before initializing.");
        }

        // Read hardware temp
        return 42; // Simulate for demo code purposes
    }        
}

The first test we could write against the preceding class is to check the “happy path”:

[Fact]
public void ReadTemperature()
{
    var sut = new TemperatureSensor();

    sut.Initialize();

    var temperature = sut.ReadCurrentTemperature();

    Assert.Equal(42, temperature);
}

Next a test could be written to check that if the temperature is read before initializing the sensor, an exception of type InvalidOperationException is thrown. To do this the xUnit.net Assert.Throws method can be used. When using this method the generic type parameter indicates the type of expected exception and the method parameter takes an action that should cause this exception to be thrown, for example:

[Fact]
public void ErrorIfReadingBeforeInitialized()
{
    var sut = new TemperatureSensor();

    Assert.Throws<InvalidOperationException>(() => sut.ReadCurrentTemperature());
}

In the preceding test, if an InvalidOperationException is not thrown when the ReadCurrentTemperature method is called the test will fail.

The thrown exception can also be captured in a variable to make further asserts against the exception property values, for example:

[Fact]
public void ErrorIfReadingBeforeInitialized_CaptureExDemo()
{
    var sut = new TemperatureSensor();

    var ex = Assert.Throws<InvalidOperationException>(() => sut.ReadCurrentTemperature());

    Assert.Equal("Cannot read temperature before initializing.", ex.Message);
}

The Assert.Throws method expects the exact type of exception and not derived exceptions. In the case where you want to also allow derived exceptions, the Assert.ThrowsAny method can be used.

Similar exception testing features also exist in MSTest and NUnit frameworks.

To learn more about using exceptions to handle errors in C#, check out my Error Handling in C# with Exceptions Pluralsight course.You can start watching with a Pluralsight free trial.

SHARE:

Customizing C# Object Member Display During Debugging

In a previous post I wrote about Customising the Appearance of Debug Information in Visual Studio with the DebuggerDisplay Attribute. In addition to controlling the high level  debugger appearance of an object we can also exert a lot more control over how the object appears in the debugger by using the DebuggerTypeProxy attribute.

For example, suppose we have the following (somewhat arbitrary) class:

class DataTransfer
{
    public string Name { get; set; }
    public string ValueInHex { get; set; }
}

By default, in the debugger it would look like the following:

Default Debugger View

To customize the display of the object members, the DebuggerTypeProxy attribute can be applied.

The first step is to create a class to act as a display proxy. This class takes the original object as part of the constructor and then exposes the custom view via public properties.

For example, suppose that we wanted a decimal display of the hex number that originally is stored in a string property in the original DataTransfer object:

class DataTransferDebugView
{
    private readonly DataTransfer _data;

    public DataTransferDebugView(DataTransfer data)
    {
        _data = data;
    }

    public string NameUpper => _data.Name.ToUpperInvariant();
    public string ValueDecimal
    {
        get
        {
            bool isValidHex = int.TryParse(_data.ValueInHex, System.Globalization.NumberStyles.HexNumber, null, out var value);

            if (isValidHex)
            {
                return value.ToString();
            }

            return "INVALID HEX STRING";
        }
    }
}

Once this view object is defined, it can be selected by decorating the DataTransfer class with the DebuggerTypeProxy attribute as follows:

[DebuggerTypeProxy(typeof(DataTransferDebugView))]
class DataTransfer
{
    public string Name { get; set; }
    public string ValueInHex { get; set; }
}

Now in the debugger, the following can be seen:

Custom debug view showing hex value as a decimal

Also notice in the preceding image, that the original object view is available by expanding the Raw View section.

To learn more about C# attributes and even how to create your own custom ones, check out my C# Attributes: Power and Flexibility for Your Code Pluralsight course.You can start watching with a Pluralsight free trial.

SHARE:

Prevent Secrets From Accidentally Being Committed to Source Control in ASP.NET Core Apps

One problem when dealing with developer “secrets” in development is accidentally checking them into source control. These secrets could be connection strings to dev resources, user IDs, product keys, etc.

To help prevent this from accidentally happening, the secrets can be stored outside of the project tree/source control repository. This means that when the code is checked in, there will be no secrets in the repository.

Each developer will have their secrets stored outside of the project code. When the app is run, these secrets can be retrieved at runtime from outside the project structure.

One way to accomplish this in ASP.NET Core  projects is to make use of the Microsoft.Extensions.SecretManager.Tools NuGet package to allow use of the command line tool. (also if you are targeting .NET Core 1.x , install the Microsoft.Extensions.Configuration.UserSecrets NuGet package).

Setting Up User Secrets

After creating a new ASP.NET Core project, add a tools reference to the NuGet package to the project, this will add the following item in the project file:

<DotNetCliToolReference Include="Microsoft.Extensions.SecretManager.Tools" Version="2.0.0" />

Build the project and then right click the project and you will see a new item called “Manage User Secrets” as the following screenshot shows:
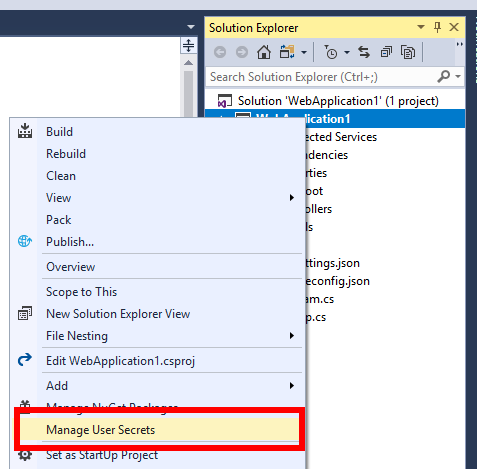
Managing user secrets in Visual Studio

Clicking menu item will open a secrets.json file and also add an element named UserSecretsId to the project file. The content of this element is a GUID, the GUID is arbitrary but should be unique for each and every project.

<UserSecretsId>c83d8f04-8dba-4be4-8635-b5364f54e444</UserSecretsId>

User secrets will be stored in the secrets.json file which will be in %APPDATA%\Microsoft\UserSecrets\<user_secrets_id>\secrets.json on Windows or ~/.microsoft/usersecrets/<user_secrets_id>/secrets.json on Linux and macOS. Notice these paths contain the user_secrets_id that matches the GUID in the project file. In this way each project has a separate set of user secrets.

The secrets.json file contains key value pairs.

Managing User Secrets

User secrets can be added by editing the json file or by using the command line (from the project directory).

To list user secrets type: dotnet user-secrets list At the moment his will return “No secrets configured for this application.”

To set (add) a secret: dotnet user-secrets set "Id" "42"

The secrets.json file now contains the following:

{
  "Id": "42"
}

Other dotnet user-secrets  commands include:

  • clear - Deletes all the application secrets
  • list - Lists all the application secrets
  • remove - Removes the specified user secret
  • set - Sets the user secret to the specified value

Accessing User Secrets in Code

To retrieve users secrets, in the startup class, access the item by key, for example:

public void ConfigureServices(IServiceCollection services)
{
    services.AddMvc();

    var secretId = Configuration["Id"]; // returns 42
}

One thing to bear in mind is that secrets are not encrypted in the secrets.json file, as the documentation states: “The Secret Manager tool doesn't encrypt the stored secrets and shouldn't be treated as a trusted store. It's for development purposes only. The keys and values are stored in a JSON configuration file in the user profile directory.” & “You can store and protect Azure test and production secrets with the Azure Key Vault configuration provider.”

There’s a lot more information in the documentation and if you plan to use this tool you should read through it.

If you want to fill in the gaps in your C# knowledge be sure to check out my C# Tips and Traps training course from Pluralsight – get started with a free trial.

SHARE:

Testing Precompiled Azure Functions Overview

Just because serverless allows us to quickly deploy value, it doesn’t mean that testing is now obsolete. (click to Tweet)

If we’re using Azure Functions as our serverless platform we can write our code (for example C#) and test it before deploying to Azure. In this case we’re talking about precompiled Azure Functions as opposed to earlier incarnations of Azure Functions that used .csx script files.

Working with precompiled functions means the code can be developed and tested on a local development machine. The code we write is familiar C# with some additional attributes to integrate the code with the Azure Functions runtime.

Because the code is just regular C#, we can use familiar testing tools such as MSTest, xUnit.net, or NUnit. Using these familiar testing frameworks it’s possible to write tests that operate at different levels of granularity.

One way to categorize these tests are into:

  • Unit tests to check core business logic/value
  • Integration tests to check function run methods are operating correctly
  • End-to-end workflow tests that check multiple functions working together

To enable effective automated testing it may be necessary to write functions in such a way as to make them testable, for example by allowing function run method dependencies to be automatically injected at runtime, whereas at test time mock versions can be supplied for example using a framework such as AzureFunctions.Autofac.

There are other tools that allow us to more easily test functions locally such as the local functions runtime and the Azure storage emulator.

To learn more about using these tools and techniques to test Azure Functions, check out my Pluralsight course Testing Precompiled Azure Functions: Deep Dive.

You can start watching with a Pluralsight free trial.

SHARE:

Automatic Input Blob Binding in Azure Functions from Queue Trigger Message Data

Reading additional blob content when an Azure Function is triggered can be accomplished by using an input blob binding by defining a parameter in the function run method and decorating it with the [Blob] attribute.

For example, suppose you have a number of blobs that need converting in some way. You could initiate a process whereby the list of blob files that need processing are added to a storage queue. Each queue message contains the name of the blob that needs processing. This would allow the conversion function to scale out to convert multiple blobs in parallel.

The following code demonstrates one approach to do this. The code is triggered from a queue message that contains text representing the input bob filename that needs reading, converting, and then outputting to an output blob container.

using System.IO;
using Microsoft.Azure.WebJobs;
using Microsoft.WindowsAzure.Storage;
using Microsoft.WindowsAzure.Storage.Blob;

namespace FunctionApp1
{
    public static class ConvertNameCase
    {
        [FunctionName("ConvertNameCase")]
        public static void Run([QueueTrigger("capitalize-names")]string inputBlobPath)
        {
            string originalName = ReadInputName(inputBlobPath);

            var capitalizedName = originalName.ToUpperInvariant();

            WriteOutputName(inputBlobPath, capitalizedName);
        }
        
        private static string ReadInputName(string blobPath)
        {
            CloudStorageAccount account = CloudStorageAccount.DevelopmentStorageAccount;
            CloudBlobClient blobClient = account.CreateCloudBlobClient();
            CloudBlobContainer container = blobClient.GetContainerReference("names-in");

            var blobReference = container.GetBlockBlobReference(blobPath);

            string originalName = blobReference.DownloadText();

            return originalName;
        }

        private static void WriteOutputName(string blobPath, string capitalizedName)
        {
            CloudStorageAccount account = CloudStorageAccount.DevelopmentStorageAccount;
            CloudBlobClient blobClient = account.CreateCloudBlobClient();
            CloudBlobContainer container = blobClient.GetContainerReference("names-out");

            CloudBlockBlob cloudBlockBlob = container.GetBlockBlobReference(blobPath);
            cloudBlockBlob.UploadText(capitalizedName);            
        }

    }
}

In the preceding code, there is a lot of blob access code (which could be refactored). This function could however be greatly simplified by the use of one of the built-in binding expression tokens. Binding expression tokens can be used in binding expressions and are specified inside a pair of curly braces {…}. The {queueTrigger} binding token will extract the content of the incoming queue message that triggered a function.

For example, the code could be refactored as follows:

using System.IO;
using Microsoft.Azure.WebJobs;

namespace FunctionApp1
{
    public static class ConvertNameCase
    {
        [FunctionName("ConvertNameCase")]
        public static void Run(
        [QueueTrigger("capitalize-names")]string inputBlobPath,
        [Blob("names-in/{queueTrigger}", FileAccess.Read)] string originalName,
        [Blob("names-out/{queueTrigger}")] out string capitalizedName)
        {
                capitalizedName = originalName.ToUpperInvariant();         
        }
}

In the preceding code, the two [Blob] binding paths make use of the {queueTrigger} token. When the function is triggered, the queue message contains the name of the file to be processed. In the two [Blob] binding expressions, the {queueTrigger} token part will automatically be replaced with the text contents of the incoming message. For example if the message contained the text “File1.txt” then the two blob bindings would be set to names-in/File1.txt and names-out/File1.txt respectively. This means the input blob nameBlob string will automatically be read when the function is triggered,

To learn more about creating precompiled Azure Functions in Visual Studio, check out my Writing and Testing Precompiled Azure Functions in Visual Studio 2017 Pluralsight course.

You can start watching with a Pluralsight free trial.

SHARE:

Dynamic Binding in Azure Functions with Imperative Runtime Bindings

When creating precompiled Azure Functions, bindings (such as a blob output bindings) can be declared in the function code, for example the following code defines a blob output binding:

[Blob("todo/{rand-guid}")]

This binding creates a new blob with a random (GUID) name. This style of binding is called declarative binding, the binding details are declared as part of the binding attribute.

In addition to declarative binding, Azure Functions also offers imperative binding. With this style of binding, the details of the binding can be chosen at runtime. These details could be derived from the incoming function trigger data or from an external place such as a configuration value or database item

To create imperative bindings, rather than using a specific binding attribute, a parameter of type IBinder is used. At runtime, a binding can be created (such as a blob binding, queue binding, etc.) using this IBinder. The Bind<T> method of the IBinder can be used with T representing an input/output type that is supported by the binding you intend to use.

The following code shows imperative binding in action. In this example blobs are created and the blob path is derived from the incoming JSON data, namely the category.

public static class CreateToDoItem
{
    [FunctionName("CreateToDoItem")]
    public static async Task<HttpResponseMessage> Run(
        [HttpTrigger(AuthorizationLevel.Function, "post", Route = null)]HttpRequestMessage req,
        IBinder binder,
        TraceWriter log)
    {
        ToDoItem item = await req.Content.ReadAsAsync<ToDoItem>();
        item.Id = Guid.NewGuid().ToString();

        BlobAttribute dynamicBlobBinding = new BlobAttribute(blobPath: $"todo/{item.Category}/{item.Id}");

        using (var writer = binder.Bind<TextWriter>(dynamicBlobBinding))
        {
            writer.Write(JsonConvert.SerializeObject(item));
        }

        return req.CreateResponse(HttpStatusCode.OK, "Added " + item.Description);
    }
}

If the following 2 POSTS are made:

{
    "Description" : "Lift weights",
    "Category" : "Gym"
}
{
    "Description" : "Feed the dog",
    "Category" : "Home"
}

Then 2 blobs will be output with the following paths - note the random filenames and imperatively-bound paths: Gym and Home :

http://127.0.0.1:10000/devstoreaccount1/todo/Gym/5dc4eb72-0ae6-42fc-9a8b-f4bf646dcd28

http://127.0.0.1:10000/devstoreaccount1/todo/Home/530373ef-02bc-4200-a4e7-948448ac081b

SHARE:

Create Precompiled Azure Functions With Azure Event Grid Triggers

Visual Studio can be used to create precompiled Azure Functions using standard C# classes and tools/techniques and then they can be published to Azure.

This article assumes you’ve created the resources (resource group, Event Grid Topic, etc.) from this previous article.

In Visual Studio 2017, create a new Azure Functions project.

Next update the pre-installed Microsoft.NET.Sdk.Functions NuGet package to the latest version.

To get access to the Azure Event Grid function trigger attribute, install the Microsoft.Azure.WebJobs.Extensions.EventGrid NuGet package (this package is currently in preview/beta).

Add a new class to the project with the following code:

using Microsoft.Azure.WebJobs;
using Microsoft.Azure.WebJobs.Extensions.EventGrid;
using Microsoft.Azure.WebJobs.Host;

namespace DCTDemos
{
    public static class Class1
    {
        [FunctionName("SendNewLeadWelcomeLetter")]
        public static void SendNewLeadWelcomeLetter([EventGridTrigger] EventGridEvent eventGridEvent, TraceWriter log)
        {
            log.Info($"EventGridEvent" +
                $"\n\tId:{eventGridEvent.Id}" +
                $"\n\tTopic:{eventGridEvent.Topic}" +
                $"\n\tSubject:{eventGridEvent.Subject}" +
                $"\n\tType:{eventGridEvent.EventType}" +
                $"\n\tData:{eventGridEvent.Data}");
        }
    }
}

Notice in the preceding code, the method name SendNewLeadWelcomeLetter is the same as specified in the function name attribute, this may be required due to a bug in the current preview/beta implementation – if these are different your function may not be executed when an event occurs.

Right-click on the function project and choose publish. Follow the wizard and create a new Function App and select your resource group where your Event Grid Topics is. Select West US 2 if you need to create any new Azure resources/storage account/etc..

Once deployed, head over to Azure Portal, open your new function app and select the newly deployed SendNewLeadWelcomeLetter function:

Adding an Azure Event Grid subcription for an Azure Function

At the top right select Add Event Grid subscription. And follow the wizard to create a new subscription - this will enable the new function to be triggered by an Event Grid Subscription. As part of the subscription we’ll limit the event type to new-sales-lead-created:

Adding an Azure Event Grid subcription for an Azure Function

Next go to the function app platform features tab and select Log Streaming. We can now use Postman to POST the following JSON to the Event Grid Topic we created earlier.

[
    {
        "id": "1236",
        "eventType": "new-sales-lead-created",
        "subject": "myapp/sales/leads",
        "eventTime": "2017-12-08T01:01:36+00:00",
        "data":{
            "firstName": "Amrit",
            "postalAddress": "xyz"
        }
    }
]

Head back to the streaming logs and you should see your precompiled Azure Function executing in response to the Event Grid event:

2017-12-08T06:38:25  Welcome, you are now connected to log-streaming service.

2017-12-08T06:38:49.841 Function started (Id=ec927bc1-fa15-4211-a7bd-8e593f5d4840)

2017-12-08T06:38:49.841 EventGridEvent
    Id:1234
    Topic:/subscriptions/797e1c4e-3fd4-4cd6-84b8-ef103cee8b6b/resourceGroups/DCTEGDemo/providers/Microsoft.EventGrid/topics/sales-leads
    Subject:myapp/sales/leads
    Type:new-sales-lead-created
    Data:{

  "firstName": "Amrit",

  "postalAddress": "xyz"

}

2017-12-08T06:38:49.841 Function completed (Success, Id=ec927bc1-fa15-4211-a7bd-8e593f5d4840, Duration=0ms)


To learn how to create precompiled Azure Functions in Visual Studio, check out my Writing and Testing Precompiled Azure Functions in Visual Studio 2017 Pluralsight course.

You can start watching with a Pluralsight free trial.

SHARE:

New Pluralsight Course: Writing and Testing Precompiled Azure Functions in Visual Studio 2017

Azure Functions have come a long way in a short time. With newer releases you can now create functions in Visual Studio using standard C# class files along with specific attributes to help define triggers, bindings, etc. This means that all the familiar powerful Visual Studio tools, workflows, NuGet packages, etc. can be used to develop Azure Functions. Visual Studio also provides publish support so you can upload your functions to the cloud once you are happy with them. Another feature that makes developing functions in Visual Studio easier is the local functions runtime that let’s you run and debug functions on your local development machine, without needing to publish to the cloud just to test them.

In my new Writing and Testing Precompiled Azure Functions in Visual Studio 2017 Pluralsight course you will learn how to:

  • Set up your local development environment
  • Develop and test Azure Functions locally
  • Publish functions to Azure
  • Create functions triggered from incoming HTTP requests
  • Trigger functions from Azure Storage queues and blobs
  • Trigger functions from Azure Service Bus and Azure Event Hubs
  • Trigger functions periodically on a timer
  • Unit test Azure Function business logic

Check out the full course outline for more details.

You can start watching with a Pluralsight free trial.

SHARE:

Mocking with FeatureToggle

I was asked a question on Twitter so I thought I’d write it up here.

When using the FeatureToggle library you may have some some code that behaves differently if a toggle is enabled.

When writing a test, you can create a mock IFeatureToggle and set it up to be enabled (or not) and then assert the result is as expected.

The following code show a simple console app that has an OptionsConsoleWriter.Generate method that uses a toggle to output a printing feature option:

using static System.Console;
using System.Text;
using FeatureToggle.Toggles;
using FeatureToggle.Core;

namespace ConsoleApp1
{
    public class Printing : SimpleFeatureToggle {}

    public class OptionsConsoleWriter
    {
        public string Generate(IFeatureToggle printingToggle)
        {
            var sb = new StringBuilder();

            sb.AppendLine("Options:");
            sb.AppendLine("(e)xport");
            sb.AppendLine("(s)ave");

            if (printingToggle.FeatureEnabled)
            {
                sb.AppendLine("(p)rinting");
            }

            return sb.ToString();
        }
    }

    class Program
    {
        static void Main(string[] args)
        {
            Printing printingToggle = new Printing();

            string options = new OptionsConsoleWriter().Generate(printingToggle);

            Write(options);            

            ReadLine();
        }
    }
}

To write a couple of simple tests for this method, you can use a mocking framework such as Moq to generate a mocked IFeatureToggle and pass it to the Generate method:

using Xunit;
using Moq;
using FeatureToggle.Core;
using ConsoleApp1;

namespace ClassLibrary1.Tests
{
    public class OptionsConsoleWriterTests
    {
        [Fact]
        public void ShouldGeneratePrintingOption()
        {
            var sut = new OptionsConsoleWriter();

            var mockPrintingToggle = new Mock<IFeatureToggle>();
            mockPrintingToggle.SetupGet(x => x.FeatureEnabled)
                              .Returns(true);

            string options = sut.Generate(mockPrintingToggle.Object);

            Assert.Contains("(p)rinting", options);
        }

        [Fact]
        public void ShouldNotGeneratePrintingOption()
        {
            var sut = new OptionsConsoleWriter();

            var mockPrintingToggle = new Mock<IFeatureToggle>();
            mockPrintingToggle.SetupGet(x => x.FeatureEnabled)
                              .Returns(false);

            string options = sut.Generate(mockPrintingToggle.Object);

            Assert.DoesNotContain("(p)rinting", options);
        }
    }
}

SHARE: