You can use IsInDesignTool to change behaviour of code if it is running in a designer (Blend), e.g.
 if (System.ComponentModel.DesignerProperties.IsInDesignTool)

    // code to run if in designer

else

    // code to run if not in designer i.e. running actual application
SHARE:
SL 3 introduced the ChildWindow to allow easy creation of modal 'pop-up' windows inside our main window. Once you have added a new ChildWindow to your project you can customise its appearance & content. The example below creates a ChildWindow to be used to display simple messages to users. In a full implementation you'd probably want to customise the appearance to match the colour scheme, etc of you main app - also ensure you have scroll bars appear if there is a large amount of txt, etc.
Full XAML for our message box:
<controls:ChildWindow x:Class="blog_misc_temp.CustomMessageBox"

           xmlns="http://schemas.microsoft.com/winfx/2006/xaml/presentation"

           xmlns:x="http://schemas.microsoft.com/winfx/2006/xaml"

           xmlns:controls="clr-namespace:System.Windows.Controls;assembly=System.Windows.Controls"

           Width="400" Height="300"

           Title="CustomMessageBox"

                      HasCloseButton="False">

    <Grid x:Name="LayoutRoot" Margin="2">

        <Grid.RowDefinitions>

            <RowDefinition />

            <RowDefinition Height="Auto" />

        </Grid.RowDefinitions>

        <TextBlock Name="txtMessage" TextWrapping="Wrap" />

        <Button x:Name="OKButton" Content="OK" Click="OKButton_Click" Width="75" Height="23" Grid.Row="1" />

    </Grid>

</controls:ChildWindow>
Code behind:
namespace blog_misc_temp

{

    public partial class CustomMessageBox : ChildWindow

    {

        // Simple property to allow setting of the TextBloxk text.

        // An alternative would be to bind the Text propery to this and

        // implement INotifyPropertyChanged to raise a PropertyChanged

        // event in the setter.

        public string Message

        {

            get

            {

                return txtMessage.Text;

            }

            set

            {

                txtMessage.Text = value;

            }

        }


        public CustomMessageBox()

        {

            InitializeComponent();

        }


        private void OKButton_Click(object sender, RoutedEventArgs e)

        {

            // Set the result to ok/accepted (i.e. not cancelled)

            // This will cause the ChildWindow to close.

            this.DialogResult = true;

        }

    }

}
To show a pop-up message from within our main form:
            CustomMessageBox msg = new CustomMessageBox();


            msg.Title = "This is a message box"; // Title is a built-in property of ChildWindow

            msg.Message = "Lorem ipsum dolor sit amet, consectetur adipiscing elit.";


            // Show our 'modal' ChildWindow message box as we do not have a cancel

            // button we discard the returned DialogResult

            msg.Show();
SHARE:
If you have a collection of items (for example a list of strings) that is assigned to the DataContext of a given XAML element (or parent element) you can use standard array index notation to get at a specific item in the list, just use Path=[n] where n is the item index.
For example:
<TextBlock Name="exampleBindingText" Text="{Binding Path=[3]}" />
With a DataContext set using the code:
            List<string> months = new List<string>()

            {

                "Jan", // 1st element in collection at index 0

                "Feb", // 2nd element in collection at index 1

                "Mar", // 3rd element in collection at index 2

                "Apr"  // 4th element in collection at index 3

            };


            exampleBindingText.DataContext = months;
Would result in the Text of the TextBlock outputting "Apr" as Path=[3] will get the 4th element in the collection.
SHARE:
Obviously you know when a users clicks your full screen button but a the user can press escape to exit full screen mode at any time, an alternative is to respond to the FullScreenChanged event.
For example:
     public partial class MainPage : UserControl

    {

        public MainPage()

        {

            InitializeComponent();

            App.Current.Host.Content.FullScreenChanged += new EventHandler(FullScreenChanged);

        }


        void FullScreenChanged(object sender, EventArgs e)

        {

            if (App.Current.Host.Content.IsFullScreen)

                txtFullScreen.Text = "Running in full screen.";

            else

                txtFullScreen.Text = "Not running in full screen.";

        }


        private void btnFullScreen_Click(object sender, RoutedEventArgs e)

        {

            App.Current.Host.Content.IsFullScreen = true;

        }

    }
The above assumes a button to enable the user to select full screen and a textblock:
<UserControl x:Class="blog_misc_temp.MainPage"

    xmlns="http://schemas.microsoft.com/winfx/2006/xaml/presentation"

    xmlns:x="http://schemas.microsoft.com/winfx/2006/xaml"

    xmlns:d="http://schemas.microsoft.com/expression/blend/2008" xmlns:mc="http://schemas.openxmlformats.org/markup-compatibility/2006"

    mc:Ignorable="d" d:DesignWidth="640" d:DesignHeight="480">

  <Grid x:Name="LayoutRoot">

        <StackPanel>

            <TextBlock Name="txtFullScreen" Text="Not running in full screen."/>

            <Button Click="btnFullScreen_Click" Content="Enter Full Screen"></Button>

        </StackPanel>

    </Grid>

</UserControl>
SHARE:
I've been working on a Silverlight 3 drum machine/sequencer called Thunder, the first (beta) version is now available at:
http://www.dontcodetired.com/live/thunder/
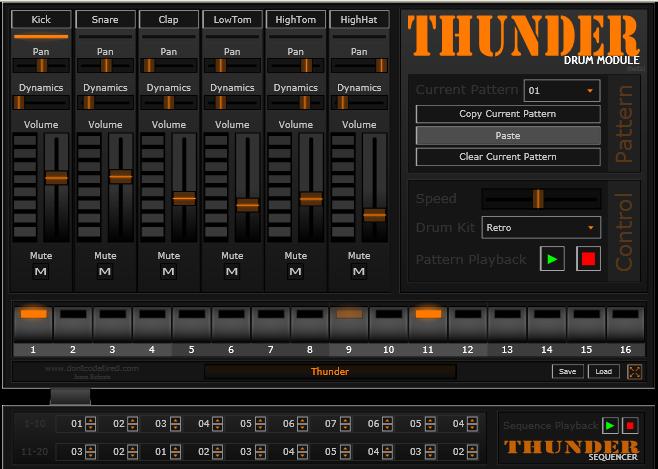
It's a fully working version but the code base requires some re-factoring. Playback smoothness varies depending on the machine specs and how many instruments are playing at the same time.
Future improvements include the addition of more than 2 drum kits, the ability to use your own drum samples and attempting to improve the performance (although this seems to be limited by having to use a MediaElement to play a stream rather than an immediate .Play() method - hopefully in Silverlight 4 a lower latency sound playback mechanism will be introduced).
SHARE:
For a bit of Silverlight 3 fun:
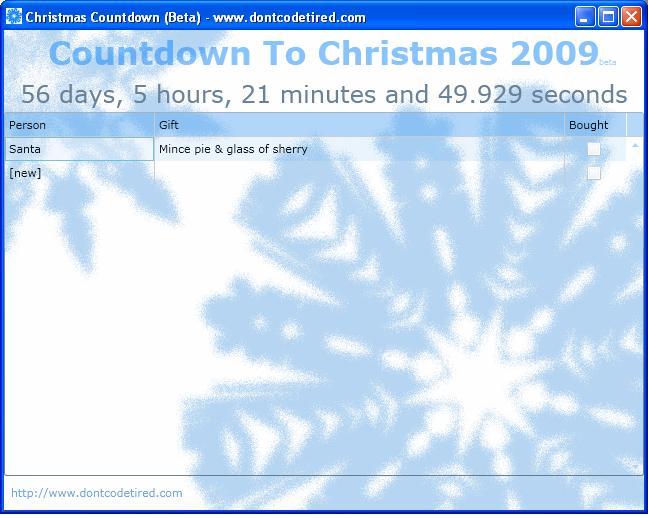
Use\install at: http://www.dontcodetired.com/live/christmascountdownbeta/
There are some things which need improving such as resizing when run out of browser, abilty to sort/hide/filter data etc.
SHARE:
Rather than taking an array of Color objects, the WritableBitmap.Pixels property holds an array on ints which represent premultiplied ARGB colour values. To set a given pixel to a given colour you have to take the alpha, red, green and blue values and convert them to a premultiplied ARGB int value.
The following code contains some helpers/extension methods to make the process bit easier, for example to set every pixel to red:
for (int index = 0; index < bmp.Pixels.Length; index++)

{

   Color myColour = new Color() { A = 255, R = 255, G = 0, B = 0 };

   bmp.Pixels[index] = myColour.ToWritableBitmapPixelValue();

}
or using the Fill extension method:
bmp.Fill( new Color() { A = 255, R = 255, G = 0, B = 0 } );
WritableBitmapHelper class listing
using System;

using System.Net;

using System.Windows;

using System.Windows.Controls;

using System.Windows.Documents;

using System.Windows.Ink;

using System.Windows.Input;

using System.Windows.Media;

using System.Windows.Media.Animation;

using System.Windows.Shapes;

using System.Windows.Media.Imaging;


namespace BitmapAPI

{

    /// <summary>

    /// Helper methods\extension methods for dealing with WritableBitmap,

    /// in real world implementation you'd probably choose to separate the

    /// extension methods iinto separate static classes;

    /// eg WritableBitmapExtensions & ColorExtensions

    /// </summary>

    public static class WritableBitmapHelper

    {

        /// <summary>

        /// Converts ARGB byte values to an integer

        /// Based on info found at:

        /// http://blogs.silverarcade.com/silverlight-games-101/15/silverlight-writeablebitmap-pixel-format-in-silverlight-3/

        /// </summary>

        /// <param name="alpha">Alpha transparency: 0=transparent  255=solid</param>

        /// <param name="red">Amount of red: 0 to 255</param>

        /// <param name="green">Amount of green: 0 to 255</param>

        /// <param name="blue">Amount of blue: 0 to 255</param>

        /// <returns>An integer representing an ARGB color</returns>

        public static int CalcWritableBitmapPixelValue(byte alpha, byte red, byte green, byte blue)

        {

            // Calc premultiplier once only. We need to use premultiplied ARGB32

            // rather than convential ARGB.

            double alphaPreMultiplier = alpha / 255d;


            // Premultiply rgb values with alpha

            byte r = (byte)(red   * alphaPreMultiplier);

            byte g = (byte)(green * alphaPreMultiplier);

            byte b = (byte)(blue  * alphaPreMultiplier);


            return (alpha << 24) | (r << 16) | (g << 8) | b;

        }


        /// <summary>

        /// Extension method to convert a System.Windows.Media.Color to an integer value.

        /// </summary>

        /// <param name="color">The System.Windows.Media.Color to convert</param>

        /// <returns>An integer representing the ARGB values of <paramref name="color"/></returns>

        public static int ToWritableBitmapPixelValue(this Color color)

        {

            return CalcWritableBitmapPixelValue(color.A, color.R, color.G, color.B);

        }


        /// <summary>

        /// Extension method to 'fill' a WriteableBitmap with a given solid color

        /// </summary>

        /// <param name="bmp">The WriteableBitmap to fill</param>

        /// <param name="color">The Color to fill with</param>

        public static void Fill(this WriteableBitmap bmp, Color color)

        {

            for (int i = 0; i < bmp.Pixels.Length; i++)

            {

                bmp.Pixels[i] = color.ToWritableBitmapPixelValue();

            }

        }


    }

}
SHARE:
While SL3 doesn't add full 3D support, you can now transform elements in a 3D fashion.
The following videos are recommended (and form the basis of this example) but I've used simple opacity rather than transforming an element off the screen:
http://silverlight.net/learn/learnvideo.aspx?video=187308
http://silverlight.net/learn/learnvideo.aspx?video=189248
The new PlaneProject allow you to 'skew' an element in X, Y and Z dimensions. UI elements now have a Projection property which can contain a PlaneProjection:
<Grid.Projection>

  <PlaneProjection x:Name="HeadsGridProjection" RotationX="0" RotationY="0" RotationZ="0"></PlaneProjection>

</Grid.Projection>
The example below uses 2 grids containing a circle (the coin face) and text "Heads" or "Tails". There are 2 storyboards, the 1st rotates the heads to tails, the 2nd animation tails to heads. The storyboards call each other wheneach one finishes using the Completed event of the storyboard.
The code behind looks like this:
using System;

using System.Collections.Generic;

using System.Linq;

using System.Net;

using System.Windows;

using System.Windows.Controls;

using System.Windows.Documents;

using System.Windows.Input;

using System.Windows.Media;

using System.Windows.Media.Animation;

using System.Windows.Shapes;


namespace _3DCoinFlip

{

    public partial class MainPage : UserControl

    {

        public MainPage()

        {

            InitializeComponent();

        }


        private void UserControl_Loaded(object sender, RoutedEventArgs e)

        {

            // Automatically start the 1st storyboard when the page loads

            FlipToTails.Begin();

        }


        private void FlipToTails_Completed(object sender, EventArgs e)

        {

            // When the head-->tails animation completes, start the tails-->heads animation

            FlipToHeads.Begin();

        }


        private void FlipToHeads_Completed(object sender, EventArgs e)

        {

            // When the tails-->heads animation completes, start the head-->tails animation

            FlipToTails.Begin();

        }

    }

}
And the XAML:
<UserControl x:Class="_3DCoinFlip.MainPage"

    xmlns="http://schemas.microsoft.com/winfx/2006/xaml/presentation"

    xmlns:x="http://schemas.microsoft.com/winfx/2006/xaml"

    xmlns:d="http://schemas.microsoft.com/expression/blend/2008" xmlns:mc="http://schemas.openxmlformats.org/markup-compatibility/2006"

    mc:Ignorable="d" d:DesignWidth="640" d:DesignHeight="480"

    Loaded="UserControl_Loaded" >

    <UserControl.Resources>


        <Style TargetType="Grid" x:Key="CoinFace">

            <Setter Property="Width" Value="200"/>

            <Setter Property="Height" Value="200"/>

        </Style>


        <Style TargetType="TextBlock" x:Key="CoinText">

            <Setter Property="VerticalAlignment" Value="Center"/>

            <Setter Property="HorizontalAlignment" Value="Center"/>

            <Setter Property="FontSize" Value="48"/>

        </Style>


        <Storyboard x:Name="FlipToTails" Completed="FlipToTails_Completed" >

            <!-- heads side -->

            <DoubleAnimationUsingKeyFrames BeginTime="00:00:00"

                                           Storyboard.TargetName="HeadsGridProjection"

                                           Storyboard.TargetProperty="RotationY">

                <SplineDoubleKeyFrame KeyTime="00:00:00" Value="0"/>

                <SplineDoubleKeyFrame KeyTime="00:00:01" Value="90"/>

            </DoubleAnimationUsingKeyFrames>


            <!-- Tails Side -->

            <DoubleAnimationUsingKeyFrames BeginTime="00:00:00"

                                           Storyboard.TargetName="TailsGridProjection"

                                           Storyboard.TargetProperty="RotationY">

                <SplineDoubleKeyFrame KeyTime="00:00:01" Value="270"/>

                <SplineDoubleKeyFrame KeyTime="00:00:02" Value="360"/>

            </DoubleAnimationUsingKeyFrames>


            <DoubleAnimationUsingKeyFrames BeginTime="00:00:00"

                                           Storyboard.TargetName="Tails"

                                           Storyboard.TargetProperty="Opacity">

                <SplineDoubleKeyFrame KeyTime="00:00:00" Value="0"/>

                <SplineDoubleKeyFrame KeyTime="00:00:01" Value="0"/>

                <SplineDoubleKeyFrame KeyTime="00:00:01.01" Value="1"/>

            </DoubleAnimationUsingKeyFrames>

        </Storyboard>


        <Storyboard x:Name="FlipToHeads" Completed="FlipToHeads_Completed">

            <!-- tails side -->

            <DoubleAnimationUsingKeyFrames BeginTime="00:00:00"

                                           Storyboard.TargetName="TailsGridProjection"

                                           Storyboard.TargetProperty="RotationY">

                <SplineDoubleKeyFrame KeyTime="00:00:00" Value="0"/>

                <SplineDoubleKeyFrame KeyTime="00:00:01" Value="90"/>

            </DoubleAnimationUsingKeyFrames>


            <!-- heads Side -->

            <DoubleAnimationUsingKeyFrames BeginTime="00:00:00"

                                           Storyboard.TargetName="HeadsGridProjection"

                                           Storyboard.TargetProperty="RotationY">

                <SplineDoubleKeyFrame KeyTime="00:00:01" Value="270"/>

                <SplineDoubleKeyFrame KeyTime="00:00:02" Value="360"/>

            </DoubleAnimationUsingKeyFrames>


            <DoubleAnimationUsingKeyFrames BeginTime="00:00:00"

                                           Storyboard.TargetName="Heads"

                                           Storyboard.TargetProperty="Opacity">

                <SplineDoubleKeyFrame KeyTime="00:00:00" Value="0"/>

                <SplineDoubleKeyFrame KeyTime="00:00:01" Value="0"/>

                <SplineDoubleKeyFrame KeyTime="00:00:01.01" Value="1"/>

            </DoubleAnimationUsingKeyFrames>

        </Storyboard>

    </UserControl.Resources>


    <Grid x:Name="LayoutRoot">

        <StackPanel>

            <Grid>

                <Grid Name="Heads" Style="{StaticResource CoinFace}">

                    <Grid.Projection>

                        <PlaneProjection x:Name="HeadsGridProjection" RotationX="0" RotationY="0" RotationZ="0"></PlaneProjection>

                    </Grid.Projection>

                    <Ellipse Stretch="Fill" Fill="Silver"/>

                    <TextBlock Style="{StaticResource CoinText}">Heads</TextBlock>

                </Grid>

                <Grid Name="Tails" Style="{StaticResource CoinFace}" Opacity="0">

                    <Grid.Projection>

                        <PlaneProjection x:Name="TailsGridProjection" RotationX="0" RotationY="0" RotationZ="0"></PlaneProjection>

                    </Grid.Projection>

                    <Ellipse Stretch="Fill" Fill="Gold"/>

                    <TextBlock Style="{StaticResource CoinText}">Tails</TextBlock>

                </Grid>

            </Grid>

        </StackPanel>

    </Grid>

</UserControl>
SHARE: