This is the eighth and final part in a series demonstrating how to setup continuous deployment of an Azure Functions App using Azure DevOps build and release pipelines.
Demo app source code is available on GitHub.
In the previous instalment we added functional end-to-end testing to the release pipeline.
As one final check for the release, we can execute a smoke test on the deployed production Function App. This smoke test won’t modify any data and will simply allow us to check that the Function App is responding to HTTP requests.The smoke test function won’t be disabled in production but it will be protected by a function key.
namespace InvestFunctionApp.TestFunctions
{
    public static class SmokeTest
    {
        [FunctionName("SmokeTest")]
        public static async Task<IActionResult> Run(
            [HttpTrigger(AuthorizationLevel.Function, "post", Route = Testing.TestFunctionRoute + "/smoketest")] HttpRequest req,
            ILogger log)
        {
            log.LogInformation("C# HTTP trigger function processed a request.");

            string requestBody = await new StreamReader(req.Body).ReadToEndAsync();

            dynamic data = JsonConvert.DeserializeObject(requestBody);

            string azureDevopsReleaseUrl = data?.releaseurl ?? "[releaseurl value not supplied in json request]";

            log.LogInformation($"Smoke test for release {azureDevopsReleaseUrl}");

            // We could add extra smoke testing code here, this simple version just allows us to
            // verify that the deployment succeeded and the Function App is responding to HTTP requests

            return new OkObjectResult("Smoke test successful");
        }
    }
}
The preceding smoke test function returns a 200 OK result and also allows the URL to the AzureDevOps release to be provided, which is written to the logs. This allows ops to see from which release the smoke test function came from.
The first step is to add a variable to the release pipeline called “prodSmokeTestKey” with the value being the function key from production for the smoketest function. Once this key is copied from the Azure Portal it can be copied into the variable value and the padlock icon clicked to mark this as sensitive data:

“Gates allow automatic collection of health signals from external services, and then promote the release when all the signals are successful at the same time or stop the deployment on timeout.” [Microsoft]
Gates can be evaluated before a stage executes and/or after a stage executes.
“Approvals and gates give you additional control over the start and completion of the deployment pipeline. Each stage in a release pipeline can be configured with pre-deployment and post-deployment conditions that can include waiting for users to manually approve or reject deployments, and checking with other automated systems until specific conditions are verified. In addition, you can configure a manual intervention to pause the deployment pipeline and prompt users to carry out manual tasks, then resume or reject the deployment.” [Microsoft]
We can add a post-deployment gate that will mark the release as unsuccessful if the smoke test function does not respond successfully. To do this we can use the “Invoke Azure Function” task. Other tasks that can be executed as part of a gate include “Invoke REST API”, “Query Azure Monitor Alerts”, and “Query Work Items” tasks.
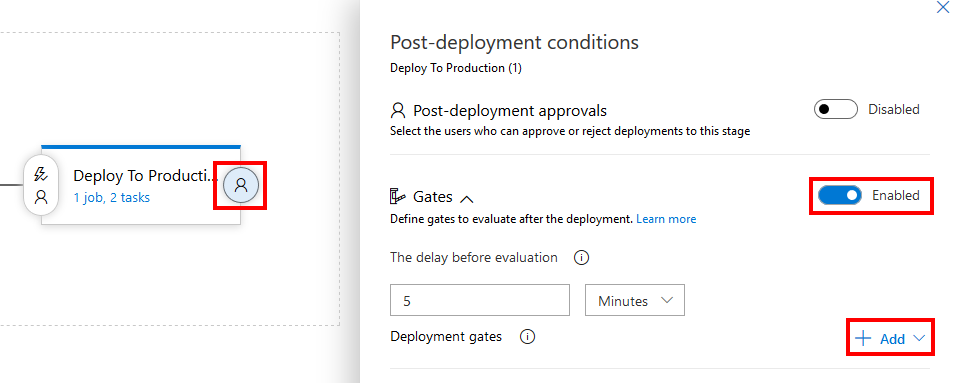
To add a post-deployment gate to the “Deploy to Production” stage, click the post-deployment conditions icon, enable the Gates switch, and click the + Add button.

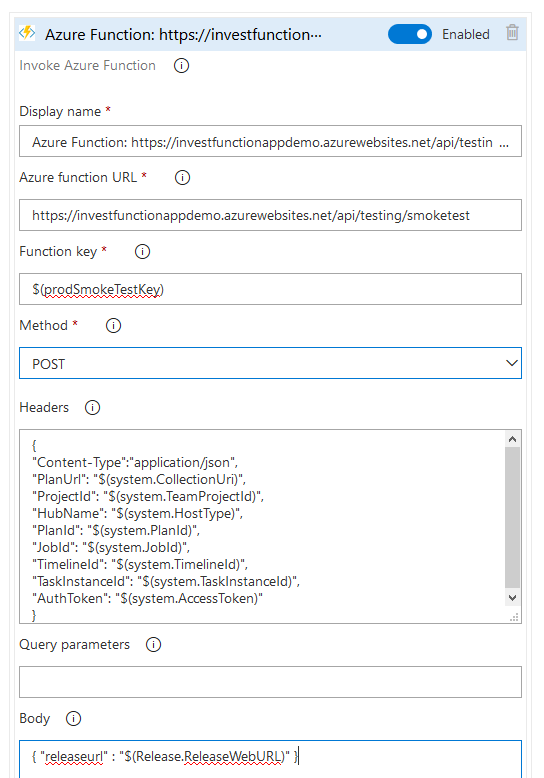
Choose “Invoke Azure Function”. Paste in the URL to the production smoke test function and for the function key specify “$(prodSmokeTestKey)” to retrieve the key from the pipeline variable that we set up earlier. Select the method as POST and in the body enter “{ "releaseurl" : "$(Release.ReleaseWebURL)" }”. This is the JSON payload that will be sent to the smoke test function.

Hit save and queue a new release.
Once the production deployment is complete, there will be a 5 minute delay before the gate(s) are evaluated for the first time and a 15 minute wait between re-evaluation of gates which ultimately means a lengthy delay between the deployment and smoke test execution. To improve this you can set the the “The delay before evaluation” to 1 minute, and in the Evaluation options section at the bottom set “The time between re-evaluation of gates” to5 mins and “The timeout after which gates fail” to 6 mins.
As an alternative to using gates in this way (especially if you need to add multiple gates or complex smoke testing requirements) could be to have another post-production-deployment task/job/stage that calls the smoke test function(s) in another source-controlled test project in a similar way to how the end-to-end tests were executed against the test Function App.
That bring us to the end of this 8 part series.To be notified of future posts subscribe to the blog feed or follow me on Twitter.
If you want to fill in the gaps in your C# knowledge be sure to check out my C# Tips and Traps training course from Pluralsight – get started with a free trial.


SHARE: